Your First CSP Illustration Part Two
Contact Graphixly @
Hello! My name is Liz Staley and I’m a long-time user of Clip Studio Paint (I started using the program back when it was known as Manga Studio 4!). I was a beta-tester on the Manga Studio 5 program and for Clip Studio Paint, and I have written three books and several video courses about the program. Many of you probably know my name from those books, in fact. I write weekly posts on Graphixly.com and on CSP Tips, so be sure to come back every week to learn more Clip Studio Tips and Tricks from me!
Welcome to part two of this series about creating your first illustration in Clip Studio Paint and the features that will help get you started using the program! Last week, we covered the basics of the user interface, creating a new document, and resizing and positioning our rough sketch.
In this article we will cover the following topics:
Using Layer Colors
Adding 3D Head Model
Downloading New Materials
Let’s get back to drawing
Using Layer Colors
The first thing I usually do with my rough sketch is to change the layer color so that it's easier to build a cleaner sketch on top of the rough layout. On the rough sketch layer, click on the Layer Color icon in the Layer Property palette. By default, the contents of the layer will be changed to a light blue color. If you want a different color, click on the blue color rectangle by the Layer Color option and choose a new color.

Sometimes if I have multiple draft layers that I’m combining into a new clean sketch I will assign each one to a different layer color so I can keep track of what I am looking at. This also works well if I have a completed layer (such as a background) that I still want to see but I don’t want to be distracted by, I will change it via the Layer Color option to a purple, green, or some other color. I love being able to do this with a few clicks and also in a way that doesn’t make a permanent change to the layer! If you ever want to change the layer back to the original color, simply click the Layer Color icon while the layer is active to turn the option off. So easy!
Adding a 3D Head Model
One of the best newer features of CSP, in my opinion, are the customizable 3D head models. These make drawing faces from tricky angles a lot easier! Now that my rough sketch is done, let's add a 3D head model to help me get my character's features placed right.
To start, open the Material Library menu by clicking on the arrows to show the menu, if it is collapsed. You can also click on Window - Material to bring up the Material Library if you are having trouble finding it.

In the left hand menu, click the arrow next to the text that says “3D” to show the subcategories. I find that looking in the subcategories of the Material Library makes things easier to find rather than scrolling through the entire Material Library (especially when you start adding materials as you build your assets!). Under the 3D category, click on “Head” to show only the 3D head models.

Scroll through the 3D head models available in CSP and choose one you like the look of. Then click and drag the head from the library palette to your canvas. You should see the icon of the material overlaid on the canvas.

Now you should have your 3D model on your canvas! The icons above the 3D model are controls for both the camera position and rotation (the first three icons) and the position and rotation of the 3D model.

If you don't want to use the icons to change the position of the model, click on the model and use the rotation and scale controls. For more information about posing and rotating 3D models, check out this more detailed article from me.
https://tips.clip-studio.com/en-us/articles/8759

Change the rotation and position of the 3D head model until it matches the relative position of your sketch.

Now you can use the features of the 3D model to help ensure your proportions and position of the facial features is accurate.
Downloading New Materials
Though the default brushes, 3D models, and other materials that come with CSP are very useful, sometimes you need some other materials to complete a project. Whether it's a special effect brush, a 3D background, or a custom body shape, you can find almost anything in the Clip Assets library, where other users share their creations for you to use in your own works.
From the Clip Studio App, find the Top Free Materials category, then click on “Assets” to go to the assets store.

Some assets in the store are free, but some require Gold or Clippy Tokens to download. For more information on these items, check out this article.
https://tips.clip-studio.com/en-us/articles/4735#132a1cb3
In the Clip Studio Assets library, you can search for anything you'd like. Click in the search bar at the top of the screen and type in a term you'd like to search for, then hit Enter.

Thumbnails and some basic information, including type of asset, will appear if there are any matches to your search term.

If there are a lot of results you may want to narrow them down according to type. To do this click on the button marked “Filter” next to the Search bar, then click on the type of asset you want to see.

Once you find an asset that you like, click on it to see more information about it. I’ve chosen a 3D vest model for my character as a reference for the placement of the collar and buttons.

The asset I’ve chosen does cost 10 Clippy Tokens, which are a token you get in exchange for real money. There are tons of great free assets in the Assets store if you don’t want to pay for them! No matter if your desired asset requires Gold or Clippy, you will click the “Checkout Now” button, then click on the green button in the next screen (shown below) to purchase the assets and start the download.
If you are downloading a Free asset, click on the “Download” button at the top of the Assets page and the download will start automatically.

You will be able to see if your download is in progress by looking at the data transfer icon, shown in the red square below. This also shows how many items are currently downloading. Once this number goes away, your asset is finished downloading and is available in your Materials Library.

Open your Material Library. If you don’t see the material you just downloaded at the top of the list, make sure you are in the “All materials” category.

Click and drag the material to the canvas to use it. If you are downloading a brush, you will need to drag the brush to the Sub Tool window. For more detailed instructions for using brushes downloaded from CSP Assets, check out the following article.
https://tips.clip-studio.com/en-us/articles/4329#db3b970c
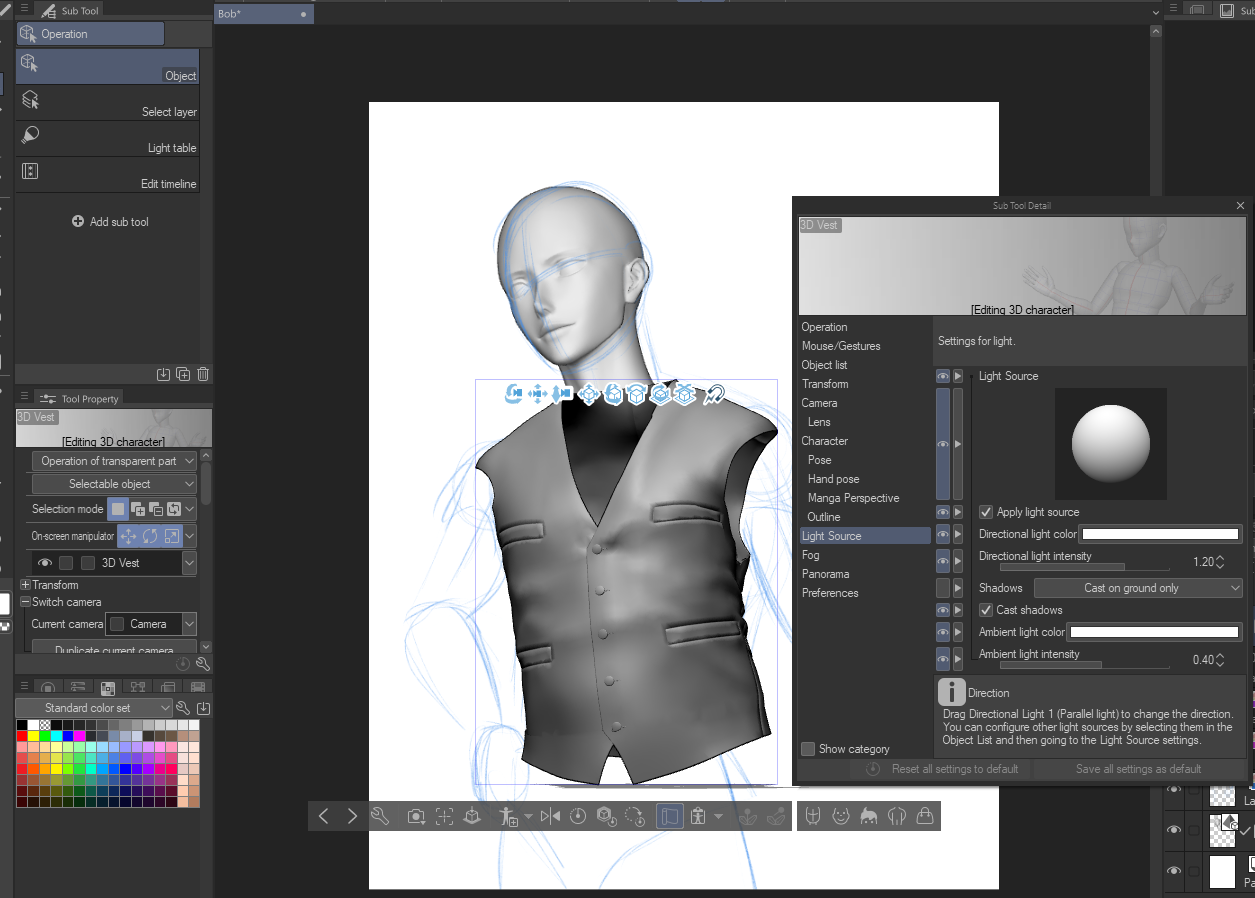
When I put this 3D vest on my canvas, none of the details like the buttons, pockets, and folds were showing. If this happens, click on the wrench icon in the bottom of the Tool Property window while the 3D object is selected. Click on the Light Source category in the left hand menu, then make sure the box next to “apply light source” is checked.

Now I can use this new 3D asset as a reference for my drawing! Note that I haven’t traced the vest itself, but used it as reference for my creation and made changes according to the style and proportions of the character I’m drawing.

And finally I have a completed sketch!

Conclusion
Next time, we will talk about inking your sketch and getting it ready for color. Come back next week to continue this journey along with me!
For more information on CLIP Studio Paint, please visit https://www.clipstudio.net/en or https://graphixly.com