Your First CSP Illustration - Part One
Contact Graphixly @
Hello! My name is Liz Staley and I’m a long-time user of Clip Studio Paint (I started using the program back when it was known as Manga Studio 4!). I was a beta-tester on the Manga Studio 5 program and for Clip Studio Paint, and I have written three books and several video courses about the program. Many of you probably know my name from those books, in fact. I write weekly posts on Graphixly.com and on CSP Tips, so be sure to come back every week to learn more Clip Studio Tips and Tricks from me!
This multi-part series is aimed for the beginner to Clip Studio Paint looking to make their first illustration in the program! We will be covering some features unique to CSP, including the new canvas options, and subview palette. In this first part, we will cover the new canvas options that you need to know to get started making a new illustration and using some tools! As this series continues, we will cover the process from sketching to coloring, so stay tuned over the next few weeks!
In this article we will cover the following topics:
Getting Familiar with the Interface
Working with Reference Images
Making a Rough Sketch
Let’s get drawing!
Getting Familiar with the Interface
In this section, we’re going to go over the bits of the interface and options that you need to get started drawing in CSP for PC or Mac. If you are on a mobile device most of these options should be the same, but may be in different locations. I will be assuming that you know a little bit about typical digital drawing, such as the existence of layers.
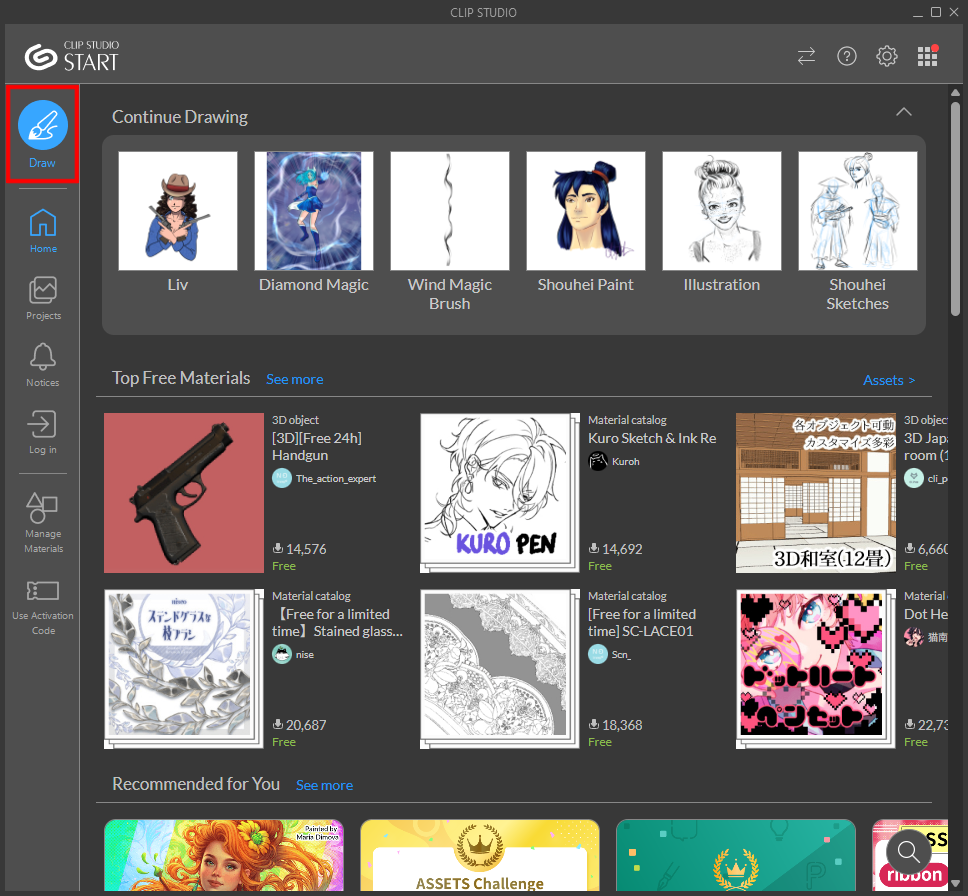
After downloading and installing Clip Studio, open the Clip Studio app. The Clip Studio app is your hub for all things Clip Studio, including software updates, notifications, links to Tips and Assets, and also quick access to your most recent projects. I recommend opening Clip Studio Paint through this “home base” so that you can be sure you are seeing news and updates from Celsys.
In the Clip Studio app, click on “Draw” to open Clip Studio Paint.

The Clip Studio Paint interface can be a little intimidating at first, but I promise it’s not as scary as it seems! I’ve outlined each area in a different color in the screenshot below, and will give a brief explanation of each below.
(Note that my interface has some tools that will not be available in the default tools of a new Clip Studio Paint install, so you may not see the same subtool names on your screen!)

File Menu: Where you can create new canvas, open existing, save, export, and do many more operations. If you can not find a specific window in CSP, you can click on the “Window” category and click on the name of the window there to open it. There are usually several ways to do any operation in CSP, and you can almost always find these operations in a category of the File Menu.
Quick Access: This is where you can put your favorite tools so you can access them easily. This window is collapsed in this screenshot. You can click on the small arrows at the top of each window to open or collapse them.
Tool Quick Access: Used for tools that have a Brush Size and Opacity control. These sliders allow you to change a brush size or opacity quickly by sliding up and down.
Tool Bar / Foreground and Background Colors: Here is where you’ll find broad categories of tools, such as Pencil tools, selection tools, Frame border tools, Blending Tools, etc. The icons in this section are broad categories of tools that house Sub Tools. The black and white squares at the bottom of the icons are the Foreground and Background color, respectively. Click on one to bring up the color picker to change the color. You will also see a “checkerboard” rectangle beneath these colors. This allows us to draw with transparency, effectively turning any tool into an eraser.
Sub Tool Menu: This is where the tools under the broad categories from the Tool Bar are displayed. Click on a tool in the Sub Tool Menu to change between available tools, such as Real Pencil, Design Pencil, Mechanical Pencil.
Tool Property Palette: Sub Tool options are displayed here. You can change any option for the tool in this window. Click on the wrench icon in the bottom right corner to open even more options (handy for when you want to start making custom tools!), but mostly you will probably use the options that are shown by default in this window for each tool.
Color Picker Palette: Choose how you wish to pick colors here. You can choose from several different methods, including color sliders, mixers, and color palettes.
Shortcut bar: Common shortcuts are shown here, such as Help, New, Open, Save, Undo, Redo, Scale/Rotate, etc.
Canvas Display Area: Open canvases will display here.
Navigation/Subview Palette: This palette has a few tabs nested under it. When a canvas is open, you can navigate around it in the Navigation palette while zoomed in on your image. Another important tab in this area is the SubView palette, which we will use later in this article to display reference images.
Layer Property Palette: Change properties of currently active layer. This includes changing a layer’s color (we’ll go over details of this soon!), adding borders to a layer, etc.
Layer Palette: See your layer stack here. Also create new layers, change layers, and set layer blending modes and opacity here.
Materials Palette: This palette is collapsed in my screenshot. This is where you can find all sorts of assets that come pre-installed with CSP, as well as where you will find any assets that you download from CSP Assets. This includes background images, screentones, and 3D models.
Now let’s start creating a new canvas by either clicking on File - New in the File Menu or Ctrl+N on your PC keyboard. The New options window will open. This is usually another part of the CSP interface that scares beginners, but again it is not as complex as it seems once you know the basics!

The icons in the Project area represent different types of templates. These are illustration, webtoon, comic, fanzine, all, and animation. The options at the bottom of the New window will change depending on the type of project template you choose. For instance, comic specific options will not show in the Illustration or Animation categories because they are not needed for these types of projects.
In each category you will see a Preset dropdown menu. Under this menu are default preset image sizes included with CSP, as well as any presets that you create and save for yourself. Many of these presets are for standard paper sizes for areas outside of the United States, so if you are a US user, you may want to create and save custom presets for the size paper that you use.
For our first digital illustration, the size of our canvas doesn't matter too much. If you want to input a custom size in something other than millimeters, click on the All Settings Project icon, then change the Unit dropdown on the right to your preferred unit of measurement.

Now you can type your preferred canvas measurements into the Width and Height fields. I always recommend a resolution of at least 300, especially if you want to print out your drawing later.
Basic Expression Color is the color mode of our canvas. I'm going to leave this on Color because eventually I want to color this illustration. This option isn't too important because we can set expression colors for individual layers in our image, but this sets the default. If you are just doing a black and white image, you may want to choose the monochrome (strictly black and white, no gray or color) or grayscale mode in the New canvas setup.
Click on OK when you’re ready to open a blank canvas.
Working with Reference Images
Unless you are working completely from imagination, you will probably have some reference images that you want to look at while you draw. In most other graphics software, there is no dedicated space to store images you're working from. However, Clip Studio Paint has the Sub View Palette, found nested with the Navigator, that allows you to display, flip through, and even color pick from other images.
To get started with the sub view option, click on the Sub View tab, shown in the red square below nested with the Navigator.

When you are just starting off in CSP, this palette looks pretty useless. To load images, click on the Folder icon shown below.

Navigate through your device's files to find the images you wish to load. Select the images and click Open to load them into the Subview palette. You can load as many images as you wish, but usually only load images needed for the current project I'm working on.
If you've loaded multiple images, you can navigate between them with the arrow icons in the Sub View palette, or click on the icon with nine small squares to see thumbnails of all loaded images and click the one you want to view.

Now we're ready to start drawing!
Making a Rough Sketch
I used the Real Pencil sub tool to create my rough sketch. Click on the pencil icon in the Tool Bar, then select a Sub Tool in the Sub Tool palette. If you are just using CSP for the first time, don't be afraid to try several sub tools on the blank canvas, or try several while you're drawing your first illustration.
For more information on the default pencil tools included with Clip Studio Paint, check out my previous article on the subject! https://tips.clip-studio.com/en-us/articles/4666
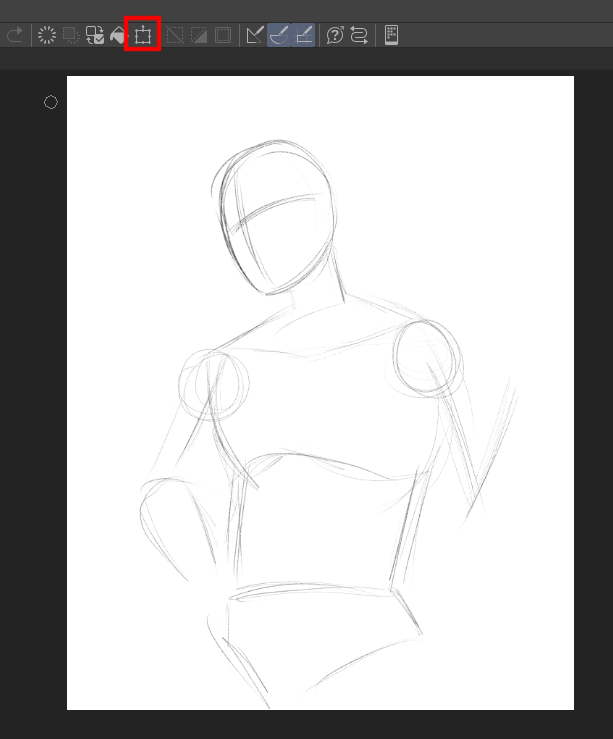
I like starting with a rough stick figure / basic shapes to map out the pose of my figure. While working out the pose, I realized I didn't leave enough room for the character's hand, so I wanted to move the sketch over to the left and resize it slightly to fit the entire figure on the canvas. To do this, click the Scale/Rotate tool in the shortcut bar above the canvas.

A bounding box with several square “handles” will show around the contents of your layer. Hovering the cursor over one of the squares at the corner then drag while holding down the SHIFT key to maintain the same proportions of your sketch while sizing up or down.
To move the contents of the layer around while still in this Scale/Rotate mode, move the cursor slightly outside the bounding box until it turns into a four way arrow. Now you can click and drag to reposition the rough sketch.

Click OK under the bounding box or tap ENTER on your keyboard to commit the changes.
Now I can finish sketching my character's pose by adding their left hand. At this point I’m just worried about getting the general pose and idea down and not concerned about perfection. We can fix any errors in the next few passes of clean up!

When my rough layout sketch is done, I like to do one or two clean up passes to add details and fix errors. We’ll go over that process, including using 3D models for reference to make sure proportions are accurate, next week!
Conclusion
Once you can get a handle on the confusing looking interface, Clip Studio Paint is really one of the best digital art programs available! Hopefully this series will help you get comfortable enough with the program that you’ll want to do more exploring on your own. Make sure to come back next week for another entry in this series!
For more information on CLIP Studio Paint, please visit https://www.clipstudio.net/en or https://graphixly.com