Using Updated Timelapse Recording Features
Contact Graphixly @
Hello! My name is Liz Staley and I’m a long-time user of Clip Studio Paint (I started using the program back when it was known as Manga Studio 4!). I was a beta-tester on the Manga Studio 5 program and for Clip Studio Paint, and I have written three books and several video courses about the program. Many of you probably know my name from those books, in fact!
It’s hard to believe that integrated Timelapse video recording has been a feature in Clip Studio Paint for almost 4 years! I first talked about this feature back in 2020, but new options have been added in the most recent upgrade as of August 2024. So, in this week’s article let’s talk about timelapse again so you know how to take advantage of these new options!
In this article we will cover the following topics:
Recording Timelapse on New Canvas
Start Recording Timelapse on Existing Canvas
Exporting Timelapse Videos
Let’s dive right in!
Recording Timelapse on New Canvas
To start recording a timelapse from a new image, first we need to open Clip Studio Paint and then select New file. Enter the dimensions, resolution, and other options for your new file. At the bottom of the New options there is a dropdown menu for “Record Timelapse”. You can set this to “Off” (no timelapse will be recorded), Prioritize Quality, or Prioritize File Size.

When choosing “Prioritize quality”, the timelapse will be recorded with a focus on the quality of the video. Choosing Prioritize file size will reduce the file size of the timelapse video, but the file size will be smaller.
Click on OK to create your new file. You will see the following warning about file size of your image file.

If you don’t want to see the warning again, click on the “Do not show again” checkbox. To continue with creating the new file with timelapse, click on “OK”. To go back to the new file options, click Cancel.
Now all you have to do is draw your image as normal! The timelapse will be created as you draw. If you save your work and close it, then open the file again and continue, the timelapse will continue recording - no need to splice together multiple video files!
Going to File - Timelapse and unchecking “Record Timelapse” on a canvas with an existing timelapse recording will DELETE the current recording, so make sure to export the video before doing this if you want to reduce the size of your .clip file!
When you’re ready to share your recording, go to the Exporting Timelapse Videos section.
Adding Timelapse Recording to Existing Canvas
You can start recording timelapse of an image you’re in the middle of creating already. Open the file you want to start recording, then go to File - Timelapse - Record timelapse to turn on the recording.
This option can also be enabled on an open file by using Edit - Canvas Properties. Or you can also turn it on in Clip Studio Paint EX by clicking Story - Change Basic Page Settings (OR Change Basic Work Settings, either one has the Record Timelapse option available).
Draw as normal and the timelapse will be recorded from the point where the option is turned on.
Now that we have some videos recorded, let’s share them on social media!
Exporting Timelapse Videos
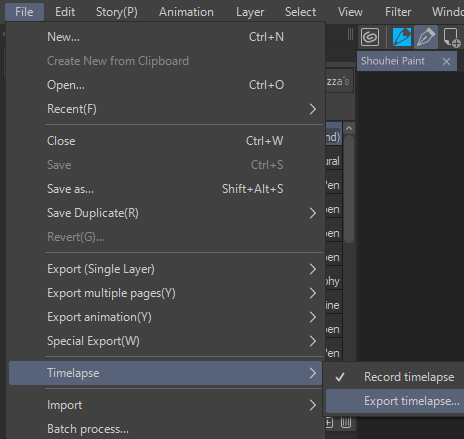
To share your timelapse, you’ll need to export it. This process is easy, but a few new options have been added to the export window to help us protect our work, so let’s cover those first. To start the export process, click on File - Timelapse - Export Timelapse.

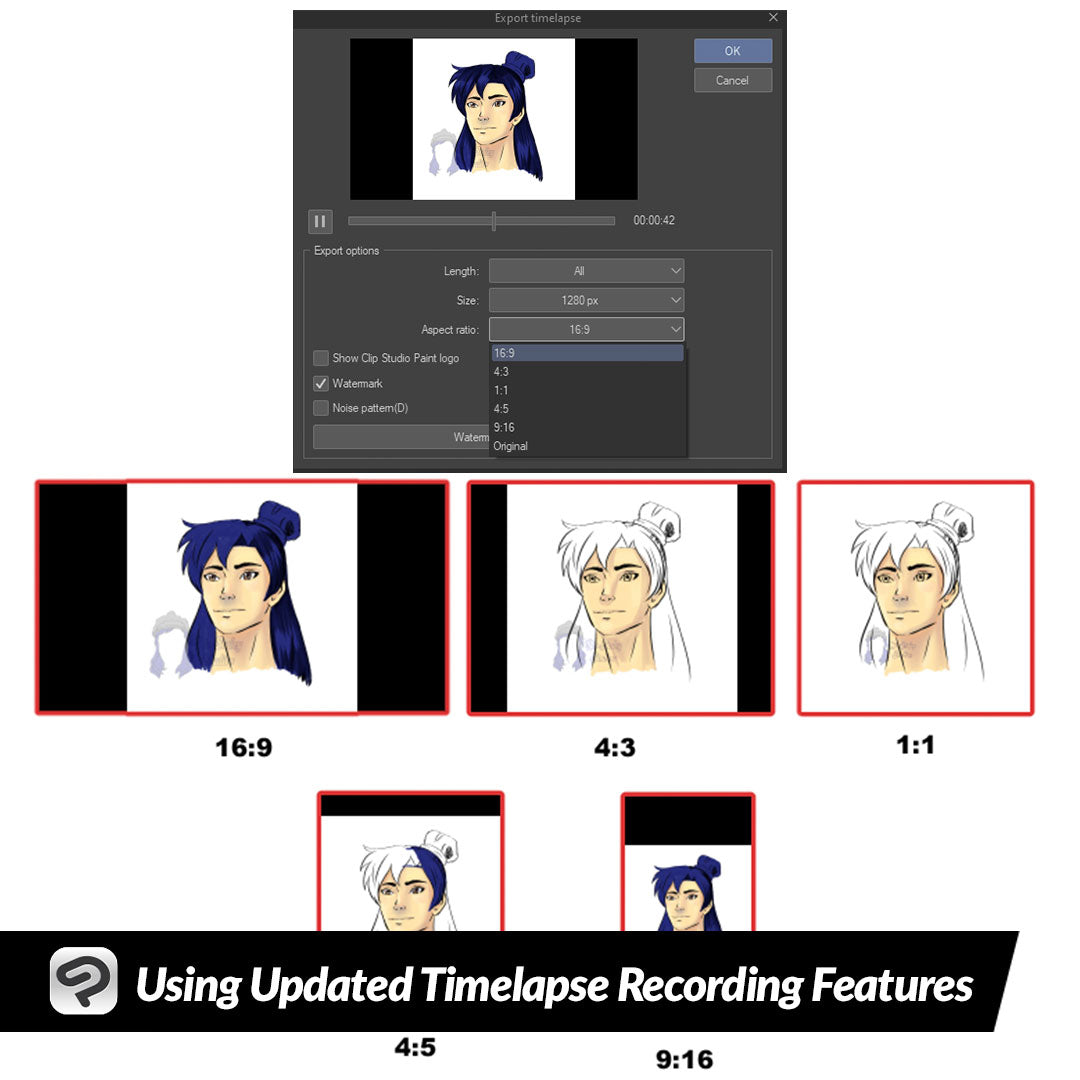
You will now see the Export timelapse window. A looping preview of the timelapse will be showing at the top. We’re going to ignore the first three dropdown menus and talk about the new options first.
First up is the checkbox for “Show Clip Studio Logo”. Turning this option on will show a small Clip Studio Paint Logo in the upper right of the video.

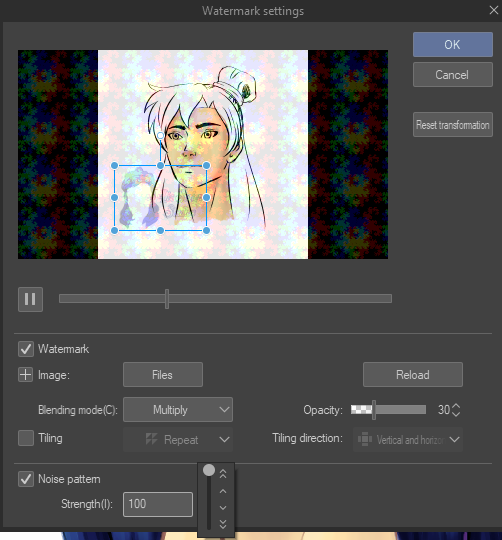
If you’d rather put your own watermark on your video, click on the “Watermark” checkbox.To set up your watermark, click on the “Watermark settings” button that will show once the Watermark checkbox has been activated.

Click on the Files button to choose an image such as a personal logo to add as your watermark.

Once you’ve added your image file to use as a watermark, you can use the handles around the image to resize, rotate, and reposition your logo. Use the Blending Mode and Opacity options as well to adjust the watermark to your personal taste.

If you want to cover more of the video, you can also turn on the tiling options! Tiling will make the watermark image repeat across the entire image area.

With this latest update, the option to add a Noise pattern is available as well. This puts a pattern of colorful noise over the image. We can control the strength of the noise as wanted. Below is the Noise pattern at 100 strength so you can see the effect better.

A strength of 50 is a bit more subtle but still effective at hopefully deterring image theft!

For more information on how Watermarks and Noise patterns can help protect your art from theft and AI training, please view this official ClipStudio post! https://tips.clip-studio.com/en-us/articles/9585
Now that we’ve explored these new features, let’s take a look at the first three options in the Export Timelapse options. First up is the option to change the length of the exported video. You can make the video shorter if needed for the platform that you wish to share your timelapse on. Simply choose from 15, 30, or 60 seconds. If you keep the “All” option, then Clip Studio will export at the length it originally recorded at. For my video, this is 1 minute and 17 seconds, but your video may be longer or shorter depending on how much time you’ve spent working on your drawing.

Under the Size dropdown you can choose from three presets for the width of your exported video file. Remember that a larger video file will result in a larger file size as well!

The final dropdown menu option is to set the Aspect Ratio of our video. This is the size of the height in proportion to the width and there are several options to choose from.

I have included examples of each aspect ratio below, with the exception of “Original” because that will depend on the aspect ratio of your canvas size!

Once you have all your options set how you’d like them, click on the OK button to start the export. You will see the following message. The export process may take several minutes depending on the size of your video file and your hardware.

Choose where to save your video to complete the process. Now you can upload your Timelapse to YouTube or any number of social media sites!
Now you can share your video with the world! The short timelapse I did for this article can be viewed on YouTube:
Conclusion
The ability to record a timelapse without having to worry about secondary recording programs is such a great option to have, especially now that there are easy ways to add watermarks and noise patterns to protect your art more effectively! I think these are great additions to the existing feature and am so happy to see them available now.
For more information on CLIP Studio Paint, please visit https://www.clipstudio.net/en or https://graphixly.com