Using Timelapse Features
Contact Graphixly @
Hello! My name is Liz Staley and I’m a long-time user of Clip Studio Paint (I started using the program back when it was known as Manga Studio 4!). I was a beta-tester on the Manga Studio 5 program and for Clip Studio Paint, and I have written three books and several video courses about the program. Many of you probably know my name from those books, in fact!
I love recording timelapse videos of my process and watching process videos of other artists working! There’s just something about watching these videos, I find them fascinating and love to see how other artists do their art. But creating these types of videos has been time-consuming and complicated - until now! CSP 1.10.5 now has a timelapse recording feature that will save you recording and editing time, allowing you to focus on creating your art instead of worrying about whether or not your screen recording program is working.
In this article we will cover the following topics:
Recording Timelapse on New Canvas
Start Recording Timelapse on Existing Canvas
Exporting Timelapse Videos
Let’s dive right in!
Recording Timelapse on New Canvas
Before we get to recording our first timelapse, let’s take a moment to talk about file size. The timelapse is saved with the canvas information, meaning that the file size of your .clip images will increase as the image gets more complicated and the timelapse video gets longer. You can delete the timelapse from your Clip file at any time if you no longer need it (i.e. you’ve exported the video to the file format and aspect ratio of your choice). We will go over how to delete a timelapse in the “Exporting Timelapse Videos” section of this article.
To start recording a timelapse from a new image, first we need to open Clip Studio Paint and then select New file. Enter the dimensions, resolution, and other options for your new file. Then click on the “Record Timelapse” checkbox at the bottom of the New option box to enable recording. This checkbox is shown at the bottom of the following image.

When you check this box, the following warning will show that warns you about the increase in file size.

If you don’t want to see the warning again, click on the “Do not show again” checkbox. To continue with creating the new file with timelapse, click on “OK”. To go back to the new file options, click Cancel.
Now all you have to do is draw your image as normal! The timelapse will be created as you draw. If you save your work and close it, then open the file again and continue, the timelapse will continue recording - no need to splice together multiple video files!
Going to File - Timelapse and unchecking “Record Timelapse” on a video with an existing timelapse recording will DELETE the current recording, so make sure to export the video before doing this if you want to reduce the size of your .clip file!
When you’re ready to share your recording, go to the Exporting Timelapse Videos section.
Adding Timelapse Recording to Existing Canvas
You can start recording timelapse of an image you’re in the middle of creating already. Open the file you want to start recording, then go to File - Timelapse - Record timelapse to turn on the recording.

This option can also be enabled on an open file by using Edit - Canvas Properties. Or you can also turn it on in Clip Studio Paint EX by clicking Story - Change Basic Page Settings (OR Change Basic Work Settings, either one has the Record Timelapse option available).
Draw as normal and the timelapse will be recorded from the point where the option is turned on.
Now that we have some videos recorded, let’s share them on social media!
Exporting Timelapse Videos
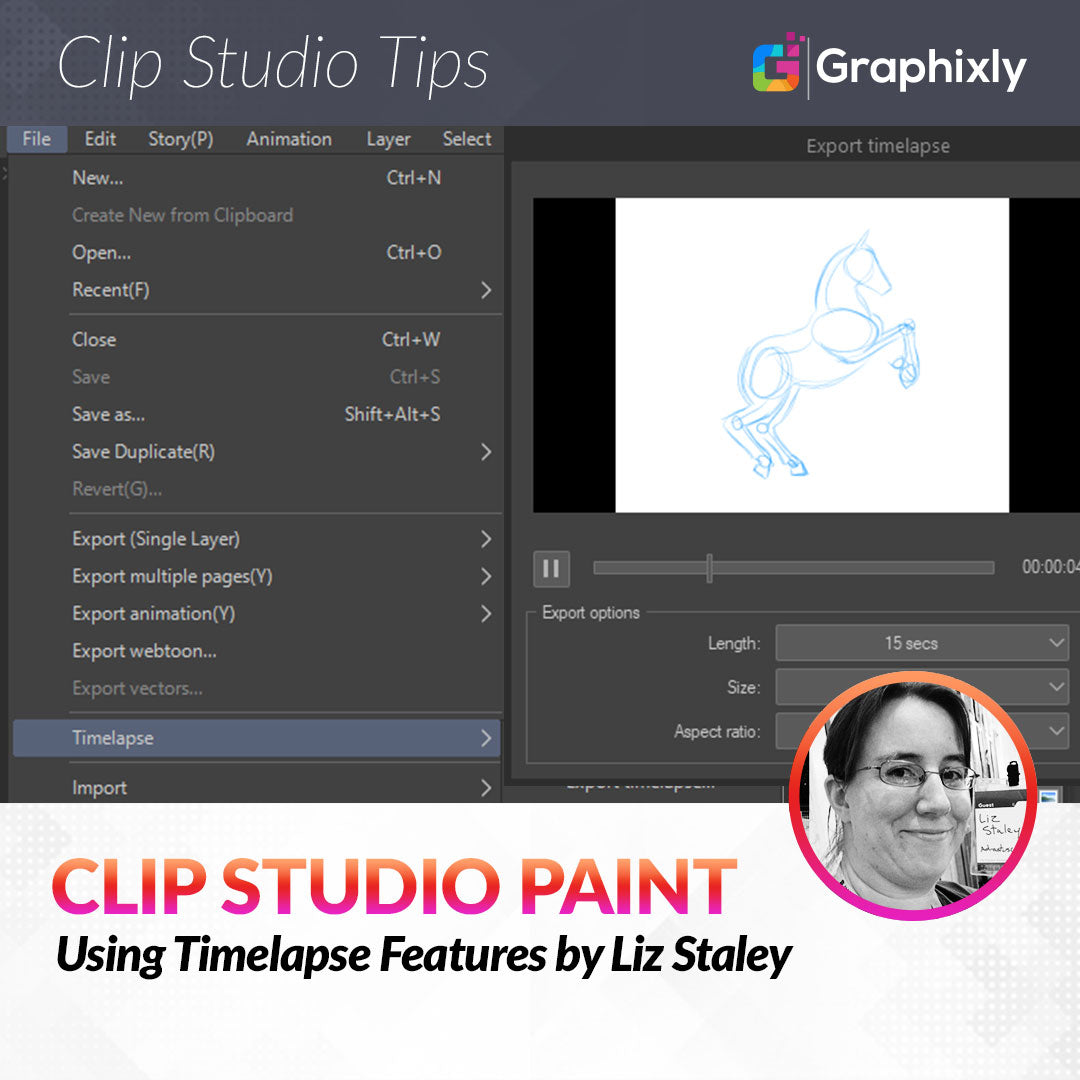
To share your timelapse, you’ll need to export it. This process is easy, but you’ll need to know where you’re going to post your video in order to set the options correctly. To begin exporting, click on File - Timelapse - Export timelapse, as shown below.

The Export timelapse options window will show. In this window you can view a preview of your timelapse to see how long it is and how it looks. The preview loops, but you can pause it at any time using the Pause button underneath the preview.
In the screenshot below, you can see the Export timelapse window and its options.

Under Export options, set the length, size, and aspect ratio desired. Here are some tips for settings based on where you’ll be sharing your video!
- TikTok: 9:16 aspect ratio. Videos can be up to 60 seconds. If video is longer than 60 seconds, set the Length option to 30 seconds.
- Youtube: 16:9 aspect ratio fits the standard video player. No limit on length.
- Instagram: 1:1 aspect ratio in the timeline. For Instagram stories, select 9:16 aspect ratio
- Twitter: Videos can be up to 140 seconds (just over 2 minutes). Maximum ratio displayed on the Twitter timeline is 1:1 (square), though any aspect ratio can be uploaded.
Once you’ve set your length, size, and aspect ratio, click on OK to start exporting. Once the video is ready, you will be asked where to save the file and what to name it. Click on Save after selecting the file location and name to complete the export.
After you’ve exported your timelapse video for your social media outlets, you can delete the timelapse from your Clip file to reduce the file size. To do this, go to File - Timelapse and uncheck “Record timelapse”. The following message will display after doing this.

If you are ABSOLUTELY SURE you want to delete the timelapse from this canvas, click on “Delete and turn off”. This action cannot be undone, so make sure that you have exported your video before doing this! To keep the recording on, click on Cancel.
Now you can share your video with the world! The short timelapse I did for this article can be watched on YouTube at https://youtu.be/m-0_YUSHSOI
Conclusion
Making videos for your social media is easier than ever with this brilliant timelapse feature being built into CSP. I love that you can set it and just draw as usual without having to worry about running another program!
For more information on CLIP Studio Paint, please visit https://www.clipstudio.net/en or https://graphixly.com