Using the 3D Binding Preview
Contact Graphixly @
Hello! My name is Liz Staley and I’m a long-time user of Clip Studio Paint (I started using the program back when it was known as Manga Studio 4!). I was a beta-tester on the Manga Studio 5 program and for Clip Studio Paint, and I have written three books and several video courses about the program. Many of you probably know my name from those books, in fact. I write weekly posts on Graphixly.com and on CSP Tips, so be sure to come back every week to learn more Clip Studio Tips and Tricks from me!
In this article we are going to cover another CSP feature that has been updated for the June 2021 release. This article will only be relevant if you are running CSP EX, not CSP Pro. That’s because the feature we’ll be talking about is one that is used with the Multiple Page functions, so you need to be able to make a file like this to use it.
In this article we will cover the following topics:
Using and Navigating the 3D Binding Preview
Export your Book to EPUB format
Let’s dive right in!
Using and Navigating the 3D Binding Preview
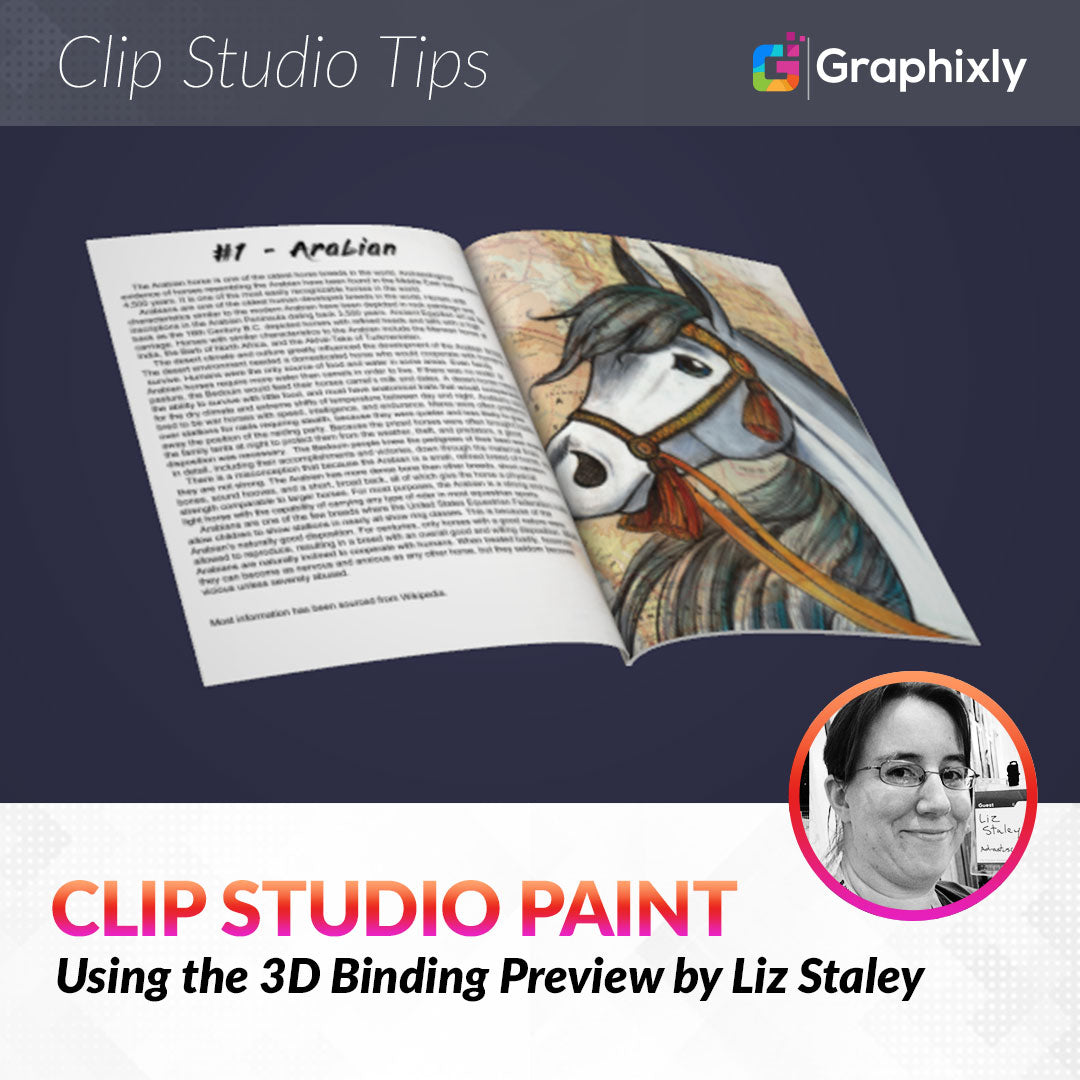
The 3D Binding Preview is a great way to get a look at your comic, sketchbook, art book, or whatever other book project you’re working on before you send it off to the printer. This feature can help you check layouts, see if anything important is going to be lost in the page margins, and also let you check the cover design.
Remember that this feature is only available for Clip Studio Paint EX, not for CSP Pro. This is because the EX version allows you to create files with multiple pages, and the Pro version doesn’t.
Below you can see the pages I’ve laid out for a hypothetical art book about the top 10 most popular horse breeds in the world. Each of my inner pages has been set up as a two-page spread. I love being able to see all my pages and my covers in thumbnail form so I can check the page flow!

For more information about creating files, including multiple page files, in CSP EX, check out this article by me that will give you all the information you need: https://tips.clip-studio.com/en-us/articles/3458
In this new update, several improvements have been made to the 3D Preview. This includes being able to preview projects without a cover page and regardless of the page number settings.Exporting the cover pages to their own file has also been added to the EPUB options, which we’ll cover in the next section.
You can also select a page in the thumbnail view of your project and immediately view those pages in the 3D preview once it’s been generated, if you want to quickly look at a specific set of pages.
For more information on the changes to the 3D Binding Preview, please check out the official release notes from Celsys at https://www.clipstudio.net/en/dl/release_note/?utm_source=clip_ice&utm_medium=referral&utm_campaign=csinfo20210527en
Once you have your project ready to preview, click on File - Export multiple pages - 3D Preview for Binding… to get started with your preview.

Clip Studio will need a few moments to a few minutes, depending on the size of your project and your hardware speed, to generate the 3D preview. While the program is compiling the preview, you will see the following message and progress bar. Be patient while CSP does its thing, and if the process needs to be stopped for any reason you can click the Cancel button.

Once CSP has gone through and collected the data to create the binding preview, you will see the 3D Preview for Binding window, shown below.

My cover is shown here as the book is “closed” at the start of the preview. Using the left and right arrows at the bottom center of the preview window allows you to virtually flip through the book. Click and drag in the preview window to rotate the 3D model. In the following screenshot you can see that my first two page spread really looks like a real magazine when turned to a ¾ view!

With the 3D preview book closed, you can click and drag to rotate around and see the spine and back cover.

At the bottom of the preview window we have a few controls other than just flipping the pages around, so let’s take a quick look at those. We’ll start from the left and go to the right.
The icon on the far left allows us to switch our spine style from saddle stitch to side stitch for the binding. A Saddle stitch spine usually has a line of visible stitching down the outside of the spine of the book. There will be only one “register”, or group of pages, that are folded in half and sewn down the middle of the book. This spine is curved because the pages are all folded in half and stacked together, and is usually only for small books like magazines. Sometimes a book is “saddle stitched” with staples instead of actual thread.
A Side Stitch binding stacks the pages flush with each other in groups of pages called registers. This produces a flat spine. In the screenshot above there is a Side Stitch spine, so it shows as flat. The image below shows a saddle stitch spine, so in the preview it will look more curved.

The next two controls in the preview window are pretty self explanatory - they allow us to zoom in and out of our book and take a closer look!

To quickly fit the binding preview back in the window, click on the control to the right of the zoom in icon, the one with the double-ended arrow inside of a square. This will center the preview again.
As said above, the left and right arrow icons allow us to flip through our book and see the pages. The final icon that looks like a book being closed is for opening and closing our 3D model book.
The numbers to the right of our controls show the number pages we are currently viewing, with the bottom number being the total pages in our project.
Once you’ve finished looking at your preview book, click on Close in the lower right to get rid of the window.
When we’ve confirmed that our book looks the way we want it to, we have lots of options for how to export our pages to their final form. If you are having your project printed and bound by a professional printer, make sure you find out what file format your printer accepts before exporting.
You also have the option to export your work into digital book formats, and that’s what we’ll cover in the next section!
Exporting your Book to EPUB Format
EPUB is a popular format for digital books, and is one of the options we have for exporting multiple pages. They are different than Kindle format, but many EPUB readers exist and the file format is widely used. Let’s export our project for digital release now! Start by going to File - Export multiple pages - Export EPUB data…, shown below.

In the window that comes up, enter the Title of your ebook and the Author name. A title is required.

Let’s take a quick look at the Advanced Settings from the Export EPUB data options by clicking on the marked button at the bottom of the dialog box.

In this screen we can enter a Publisher name, if desired. We can enter the date the ebook was last modified if it is not the current date shown. We also have a few Export option checkboxes at the bottom of this window.
The first checkbox does exactly what it says - it exports the back cover page and includes it in our EPUB data. The middle option inserts a blank page so the last pages will be a two page spread. Since I made my project with two page spreads, I’m going to turn this option on so that my formatting remains intact and the digital book viewer doesn’t split the last pages up.
The final checkbox allows us to export for Kindle format, which is of course great if you will be putting your project in the Amazon Kindle store!
If you made any changes on the Advanced Settings window, click on OK to save them or Cancel to discard. Then, in the Export EPUB Data window, click on OK to start the export. Clip Studio Paint will show the following message when the export is finished.
Click on Close to get rid of this message, or click on Check exported data if you want to check your data to verify it. Clicking this button will send you to the Clip Studio main window.
From the Clip Studio main window, I clicked on Manage Works on the left-hand side menu. Then I clicked on “EPUB data” under the Type heading up top. We can see that my exported project is the only one that shows up, so it did export the EPUB data.

Click on the work to open up some more options, shown below.

From this window we can open the project in CSP if we want to make more edits. We can also send our work to Clip Studio SHARE to let others see what we’ve created.
You can also see that there are options in this window that allow us to export to Kindle or EPUB directly from this screen if you want to.
Now that we have our EPUB exported, where did the data file go? To locate it, let’s go back to Clip Studio Paint and go to File - Export multiple pages - Open exporting destination of EPUB data.

This will open the folder on your hard drive where the EPUB data was stored. You can then open this file in an EPUB reader. Below you can see my project in a free EPUB reader called Ice Cream Ebook Reader.

This process also works for Kindle format exports too, though of course you would then open that file in a Kindle device or Kindle app for your computer or mobile device!
Conclusion
There are so many ways to share your work, but one of the easiest is with digital book distribution because it has very little overhead costs. You don’t need to pay for printing, pay to ship books, or find a place to store thousands of printed copies of your comic! EPUB and Kindle distribution can be a great way to make some extra money or just get your work out in the world.
For more information on CLIP Studio Paint, please visit https://www.clipstudio.net/en or https://graphixly.com