Using Mesh Transformation for More Realistic Cloth Patterns
Contact Graphixly @
Hello! My name is Liz Staley and I’m a long-time user of Clip Studio Paint (I started using the program back when it was known as Manga Studio 4!). I was a beta-tester on the Manga Studio 5 program and for Clip Studio Paint, and I have written three books and several video courses about the program. Many of you probably know my name from those books, in fact. I write weekly posts on Graphixly.com and on CSP Tips, so be sure to come back every week to learn more Clip Studio Tips and Tricks from me!
Patterns on a character’s clothing in Clip Studio Paint can add a lot of interest and personality to your illustrations, but how can we make those patterns not look like a flat illustration that’s been pasted onto our image? Taking a few extra minutes to carefully add and edit your cloth patterns can really make your illustration pop, and it’s not difficult to do!
Let’s get to it!
Adding Patterns to Clothing
For this article I will be adding patterns to the hoodie that this character is wearing.

Before I start adding patterns to any piece of clothing I like to take a moment and make a plan of action. I take a look at the article of clothing and mentally break it into pieces along where the seams would be on a real piece of clothing. This hoodie has six “zones”, three on each side that consist of the hood, the main body, and the sleeve.
Because the two parts of the hoodie are so far apart in the drawing I could probably get away with doing both sides of the hood, both sides of the main body, and both sleeves at once, but for the sake of this article I will be concentrating on one part of the jacket at a time.

Choose an area to start. Then use the Lasso selection tool to draw around that part while leaving a very large area outside. I decided to start with the hood of the jacket, so I drew a large area around it. You want to make sure you leave lots of space for editing the pattern later.

Add in your pattern material. I will be using this pattern for the hood and main body of the jacket in my example: https://assets.clip-studio.com/en-us/detail?id=1763647
If you scale your pattern material make sure you take note of the “Scale ratio” in the Tool Property window so that you can scale it the same amount for each part of the clothing!

Once you have your pattern scaled and positioned where you like it, right-click on your pattern layer and click on Rasterize. Right-click the Layer mask and select “Apply Layer Mask” as well.This will give us a piece of our pattern that we can edit in the next step.

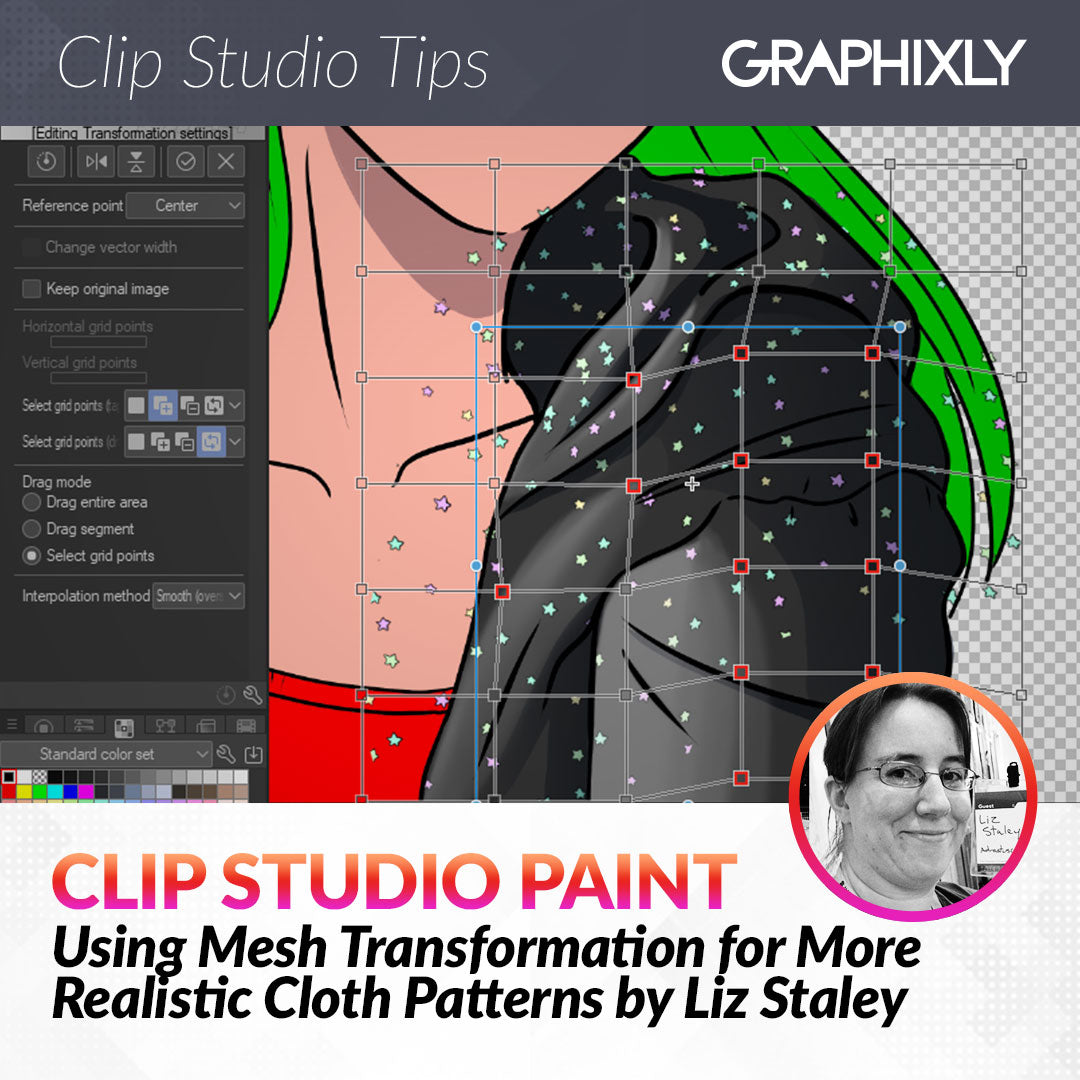
Next select Edit - Transform - Mesh Transformation.

If you have the CSP Update Pass and have updated to Ver 2.3.1 (as of December 8, 2023) then you will have access to the new options for the Mesh Transform tool, namely the option to select multiple grid points at once! Below shows the mesh transformation grid as well as the new updated Tool Property options.

Mesh Transformation allows us to click and drag the control points on the “mesh” to give our pattern image a more organic shape. In previous versions, you could only select one control point at a time to move. But in versions 2.3.1 and up there is now the option to select multiple control points to edit.
Beneath the “Vertical Grid Points” option there are several new options. The first two are “Select grid points (tap)” and “Select grid points (drag)”. These change how tapping or dragging over the grid points operate, and the options are New Selection, Add, Subtract, or Toggle.
New selection - Creates a new selection each time
Add - Add to the current selection
Subtract - Remove from the current selection
Toggle - Will “switch” the control points. If an inactive point is clicked/dragged it will be switched to active, and vice versa.
There is also a new set of options called “Drag mode”. By default this was set to Drag entire area”, which moved the entire area of my mesh transformation when dragged. Let’s change it to Select Grid Points instead and then drag a box around some control points.

The control points turn red when they are active. Now we can drag and move the selected control points all at once, making editing much faster than having to change them one at a time.
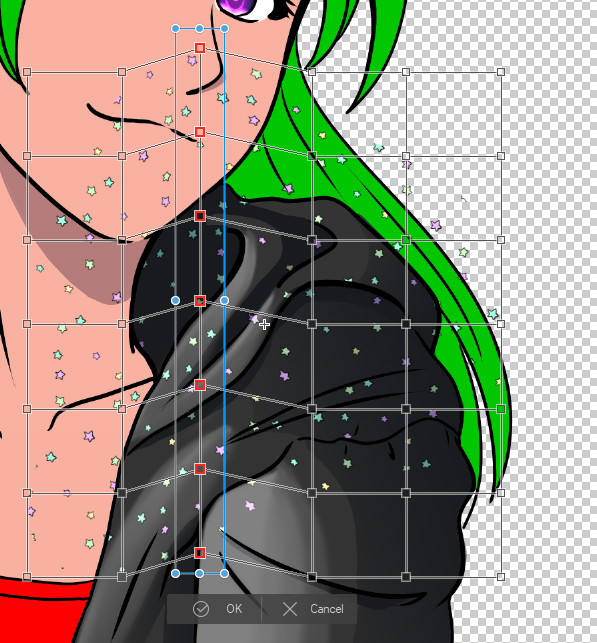
Move the control points around according to the folds and direction of your fabric. I like to move the points closer together where the fabric bunches up and space them further apart where the fabric stretches.

Click OK or press Enter on your keyboard when you like the look of your pattern. Next use an eraser tool, selection tool, or layer mask to get rid of the extra material pattern outside of the area you are editing.
Continue this process with the other areas of your piece of clothing.

If part of your clothing goes off the edge of the canvas, make sure that you leave enough room when you make your initial selection to move some of the pattern off the edge so that you don’t end up with a gap. For instance, for the hoodie sleeve I needed to make sure there was enough extra pattern at the top so that I could move the pattern down, otherwise when curving the plaid pattern to match the curve of the arm there would be a gap at the bottom of the canvas.
The plaid pattern in my example image can be downloaded here: https://assets.clip-studio.com/en-us/detail?id=2037885
Finish cleaning up the edges of each area and you’re done! Now your fabric patterns look much more natural and not like a flat image that has been pasted into your illustration!

Conclusion
If you’ve never tried the Mesh Transform tool before, it is definitely one of the most useful tools in Clip Studio Paint. You can use it not just for making clothing patterns but for so many other things as well, including adjusting inked lines and so much more! The new options added in 2.3.1 are useful but aren’t absolutely necessary, so give this tool a try even if you don’t have the update pass!
For more information on CLIP Studio Paint, please visit https://www.clipstudio.net/en or https://graphixly.com