Understanding Most Common Layer Types
Contact Graphixly @
Hello! My name is Liz Staley and I’m a long-time user of Clip Studio Paint (I started using the program back when it was known as Manga Studio 4!). I was a beta-tester on the Manga Studio 5 program and for Clip Studio Paint, and I have written three books and several video courses about the program. Many of you probably know my name from those books, in fact. I write weekly posts on Graphixly.com and on CSP Tips, so be sure to come back every week to learn more Clip Studio Tips and Tricks from me!
There are so many types of layers in Clip Studio Paint that it can be difficult at first to figure out what they all do and what you can use them for. This week I will introduce you to the five most common and useful layer types in CSP.
In this article we will cover the following topics:
Raster and Vector Layers
Object Layers
Reference Layers
Adjustment Layers
Let's start!
Raster and Vector Layers
Of all the layers most artists will use in Clip Studio Paint, raster layers are probably the most common, with Vector being second most common.Raster layers use pixels to display information, while vector layers are made up of points that are used to display lines and shapes.
There are pros and cons to both layer types. Raster layers are very easy to blend and paint on, while vector layers can be infinitely scaled up and down without losing quality. Let’s look at an example!
The line art below was created on a raster layer and this is the original size I created it at. Looks pretty good!

However, if we increase the scale by 1000 we’ll see that the lines start to get fuzzy and “soft”.

However, the line art below was created on a vector layer, and you can see that even scaled up by 1000, the lines are still very crisp on the edges!

Though you can do almost all of your art on a vector layer, it is usually better to reserve them for times when it’s necessary, like when making line art! I find that it’s just too difficult to try and edit vector layers in the way that I like to shade and work with raster, especially when trying to color! It’s possible because of the way vector layers work in Clip Studio Paint since you can use any drawing tools on them, but I find them a bit clunky to erase and you can’t make filled shapes on them so coloring is a much longer process.

Object Layers
Object layers are created when you drag a material in from the Clip Studio Paint Materials library. They can consist of 3D backgrounds, images, 3D characters and poses, speech balloons, and more.
It is important to remember that object layers can not usually be edited directly with drawing and erasing tools. If you want to make changes to something in an object layer, such as drawing over something or adding color to an image object, be sure to right-click on the Object layer and select “Rasterize Layer” to convert it from an object layer to a raster layer.

Also, if you have trouble setting up 3D perspective rulers, here’s a bit of a hack- use a 3D model layer! Whenever you add a 3D object to your canvas a 3D ruler will also be created. You can see this ruler usually only when you are moving the camera around, so let’s make it so we can see the ruler all the time. To do this, right-click on the 3D object layer and go to Ruler/Frame, then click on “Show Ruler.”

While staying on the 3D object layer, click on the “Set Ruler Range” icon at the top of the Layer palette below the Opacity slider, then click on “Show in All Layers” so that the ruler will be visible even when we move to another layer.

Now we can create a new raster layer and start drawing a background in 3-point perspective using the ruler from the 3D model layer!

Reference Layers
Aside from raster layers, reference layers are probably the layer type that I use the most in my own work! You can turn any layer into a reference layer by choosing it from the list in the layer palette and then clicking the “Set as Reference Layer” icon at the top of the window. It looks like a little lighthouse.

So what do we use Reference Layers for? Let me give you an example! I’ve turned my line art layer into a Reference Layer, then made a new raster layer below it for my flat colors. Now I’ll choose the Fill tool and the “Refer other layers” subtool. In the Tool Property palette, under “Refer multiple” click the lighthouse icon to tell the Fill tool to look at the Reference layer when using it.

Now I can click with the Fill tool to fill in my flat colors very quickly.

For me, this is the fastest way to get flat colors on their own layer! I love being able to just use the Fill tool to quickly put in my flats and get to shading faster.

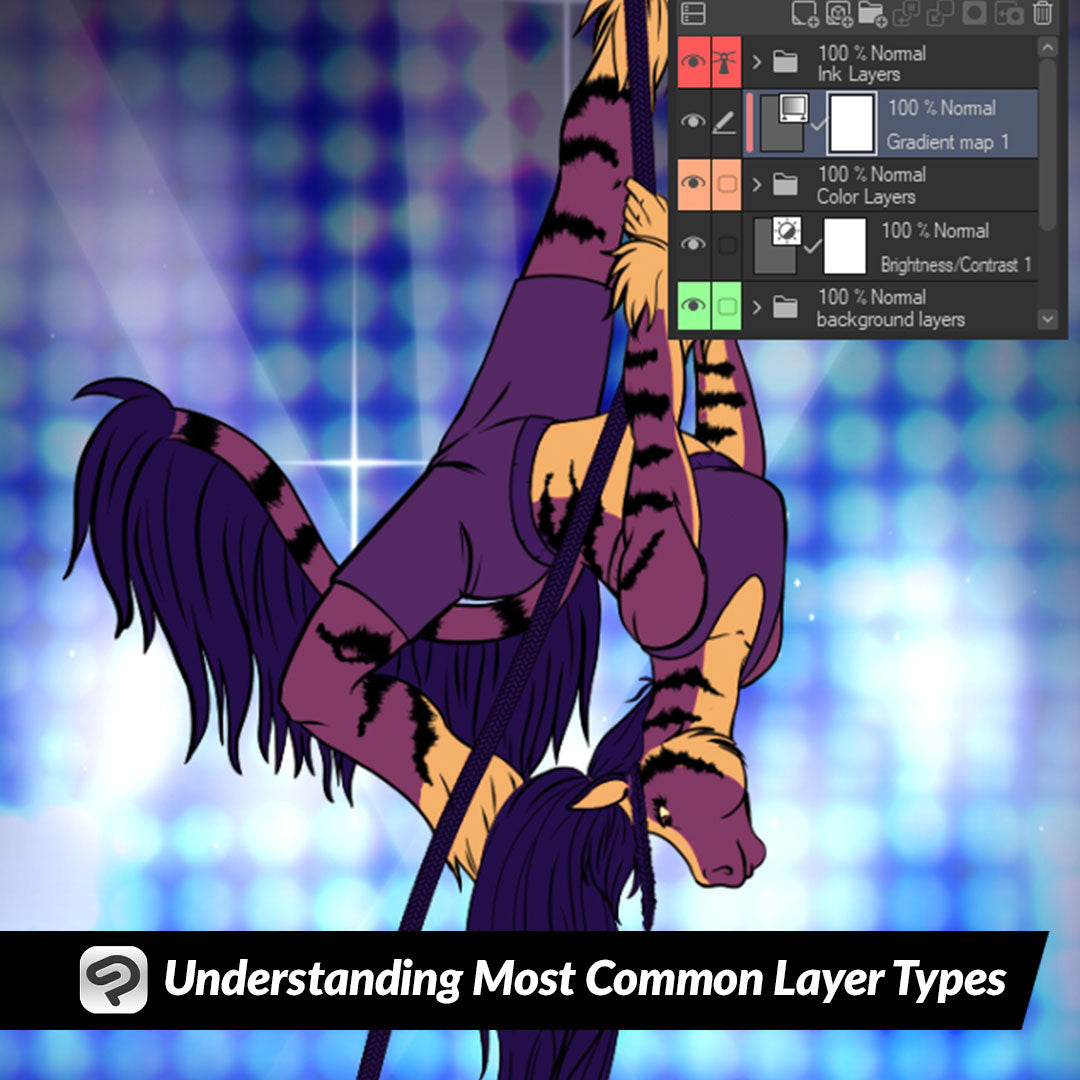
Correction Layers
Correction layers are a great way to play with different colors and do color correction on your images without making permanent changes. These layers can be turned off and on, have the parameters changed, and even be applied only to certain parts of your image so they’re a great way to play with different effects!
To add a correction layer, click on Layer - New Correction Layer and then select the adjustment you want to make. For this example I’m going to use the Brightness/Contrast setting.

Use the sliders to change the settings of your chosen adjustment.

Once you click on OK, a new layer will be created in the layer palette with the name of the correction you applied. This layer has a layer mask attached to it already that you can use to mask out portions of the effect so it is only applied to certain parts of your illustration.

A really fun type of adjustment layer is the Gradient Map! You can use this to change the colors of your images based on a gradient. Below is a very extreme example of this. The colors from the gradient are being applied to certain colors in the image.

For a fast way to apply an adjustment to only a portion of an image, you can use a Clipping layer. Create your adjustment layer and move it in the layer stack so that it is on top of the layer (or layer folder) that you want it to apply to. Then right-click the adjustment layer and go to Layer Settings - Clip to Layer Below.

Now my gradient map is only being applied to the character folder instead of the background!

And since these changes are non-destructive, you can simply erase or hide the layer if you decide later that you don’t want those changes any more, or double-click on the layer icon to change the settings even after you’ve made the layer.
Conclusion
There are other types of layers, like text layers and draft layers, but these five layer types are the ones you will likely encounter the most often!
For more information on CLIP Studio Paint, please visit https://www.clipstudio.net/en or https://graphixly.com