Transferring CSP To a New Computer
Contact Graphixly @
Hello! My name is Liz Staley and I’m a long-time user of Clip Studio Paint (I started using the program back when it was known as Manga Studio 4!). I was a beta-tester on the Manga Studio 5 program and for Clip Studio Paint, and I have written three books and several video courses about the program. Many of you probably know my name from those books, in fact. I write weekly posts on Graphixly.com and on CSP Tips, so be sure to come back every week to learn more Clip Studio Tips and Tricks from me!
I recently got a new PC because my old one decided to start having issues. However, I have a ton of tools, materials, and custom settings on my old computer’s copy of CSP that I didn’t want to lose when moving to a new system! I did some research on how to move my settings and could not find a recent article that covered both ways this problem can be solved, so I decided to write about it! Hopefully this will help you if you need to move your Clip Studio Paint settings to a new computer.
In this article we will cover the following topics:
A Note About Moving Materials and Settings
The CELSYS Folder Method
The Cloud Backup Method
Let’s get to it!
A Note About Moving Materials and Settings
When I was researching how to move my materials, tools, and other settings I found quite a bit of conflicting information. Most articles or videos I found stated that using the first method in this post (the CELSYS Folder Method) would transfer everything to the new copy of Clip Studio Paint. However, when I did this process it only transferred the Materials that I had downloaded and did NOT bring over my workspace, custom tool sets, and installed brushes. When I tried the second method (the Cloud Backup Method), these missing items were copied over. So I would recommend trying the first method and then, if all of your settings and items are not in Clip Studio Paint, then try the second one.
Of course, you can only use the Cloud Backup if you still have access to your previous system. Thankfully my old computer was still usable and accessible so I was able to use the Cloud system. If you often create custom tools or install brushes you may want to regularly back up your settings using the directions in the second method’s section of this article in case of catastrophic system failure.
With that out of the way, let’s get Clip Studio Paint moved to a new computer!
The CELSYS Folder Method
To start this method off, we need to find where our Materials are saved. To do this, open the Clip Studio App (NOT the Paint app). Then click on the gear at the top of the Clip Studio window and click on the “Location of Materials” option.

The Location of Materials window will show you the path of folders where your assets are stored on your computer. Your path will likely be different than mine, but what we’re looking for is the “CELSYS” folder toward the end of the location string.

Open your operating system’s file explorer and follow the path of folders from the Location of Materials window. In the following screenshot you can see how the folder address on the left matches the Location of Materials window.

If you are having trouble finding your CELSYS folder, your Operating System may have the folders hidden. I actually ran into this issue while looking for my folder on my Windows 11 system (the computer I was moving to). In this case, you may need to make the hidden files and folders visible. In Windows File Explorer this can be done by clicking on View, then going to Show - Hidden Items.

Once you locate the CELSYS folder on your old computer system, you will need to make a copy of that folder. You can do this either with the cloud backup system of your choosing (i.e. Dropbox, Backblaze, etc), or by copying the Folder and its contents to a USB drive.
With our old CELSYS folder copied, we can now move to our new system. Opening Clip Studio Paint on the new computer shows the default CSP setup, including just the default library of materials.

Locate the CELSYS folder on the new system. For safety’s sake I renamed the backup of my old CSP system to “CELSYSbackup” before proceeding. Copy the backup of the CELSYS folder into the location of the same folder on the new computer. Coping the backup folder over may take some time, depending on how many files are in the folder.

There should now be two sub-folders in the “CELSYSUserData” folder - one named “CELSYS” and one named “CELSYSbackup”.

Rename the current CELSYS folder to “CELSYSdefault”.

Then rename CELSYSbackup to “CELSYS”.

Now when we open Paint again, we should have all of our downloaded Materials in the Material Library.

As stated earlier, some videos and articles I found while trying to figure out how to do this say that copying this folder over will also back up tools, workspace, and more. However, when I did it only my downloaded Materials were copied over. All my installed and custom brushes were not included, and neither was my workspace. If this happens to you, continue to the next section.
The Cloud Backup Method
This method relies on the Clip Studio cloud system. You will need to have a free Clip Studio account if you don’t already have one, and will need to be connected to the internet.
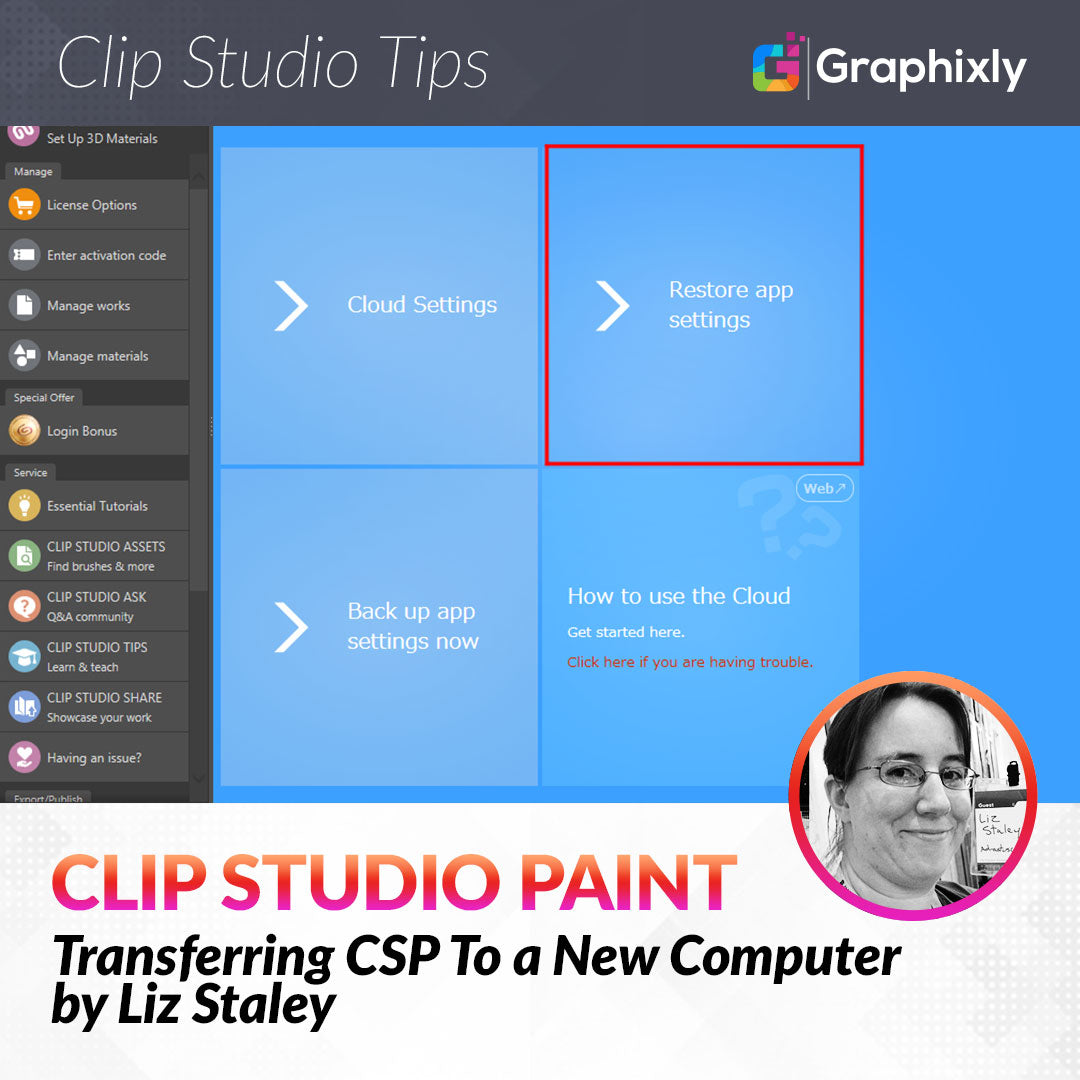
To get started, open up the Clip Studio app. Ensure that you are signed in to your Clip Studio account before proceeding. Then click on the Cloud bar at the top of the Clip Studio window (to the left of the button with your account name and icon in it). On the Cloud screen, locate and click on the “Back up app settings now” button.

Click OK on the following message.

You will not be able to use CSPaint while the backup is running so keep this in mind!
This process may take some time, especially if you’ve never run the backup before and you have a lot of items. My backup took around an hour or so (though I wasn’t sitting at the computer keeping track of it so that’s just an estimate).
To check the progress, you can click on the icon in the top of the Clip Studio window that has two arrows, one pointing left and one pointing right, to see your data transfers.
You will know that your backup is complete when all data transfers are marked as “Successful”.

Now, go to the computer you are transferring Clip Studio to. Log in to your Clip Studio account, then click on the Cloud icon.
(By the way, clicking on the Cloud Settings in this window will open up the options to automatically back up your items once a day when you log into Clip Studio. This is a great idea if you are always adding to your Materials library or tools and want to ensure that you don’t lose anything in the event of a catastrophic and sudden system failure!)
This time, click on the “Restore app settings” button.

The next screen will show a list of your app settings backups, complete with the date, the size of the backup, and the name of the device the backup was made from.
Locate the backup you wish to restore from, then click on the “Restore” button to the right.

Clip Studio will start restoring from the chosen file.

Once the restoration completes, we can open Clip Studio Paint again. This time my Quick Access settings and custom folders for tools were all moved over to my new computer without me having to install everything again and remake all my subtool folders! Other items, such as installed color sets and custom auto actions, were also moved to my new computer as well.

Now you should be able to continue creating just as you would on your previous system!
Conclusion
Having to adjust to using a new computer or an updated operating system is never easy, but thankfully with just a bit of time and a few clicks the process can be made easier. Remember to back up your computer files regularly to avoid losing your work - and your precious custom art tools!
For more information on CLIP Studio Paint, please visit https://www.clipstudio.net/en or https://graphixly.com
3 comments
Hello! First of all, THANK YOU SO MUCH FOR THIS— I’m a webcomic artist and I was in shambles when I couldn’t find all my resources (brush, presets etc), but this article/ tutorial helped and fixed the problem for me! Thank you thank you so much!!! ;;;
Thanks for this. Whenever I update CSP to a new version I’m always holding my breath, hoping for the best.
So the Cloud “Backup App Settings” backs up all the brushes you have installed and Quick Access folders, too?
I’ve found that some of the CSP help files can be a bit vague. At the moment I’m backing up brushes by clicking on brushes one at a time, registering sub tool as material, and syncing to the cloud. I can then download the brush to my tablet, etc….
Hello! Thank you for making this really helpful guide. It really helped me and friend, especially my friend who was very devastated thinking they lost their workspace they had for many years.