Three MORE Timesaving Features
Contact Graphixly @
Hello! My name is Liz Staley and I’m a long-time user of Clip Studio Paint (I started using the program back when it was known as Manga Studio 4!). I was a beta-tester on the Manga Studio 5 program and for Clip Studio Paint, and I have written three books and several video courses about the program. Many of you probably know my name from those books, in fact. I write weekly posts on Graphixly.com and on CSP Tips, so be sure to come back every week to learn more Clip Studio Tips and Tricks from me!
One of the things that I love about Clip Studio Paint is how much time it saves me when I work with it. Back when I was creating a webcomic I switched to CSP just to save time with the perspective ruler, and I was constantly surprised at how many new tools I found to speed up my workflow. Since it’s created specifically for comic artists and illustrators, I feel like CSP has some of the best features for saving time.
In this article we will cover the following topics:
Shading Assist
Adjust Line Width Filter
Select Layer Tool
Let’s get drawing!
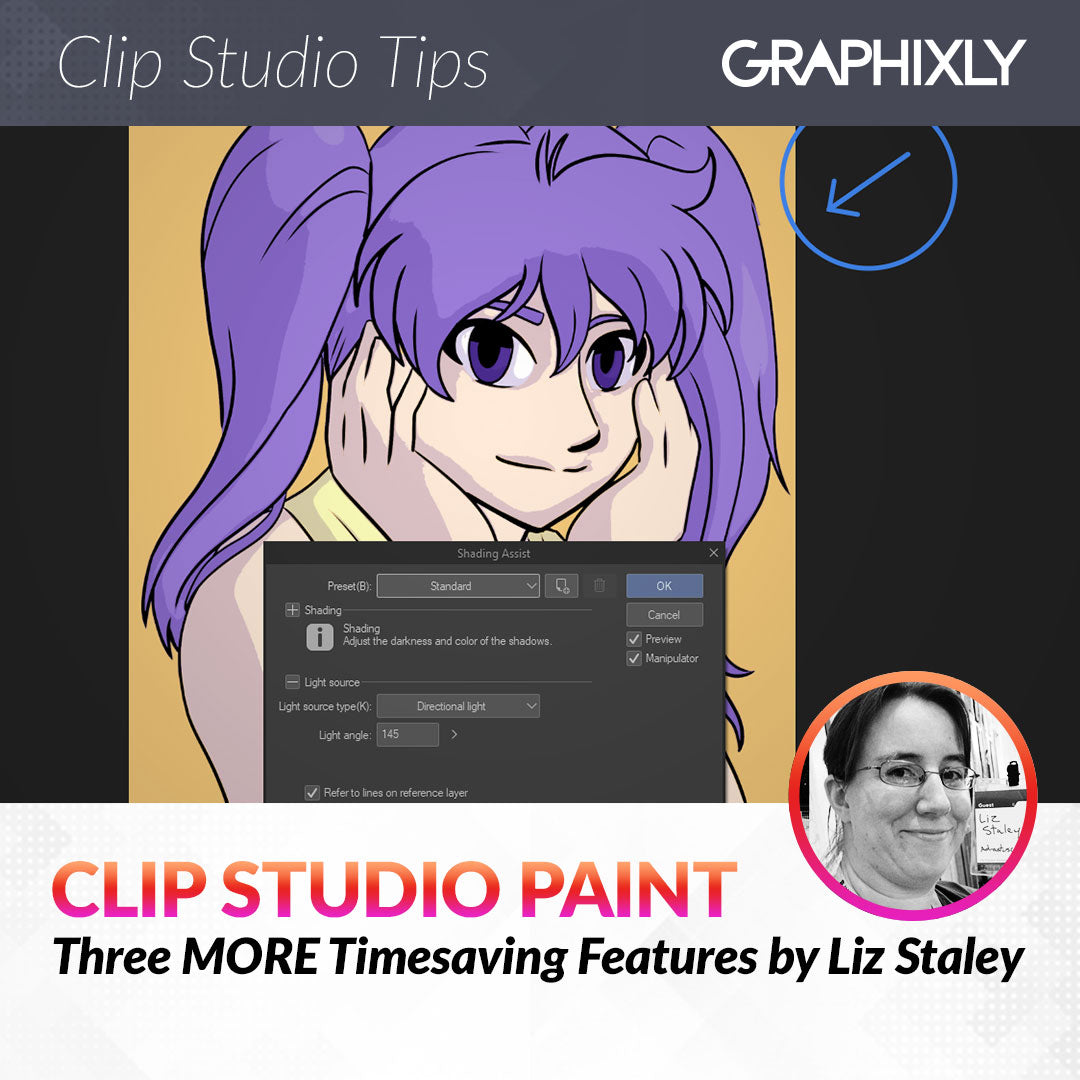
Shading Assist
When I saw the preview for this feature in the video for Version 2.0 I was blown away. Like colorize, it’s not perfect - at least not for any of my art! But it does give a base that is very quick and easy to modify and work off of, which saves a ton of crucial time!
To start using shading assist, you’ll want to have an image open with a lineart layer that is set as a Reference layer (to do this select the lineart layer in the Layer palette and then click on the lighthouse icon to set as a reference layer) and you should also have your flat colors on another layer as well.
Then click on Edit - Shading Assist…

This will bring up the Shading Assist options and a control circle. To change the angle and position of the light source, drag the circle and arrow (in blue on the right side in the screenshot below) and the shading preview on the image will change.
In the Shading Assist options, you can choose a preset from the top dropdown menu to change the lighting from standard, to nightime, to morning, and even to stage lighting and backlight! You can also change the Light source and Shading options manually to adjust the look of the piece to something custom if the presets aren’t to your liking.

Click on OK to finish the Shading Assist process. From here CSP will create a few additional layers in the Layers palette that you can then select and edit to fine-tune your shading. I usually erase shadows that are in place where I don’t want them and adjust the shape of other shadows as well. You can also add extra layers for deeper shadows or brighter highlights as well.

For a full tutorial on all the details of Shading Assist, please check out the post I wrote about it not long after it was released! https://tips.clip-studio.com/en-us/articles/7671
Adjust Line Width Filter
This feature is BRILLIANT and I actually just found out about it recently. Sometimes I ink a piece and realize that I really wanted the lines to be thinner or thicker, but I don’t want to try doing it over again because I’m busy and don’t have time to start over. That’s where this awesome filter comes in!
Select your line art layer and then click on Filter - Correction - Adjust line width.

From the dropdown menu, choose whether you want to Narrow or Thicken your lines. Then use the slider or the number box under the Scale option to adjust how much to adjust the lines by. Remember to check the Preview box to see in real-time what the filter is doing if it’s not already checked!

In the screenshot below you can see how much my lines have been narrowed by by looking at the bright pink areas. I did my flat color layer using the original line work, so the pink is the Paper layer showing through!

This is such a cool filter and will be a lifesaver when I realize I was too heavy-handed with my inking when I really wanted thinner lines!
Select Layer Tool
Have you ever been working on an image and realized there was a speck of errant color somewhere, but you can’t figure out which layer that speck is on? If you have an image with a ton of layers it can take forever to figure out where something is! But did you know that there’s an easier way to figure out what layer anything in your image is on?
For instance, let’s say that I want to figure out which layer the bright pink spot in the following screenshot is on.

Under the Operation tools, click on the “Select Layer” tool.

With the Select Layer tool, click on the thing in your image that you want to locate. Your currently active layer in the Layer palette should immediately change to the layer that it’s on!

You can use this to quickly find any layer just by clicking on something in your image. Extremely helpful, especially for those who make lots of layers in their images!
Conclusion
And there you have it! With this and my previous post you now know how to use six very useful timesaving features in Clip Studio Paint. I hope you found a couple that you’re going to incorporate into your workflow!
For more information on CLIP Studio Paint, please visit https://www.clipstudio.net/en or https://graphixly.com