Story Features for Storyboards
Contact Graphixly @
Hello! My name is Liz Staley and I’m a long-time user of Clip Studio Paint (I started using the program back when it was known as Manga Studio 4!). I was a beta-tester on the Manga Studio 5 program and for Clip Studio Paint, and I have written three books and several video courses about the program. Many of you probably know my name from those books, in fact!
Storyboards are used primarily to plan out video projects, especially animation, movies, commercials, and any other video project. They are basically a plan of how the video will be laid out, where characters will stand, how shots will be framed, camera movements, and how action will flow throughout the video or animation. Storyboards can be as rough or detailed of drawings as you want, but they are usually rough layouts because they’re a working document that is used to create the final product and only those involved in the production usually see them! You can save time creating storyboards by making your own template and loading it whenever you need to create more boards. Using the CSP EX Story features will also help keep your boards organized and easy to access!
In this article we will cover the following topics:
Creating a storyboard template page
Saving template to the Templates library
Creating a storyboard file using the CSP EX story features
Let’s get started!
Creating a Storyboard Template
Before we can incorporate the Story features, we need to create a template for our storyboards. We will be saving this template to the template library in the Materials so that we can load it to every page in a new file, saving us time on recreating the template over and over again or adding the template to each page of our document.
You can set your page up to whatever dimensions and layout you want. I’m going to be using U.S. Letter size paper dimensions in the Landscape orientation (11 inches wide by 8.5 inches high), at 300dpi. This will ensure that we can fit several storyboard panels on the page and that they will print clearly when we need them. My page settings for this template are shown in the image below.

Click OK once you have entered your new document settings to create a new page.
Before we start making our template, we need to quickly discuss aspect ratio. An aspect ratio is the relationship between the width and height of something. In this case we’re talking about the aspect ratio of whatever screen size our project will be displayed on. At one time, movies and TV were shot in different aspect ratios because movie screens were different proportions to TV screens. With current technology, our TVs and computer monitors are now in wider aspect ratios. However, now we have video for Instagram and TikTok that are formatted as a square (a 1:1 ratio) instead of a long skinny rectangle! So if you are creating storyboards for square “mobile formatted” video, you’ll want to create a perfectly square frame for your panels.
For the purpose of this tutorial, I’m going to be using a 16:9 aspect ratio. There are no hard-and-fast rules for the actual dimensions for this ratio, so to make things easier I found an image that was already in this aspect ratio that I could use to “trace” for my storyboard frames.
The image I’m using to get this measurement is from the Wikipedia page for the 16:9 aspect ratio, found here: https://en.wikipedia.org/wiki/16:9_aspect_ratio I will ONLY be using this image to get the correct aspect ratio so that my storyboard frame is accurate for a movie project. If you don’t need to be so accurate for your boards, you can skip this and make your frames whatever size you want.
I pasted the 16:9 measurement image into my Clip Studio Paint file and resized it so that three of these panels will fit across the width of the page. Then select the Frame Border tool from the toolbar and select the Rectangle Frame subtool. Under the Tool Property settings, ensure that “Draw border” is checked so that CSP draws a black line around your frame. Also make sure that “Create a new folder” is selected from the “How to add” drop-down menu. You can see my Rectangle frame tool settings in the screenshot below.

Now, use the rectangle frame subtool to create a frame. I based mine on the size of the aspect ratio I wanted to set for my project. When you create this frame, a new folder will be created in the Layer stack with one raster layer inside of the folder. This is our first storyboard frame! Now we need to create more frames on the page, and the easiest way to do that is to copy the one we’ve already made. To do this, we want to click on the Layer Folder in the layer palette (it will be named Frame 1). Right-click the layer folder and click on “Duplicate Layer” from the menu. A new layer folder and layer will be created named “Frame 1 Copy” or something similar.
Now we have two frames, but one is on top of the other! To fix this, select the Operation tool, then the Object subtool. Click on the border around the frame to select it. Now you can drag it to a new location using the Object subtool. (Tip: To move the frame in a straight line, hold down the SHIFT key on your keyboard.)
Repeat this step to create each frame. In the screenshot below you can see that I have 3 frames across my paper.

Now I’ll make three more halfway down the page by continuing to copy the existing frames and moving them to their new positions! I want six frames on the page, three in each row.
Now that we have all our frames made, it’s time for a little bit of layer organization. Since I’m planning on using this as a template, organization will save time later with trying to figure out what layer folders belong to which shot frames. I dragged the layer folders around so they were in order, then renamed each one so it would be easy to find later. You can see my layer folder names and order in the following image.

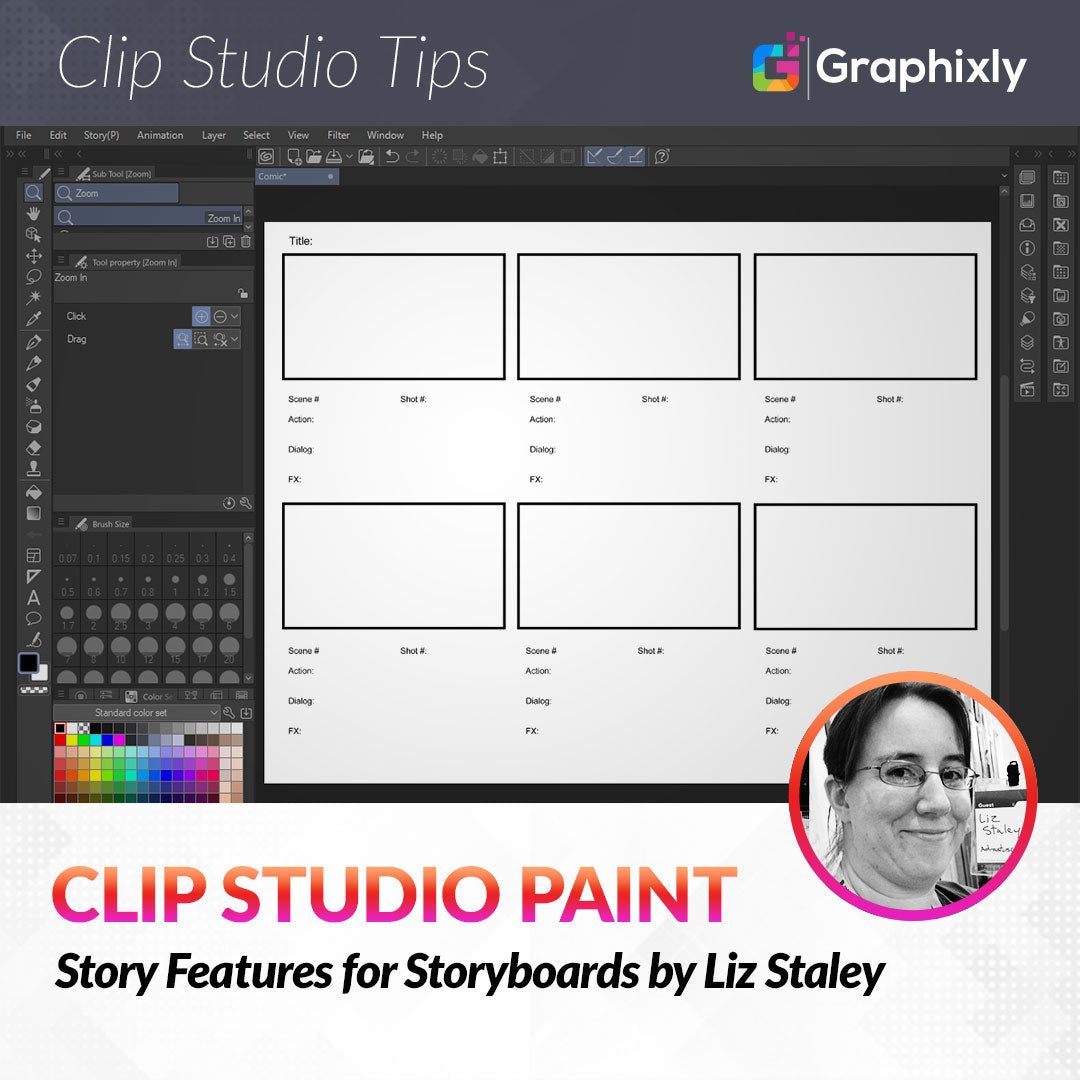
For the last touch on this template, I’m going to add in space for text as well. If you don’t need to add items like dialog, action, and effects for your boards you can skip this. But I’m going to do it so scene and shot numbers can be added, along with descriptions of what’s going on in each shot.
Using the Text tool, I created text under the first frame that had all the categories I wanted to include. Then I copied that text layer for each shot on my page. You can see the text boxes in the screenshot below.

Our base template is done! Now it’s time to save it to the template library, which we’ll do in the next section.
Saving the Template to the Materials Library
In order to easily use the storyboard template on new files, we need to save it to the materials library as a template. To start this process, click on Edit - Register Material - Template, as shown below.

This will bring up the Material Property window. In the Material Name text entry box, enter a name for your template. I used “Storyboard Template” for mine. In the “Location to save material” section, expand the folders and select the Manga Material - Framing Template category to store the template in. In the search tag box, click on the “+” in the lower right to add a new tag. Type the tag and hit Enter to confirm it. Then click OK to save the material. You can see my Material Property settings in the following image.

Now that we’ve saved our template somewhere we can use it easily, it’s time to apply it to a new file!
Creating a New Story File using the Storyboard Template
It’s time to create a file using our new template! For this, we’re going to use the Multiple Page settings in the New document window to create a story file that will allow us to view and manage our storyboards like a book. This feature is only available in Clip Studio Paint EX (not the PRO version!)
When we create a multiple page file, CSP “links together” the files for each page associated with the story file that manages them. We can view all these linked pages as thumbnails, open and close them easily, rearrange them, and do all sorts of other cool things that aren’t possible when each page is a separate file that isn’t linked together. Story files are a great way to organize, especially if you create things like graphic novels, comics with ongoing stories or chapters, storyboards for longer projects, and even illustration sketchbooks.
First, let’s apply our template to our new file. Click on File - New (or Ctrl+N) to start creating a new file. I’m going to use the same page size and DPI settings from when we created our template earlier in this article. In the New file options, you will see a checkbox labeled “Template”. Click this box to apply a template to the new file.
Once the box is checked, the Template box will appear. Look for your new template in the list from the center of the window. If you can’t find it, you may need to click on the “Layer template” tag on the left hand side of the window. Once you find your template, click on it to highlight it, then click on OK to return to the New options.

Now scroll down in the “New” options until you find the checkbox labeled “Multiple pages.” Click on it to turn these options on. Then enter the number of pages you wish to create in your new file in the “Number of pages” box. You can enter a custom amount or choose from the preset numbers in the dropdown. In the screenshot below, I’ve chosen to create 4 pages for the purpose of this article.

When creating a multiple page file, you must enter a File name at the top of the New document window. You must also choose a location to save your new file to. This is because once you create the new document, CSP will automatically create each page as a file in the specified folder, as well as a file that manages those page files. So Clip Studio needs to know where to save those files! The “Save to” option will show the current file path. To change it to a different folder, click on the folder icon to the right of the Save to option.
Click on OK to create your new document. Depending on your computer’s specs and how many pages you’re creating, it may take a few minutes for your new file to be created, so be patient!
Once your new file is created, you will see the page management window with thumbnails of each page. In the screenshot below, you can see my four page file, each with the storyboard template we created earlier applied to it. Clip Studio automatically put the template in because we set the template for the pages earlier!

Now that you have created your storyboard file, you can open your pages and start drawing your storyboards on your templates.
Conclusion
Creating your own template for storyboards and then organizing them into a document is easy with Clip Studio Paint’s story tools. You can also use these features to create any other sort of template as well and apply it to a new document!
For more information on CLIP Studio Paint, please visit https://www.clipstudio.net/en or https://graphixly.com