Snapping to Rulers and Control Points
Contact Graphixly @
Hello! My name is Liz Staley and I’m a long-time user of Clip Studio Paint (I started using the program back when it was known as Manga Studio 4!). I was a beta-tester on the Manga Studio 5 program and for Clip Studio Paint, and I have written three books and several video courses about the program. Many of you probably know my name from those books, in fact. I write weekly posts on Graphixly.com and on CSP Tips, so be sure to come back every week to learn more Clip Studio Tips and Tricks from me!
Last time we started going over some of the functions of the new Snapping options. This time we’ll explore a few more ways snapping can be used.
In this article we will cover the following topics:
Snapping to Perspective Rulers
Symmetrical Ruler Snapping
Vector Control Point Snapping
Let’s jump right back in!
Snapping to Perspective Rulers
Another way that snapping can be used is to snap items to rulers, including parallel line rulers and other types of rulers. However I think one of the most useful options for this feature might be snapping to perspective rulers!
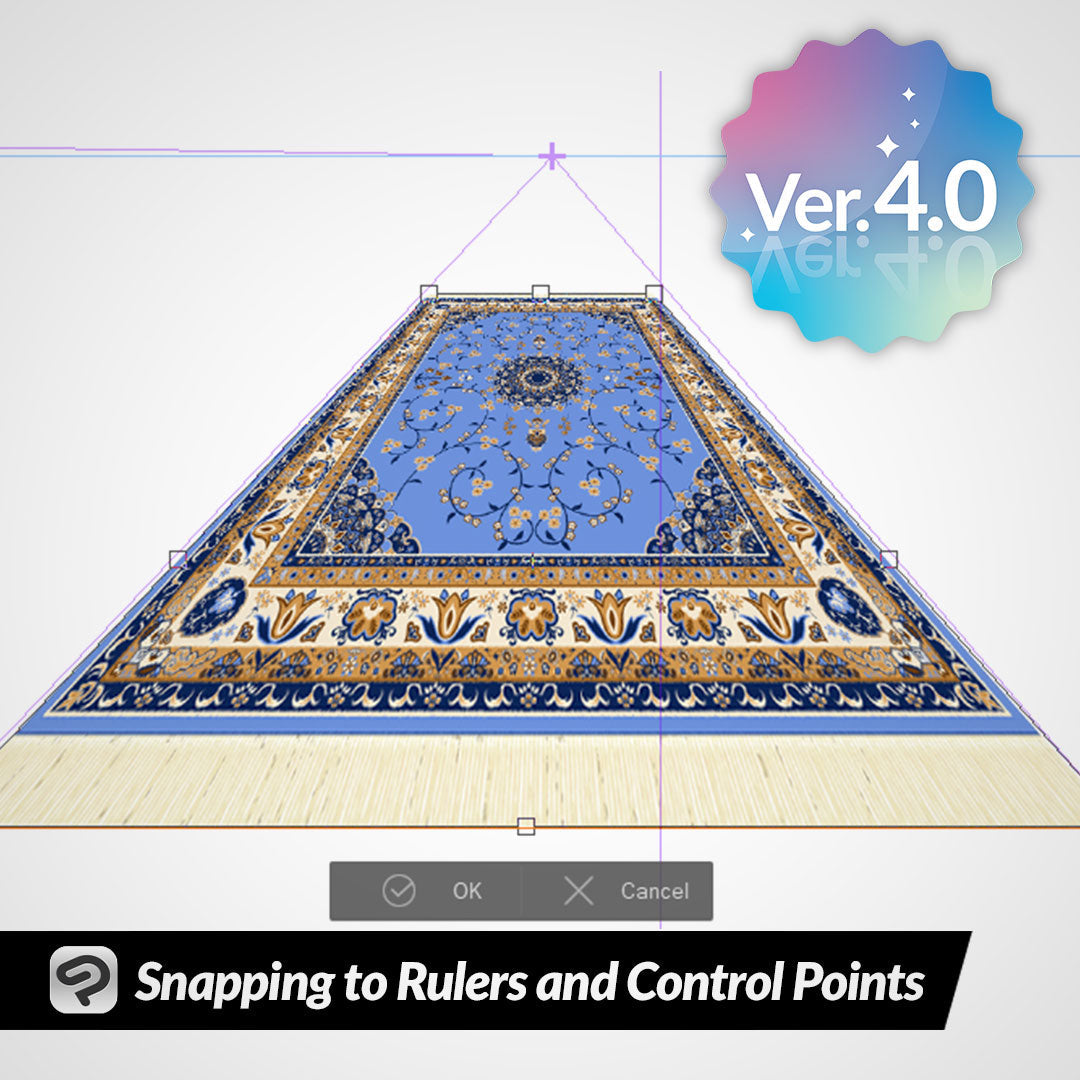
Start by going to View - Snap and making sure that “Snap to Rulers” or “Snap to Special Rulers” is turned on. For this example I’ve created a one-point perspective ruler.

Next I’m going to load this image material of a rug design.

If you are importing an image instead of using something from the Material Library, you may need to right-click on the layer in the layer palette and click on Convert Layer, then convert it to an Image Material layer. This will allow the snapping to work.
For the rug material, I clicked on Edit - Transform - Free Transform so that each control point can be moved independently. The orange line tells you when a point is in line with the perspective ruler.

By moving each corner until it has snapped to the ruler, now the rug is lined up in perspective!

This feature also works the same way with two point perspective. Follow the same steps as before, but this time we want to make sure that we are snapping to the correct vanishing point by carefully watching the orange snapping lines.

Using this new technique it’s very easy to get elements to snap to perspective and save a ton of time without trying to line them up to the ruler guides by hand!

Symmetrical Ruler Snapping
Now let’s try a Symmetrical ruler! For this example I’m using a simple 2 lines of symmetry ruler. On the left I drew a circle on a vector layer.
Using the Object tool, I can move one circle and snap it to the symmetry ruler with the control points of the circle.

I wanted to see if I could snap a raster layer and the vector layer, so I tried that as well by creating a raster layer and drawing one straight line on it. To my surprise, you can snap raster elements to vector elements and to the symmetry ruler as well!

Vector Control Point Snapping
Another way to use snapping is to snap vector control points to one another. With this option on you can quickly line up vector control points with one another. For instance, in the screenshot below I have snapped the control point on the end of the vector line to a control point on the top of the circle. This is so handy for quickly lining up vector elements with one another! Again, watch for the orange line to be sure that your control points have snapped to one another to ensure they are in the proper position.
Conclusion
There are so many benefits to being able to snap elements together, from making sure that vector lines meet up to one another without gaps, to designing layouts, to making symmetrical patterns. If you are looking for precision then I definitely recommend turning the snapping options on and giving them a try!
For more information on CLIP Studio Paint, please visit https://www.clipstudio.net/en or https://graphixly.com