Saving Images to the Materials Library
Contact Graphixly @
Hello! My name is Liz Staley and I’m a long-time user of Clip Studio Paint (I started using the program back when it was known as Manga Studio 4!). I was a beta-tester on the Manga Studio 5 program and for Clip Studio Paint, and I have written three books and several video courses about the program. Many of you probably know my name from those books, in fact. I write weekly posts on Graphixly.com and on CSP Tips, so be sure to come back every week to learn more Clip Studio Tips and Tricks from me!
One of my favorite features of Clip Studio Paint is the Materials library. I think that it’s just an extremely convenient way to store assets that you use on a regular basis - whether that be a design for a character’s t-shirt, a fabric pattern for a school uniform’s plaid skirt, or a watermark that you use to protect your images. It’s a great way to save precious minutes of your time by not having to locate, open, and copy-paste those items into your new files all the time.
But how do we save our own assets into the Material Library? It’s easy, but requires a few steps and some considerations!
In this article we will cover the following topics:
Prepping Assets to be saved to Materials
Setting up a Material
Let’s dive right in!
Prepping Assets to be Saved to Materials
The first thing we’ll need to do to save an image to the Materials palette is… an image! (shocking, I know!) This can be really anything you want to use multiple times: a fabric pattern, a design for a shirt, a school uniform patch for a jacket, a watermark with your information, or designs for a character’s tattoos. Anything that you don’t want to draw over and over again is a great candidate for turning into a Material.
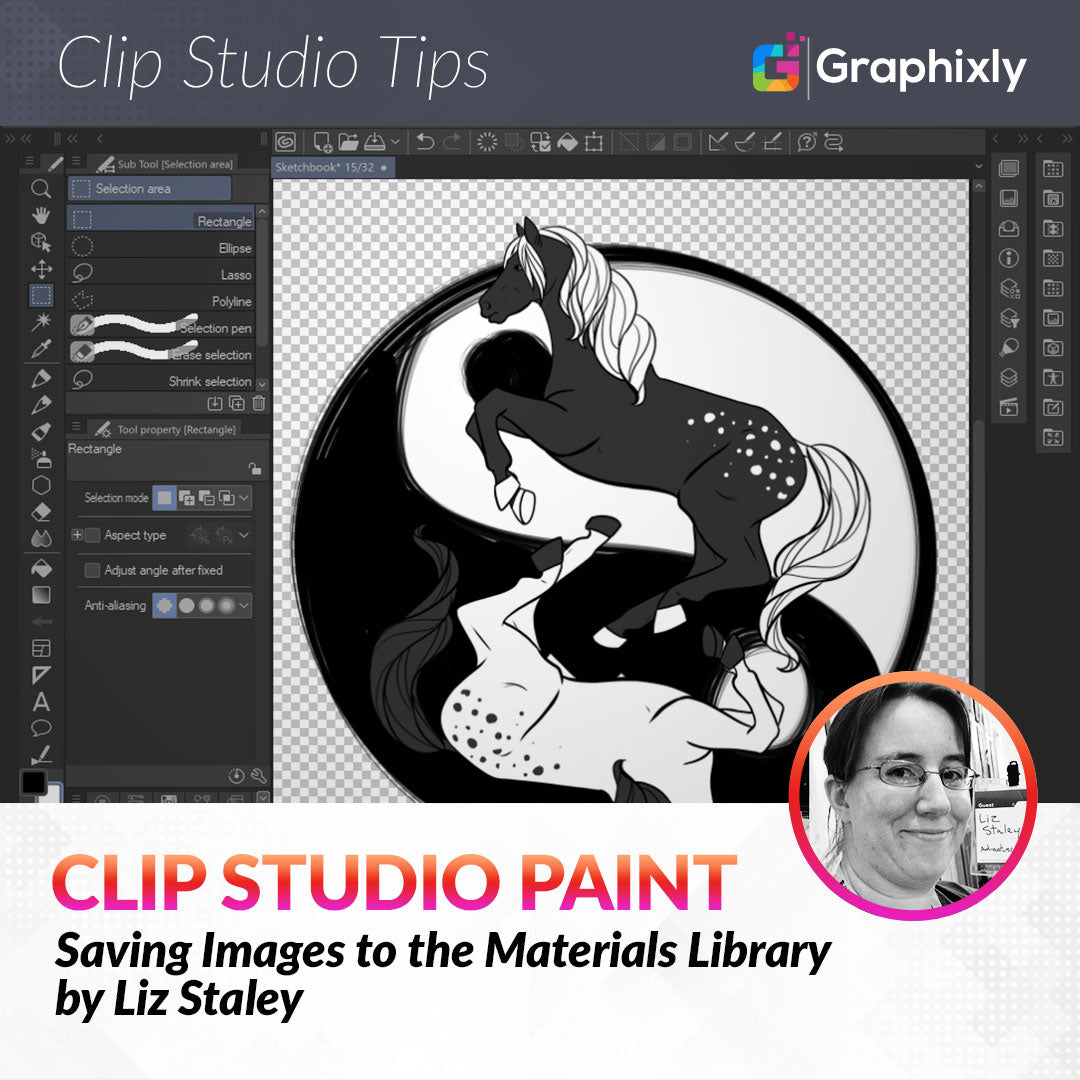
The image below is what I’ll be saving as a Material image for this example.

I have filled in the lines of this drawing with colors so that it can be used on multiple different background colors and the white and gray won’t have to be filled in each time. This is something you need to think about when making an image to be saved as a material. How will you use it? Will it be used on multiple background colors, or is it always going to be on the same color? Do you need to put down flat colors only, or are you going to include shading?
My purpose for this Material is as a graphic on a t-shirt, so I included the fill colors in order to make it work on different background colors. You’ll notice I’ve also kept the outside of the image transparent so it can be put on different colors.
If you are making something like a watermark with text that will be going over busy areas, you may want to include an outline stroke so that the text is legible no matter what it’s over top of.
Now that we have our image open in CSP, let’s start the process of saving it to the Materials Library. To begin this process, go to Edit - Register Material - Image, shown below.

The Material Property window will come up. This is where we’ll enter in all the details of our Material. But before we do that, let’s look at the Material Image thumbnail, shown on the middle left hand side of the Material Property window.

You can probably see that something is amiss with my thumbnail image! The Yin Yang background is missing and only the two horses are showing! Try to get into the habit of checking this area first before doing anything else so you can find any problems with your potential Material before you go through all the work of saving it.
Press Cancel or the X button to close out of the Material Property window to go back to editing your image if there are issues. In the Layer window below, you can see that I have my design broken up into several layers - the two horses, the Yin Yang lines, and then the white fill behind the Yin Yang lines. The layer with the horses is the current active layer, which is why it’s the only one that showed up in the Material Image thumbnail.

In order to save the horses and the Yin Yang design background to one Material, we need to combine those elements onto one layer. I also want to do this without getting rid of the transparent background, so “Flatten image” won’t be an option. Instead, go to Layer - Merge visible to new layer. This will take the currently visible elements (all the “on” layers) and combine them to a new layer.

I like using this option because then the original layers are still preserved. Sometimes I’ve flattened layers down and then forgotten and saved over the file, then realized the mistake when I went back and needed those layers. So making a copy layer with the combined elements is a much safer option!
Make sure that the layer with the combined elements is the active one, then go to Edit - Register Material - Image again.

Now our Material Image thumbnail matches up with the complete design! We can continue with saving the Material assets in the next section.
Setting Up a Material
Now that we have our image, and it’s combined on to one layer so everything will be save as our Material, let’s take a look at the rest of the Material Property window’s options to make sense of them.
The first option on the top right is the Material Name entry box. Enter a name for your Material here. Make it something that you’ll remember later!
Beneath the Material Image preview are two checkboxes. They are “Use for Paper Texture” and “Use for brush tip shape”. Unless making a paper texture or a brush tip, leave these checkboxes unchecked.
Now let’s move on to the various “Paste Operation” options in the middle of the Material Property window. These can be a little confusing at first glance, but they’re really easy to understand! First let’s look at the options for the “Scale up/down” checkbox.

This option makes it so that the Material has a transformation box around it when it’s put into the canvas from the Library. With the checkbox off, the Material is just pasted in and you’ll have to use the Scale function manually each time you use it. With something like a design for a shirt, I like to turn this option on so it can be adjusted right away to the scale of the current drawing.
The dropdown menu has options that control how the Material is pasted in. These are described below:
Adjust after pasting - Pastes the Material in at full size with a scale/rotate bounding box.
Expand in Full - Pastes in at a scale to completely cover the destination. This option is perfect for backgrounds.
Fit to Scale - Fits the destination’s scale. (i.e. a comic panel)
Adjust according to Destination - Scale is adjusted up or down according to the size of the destination.
Fit to Text - Scales according to text at the destination area. This is useful for materials like speech balloons.
For most items, Adjust After Pasting will be fine. I like this option because I can scale the material up or down quickly to exactly the size I need it instead of relying on the computer to do the thinking for me.
The next checkbox is called Tiling. When this option is turned on, it also activates the Tiling Direction dropdown below it. Let’s look at the Tiling options first.

Tiling is a way to make the Material repeat more than once across the canvas. On the Repeat option from the drop down, CSP will take the material image and simply repeat it over and over again across the canvas.
By changing the Tiling option to Reverse, the program will mirror the image across the canvas instead. In the Material Image thumbnail below, note that the top and bottom horses’ heads are mirrored above and below them, and that the left and right sides of the design are also mirrored into the next instance of the design.

The Flip tiling option takes the base image and mirrors it, then repeats that. Note that the black horse in the Material Image thumbnail below is now facing to the right instead of the left.

The Tiling Direction options are pretty straight-forward. By default this option is on “Vertical and Horizontal”, which repeats the image in both directions all the way across the destination layer. This makes a repeating pattern.
The image below shows the “Only horizontal” option, which repeats the image only in one horizontal line instead of spreading it in both directions.

The third Tiling Direction option is called “Only vertical”, and it does the opposite of the Horizontal option!

For the purposes that I’m going to be using this image, Tiling isn’t needed so I’m going to turn the Tiling options off.
The last set of options in the middle section is the Specify Order in Layer Palette, shown below.

When this option is activated, the order that the Material will be pasted into the layer “stack” in the appropriate position. For instance, when saving an image that will be used for backgrounds, selecting the “Background, etc” radio button will make the image appear in the bottom of the layer palette stack. This can then be rearranged later, but if you are making something that you know you always will have in the background, it can save time to set it up so that CSP always puts it there.
Because the image I’ve been working with in this article is going to be used for a shirt design, I’m going to leave the order set to “Sound effect” so that it shows up at the top of the stack.
Finally, let’s look at the two options on the right hand side of the Material Property window. The top one is called Choose Save Location. The Material Library has different categories and folders to organize your assets in. You’ll want to choose the appropriate folder for the material you’re creating at the time.
In the image below I’ve chosen the Image material folder, then the “Decoration” subfolder.

The final box is the Search tag addition and I HIGHLY recommend you don’t skip adding tags when you save Materials. It takes an extra few seconds and can save you tons of time later on when you’re trying to find a specific thing you’ve created but you can remember what you titled it or which folder it’s in. If you don’t want to extensively tag assets, I suggest choosing at least one tag that you always use in the Materials you create so you can find all your creations. I use the word “custom” to tag all my works.
To add a tag, click on the little icon at the bottom right of the Search tag box, then type in a tag and hit Enter on your keyboard. Do this for each tag you want to add. The tags I chose for my Material are shown below.

Now that we’ve chosen all our options, click on OK to finish saving the Material to your library.
Looking at the Material Library under “All Materials” we can see our new asset right at the top of the list!

To search for a specific tag, use the “Type search keywords” box and enter a tag. In the following image I’ve entered my “custom” tag, and you can see that this brings up anything I’ve made with the matching keyword.

To add a Material to the current canvas, you can either click-and-drag the material from the Library to the canvas, or select the Material and click on the icon indicated by the red arrow in the screenshot below.

For my tips on how to use Patterns and Materials in convincing ways on your illustrations, check out this article by me! https://tips.clip-studio.com/en-us/articles/3586#3c309ac0
Conclusion
The Materials Library is a great way to keep designs and drawings you use often at your fingertips. If you want to learn in detail how to create great repeating patterns for fabric designs, check out this article: https://tips.clip-studio.com/en-us/articles/3273
For more information on CLIP Studio Paint, please visit https://www.clipstudio.net/en or https://graphixly.com