Saving Custom Export Settings
Contact Graphixly @
Hello! My name is Liz Staley and I’m a long-time user of Clip Studio Paint (I started using the program back when it was known as Manga Studio 4!). I was a beta-tester on the Manga Studio 5 program and for Clip Studio Paint, and I have written three books and several video courses about the program. Many of you probably know my name from those books, in fact. I write weekly posts on Graphixly.com and on CSP Tips, so be sure to come back every week to learn more Clip Studio Tips and Tricks from me!
In this article we will cover the following topics:
Understanding Export Settings
Adding a Watermark
Saving Custom Export Settings
Let’s save our drawings to share with the world!
Understanding Export Settings
First, let’s take a look at the Export settings window and talk about each option so we understand what they all do. In this article I will be creating and saving export settings for sharing an image online. You may need to adjust your settings depending on what you are exporting for, such as making images to send to a printer.
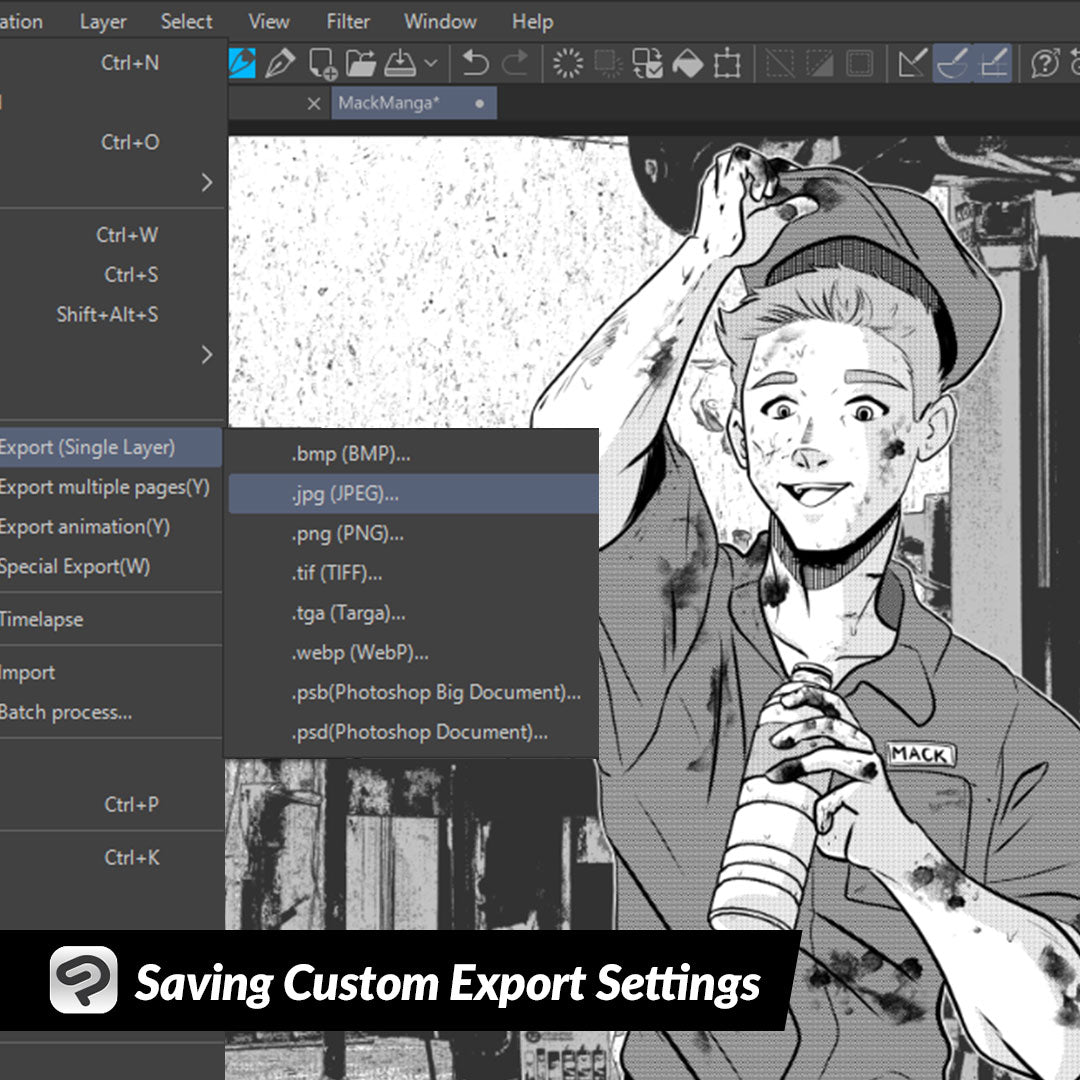
I’ll begin by clicking on File - Export (single layer) - JPG. JPG files are a standard for sharing online because they have compression, which make the image file size smaller so they are easier to upload to websites. This also means that you won’t be sharing your work at large resolution, which makes it harder for unscrupulous people to steal!

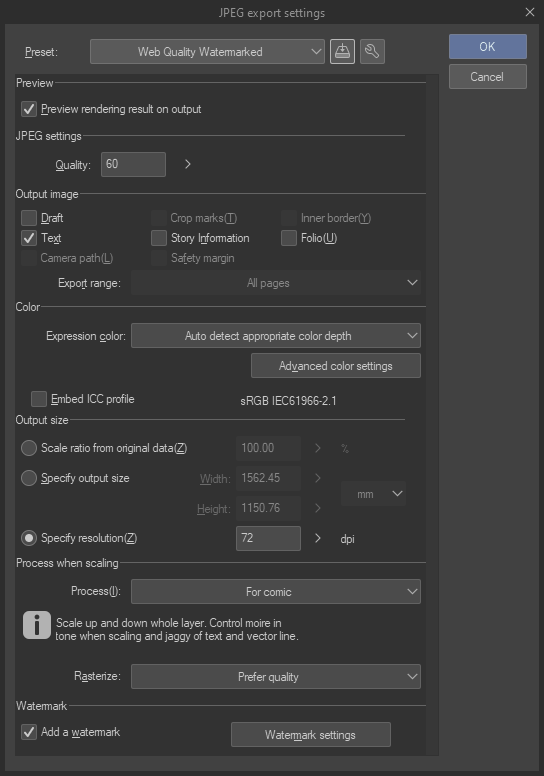
The export settings window looks a bit intimidating at first, but we’ll break it down and explain what you need to know for each option.
Checking the box next to “Preview rendering result on output” will allow you to see a preview of how your exported image will look before it is saved. I like having this option on so I can check the size and the quality of the image before committing to it.
Under the JPEG settings there are a bunch of checkboxes that allow you to control whether or not a special type of layer gets exported as well. For example, if there are text layers present but we wanted to export a version with no text, we can uncheck the “Text” option while exporting and any text will be excluded from the exported image. If you have layers set to Draft that are visible, checking or unchecking the Draft option will control whether that layer is included in the export.
If you are using a canvas with borders, crop marks, story information, or folio information, you can choose whether to export them or not by checking on unchecking the appropriate option.
If you have Clip Studio Paint EX and are exporting from a multi-page document, you can change the export range in the dropdown menu. Since I am working from a single illustration, this option is grayed out.

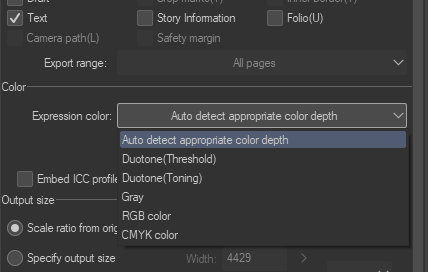
Now let’s look at the Color category of options. There are quite a few options in the Expression color dropdown. Usually the “Auto detect appropriate color depth” option is perfectly fine. This option looks at your file and determines what color expression the layers are set at, then automatically exports based on those parameters.

The other options can be used to change the color expression of the image upon export. All the examples below are exports of one image that was created in RGB color, the only thing changed is the option in the Expression color dropdown in the Export settings.

If you’re not sure of the difference between CMYK and RGB color, you can find more information in this previous article from me! https://tips.clip-studio.com/en-us/articles/5656
The next category of options is the Output size, which allows us to change the size of the exported image in one of three ways. The first option is a percentage scale from the original data. If set to 100% then the export size will be the same size as the original canvas, but you can make the canvas proportionally smaller or larger by entering a smaller or larger number here.
Using Specify output size allows us to put in exact dimensions of the final image that we want. The dropdown on the right allows us to change the type of measurement to everything from centimeters to pixels. Typing a new number into either the width or height box will then change the other dimension accordingly.

Specify resolution can also be used if you want to export at a specific resolution. Images for the internet are 72dpi. It is never advisable to upload an image above 72dpi to the internet because this resolution is too low to create a nice print from so it deters most art thieves. However, if you are exporting for print you may want to set this to at least 300dpi.
Note - if you are sending your file to a professional printer, be sure to look at their file requirements to see if they have dpi preferences before exporting!

I have found that the Process When Scaling options are only really important when exporting something with screentones. Most of the time if you are exporting regular grayscale or colored images, you can leave it on “For illustration” without worrying. However, if you are exporting something with screentones - as I am in the example for this article! - switch this to “For comic”. This scales while reducing the moire pattern that can occur when using screentones.

Beneath the Process when scaling option is a checkbox for “Add watermark”, and then a button to click to change Watermark settings. We will be covering the watermark settings in the next section!
Adding a Watermark
Being able to add a watermark upon export is one of the best features that has ever been added to CSP, if you ask me! It’s so much more convenient, and once you have this set up then you never have to worry about forgetting to watermark your work again!
In the Watermark settings window click on the Files button to choose an image that you'd like to use for your watermark.

Once you have chosen and loaded your watermark you can use the bounding box controls to scale, rotate, and reposition it on your image preview.

The Blending Mode dropdown menu allows you to change the blending mode of your watermark, which changes how it looks and interacts with the image below. In the screenshot below I have changed the blending mode to Multiply, which allows the watermark to be changed by the image below.

In addition to the Blending Mode, there is also the option to change the Opacity using the slider. Usually for a watermark I like to lower the opacity to at least 50% so that the image behind it can still be seen through the watermark.

If you want to really decrease the likelihood of art theft, you can also have your watermark tile across the finished image. Tiling makes the watermark repeat across the image in either or both directions. To turn tiling on, click on the checkbox next to the “Tiling” option.

Tiling has two dropdown menu controls, so let’s go over the first one. This controls how the watermark repeats. The default setting is “Repeat”, which just repeats the watermark without changes.
Changing this setting to Reverse will mirror the watermark both horizontally and vertically across the image.

Meanwhile, changing the option to Flip will make all tiles of the watermark be flipped from the original orientation.

The default setting for Tiling direction is “Vertical and horizontal”, which repeats the watermark in both directions. Changing this to “Only horizontal” will repeat the watermark in only the horizontal direction from where the watermark image is placed.

And, of course, changing this to “Only vertical” does the same, just in the vertical direction!

Once you have your watermark settings how you’d like them, click on OK to return to the Export settings.

Saving Custom Export Settings
To save your current export settings to a preset, click on the “Add to presets” icon in the Export Settings window.

Type in a name for your Preset, then choose which options you want to save the settings for. For instance, if you always want to choose a different output size, uncheck “Output size” and the current settings won’t be saved to your Preset.

Click on OK to complete the preset save. You should now see the name of your Preset in the “Preset” dropdown box.

Click on OK. If you chose to see a Preview then the Export preview window will come up (shown below). In this window you can zoom in or out to check the size and quality of the image, and change the file quality for JPG or other compressed file types. You can not change the dimensions of the export file from this window, so if it is too large or too small, click Cancel and try the export again with different size settings.

Click on OK in the Export preview window to finish the export. You can now share this file to the internet, take it to other programs, or send it to a printer depending on what your needs are!

Conclusion
I absolutely love being able to save Export presets. Back when I was creating a webcomic this would have been such a time saver rather than having to enter in the image dimensions and quality each time I exported pages! If you use the same settings for certain projects, I highly recommend making use of this feature to save time!
For more information on CLIP Studio Paint, please visit https://www.clipstudio.net/en or https://graphixly.com