Rulers Part 5 - Symmetrical Ruler
Contact Graphixly @
Hello! My name is Liz Staley and I’m a long-time user of Clip Studio Paint (I started using the program back when it was known as Manga Studio 4!). I was a beta-tester on the Manga Studio 5 program and for Clip Studio Paint, and I have written three books and several video courses about the program. Many of you probably know my name from those books, in fact. I write weekly posts on Graphixly.com and on CSP Tips, so be sure to come back every week to learn more Clip Studio Tips and Tricks from me!
When I first learned about this software, it was the Perspective Ruler tool that made me realize how awesome it was and influenced my decision to start using it. And I still think that the built-in ruler tools are one of the coolest features in CSP. Covering all the ruler tools in one tutorial would result in a huge amount of text, so I’m going to break this up into parts! This is Part Five of the How To Use Ruler Tools series. In the previous installments we covered the Linear Ruler, Curve Ruler, Figure Ruler, Ruler Pen, and Special Ruler tools.
In this article we will cover the following topics:
Symmetrical Ruler Settings
Using the Symmetrical Ruler
Let’s dive right in and get started!
Symmetrical Ruler Settings
As we’ve done with all the ruler tools so far in this series, let’s take a look at the settings that are available for the Symmetrical Ruler.
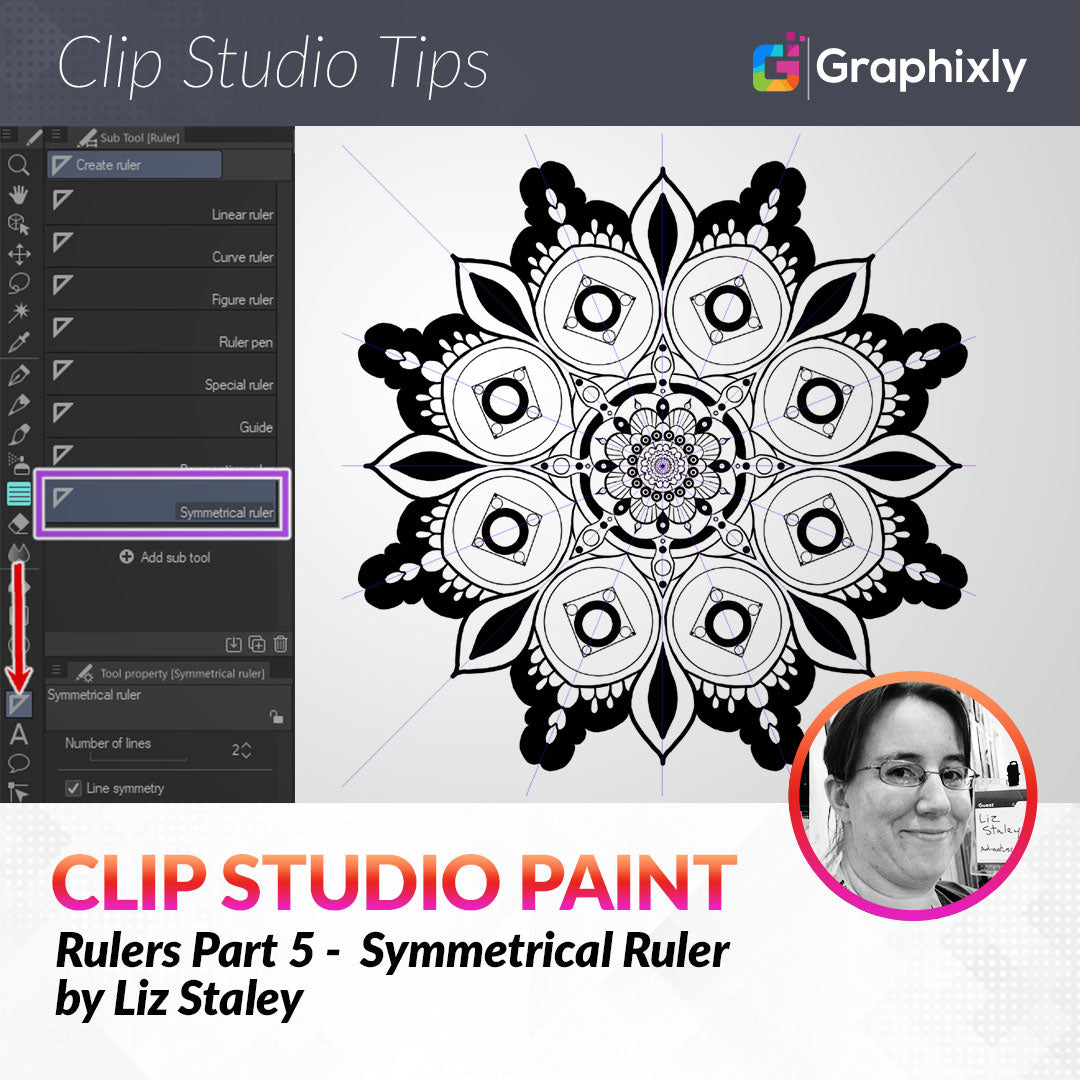
To get to the Symmetrical ruler, click on the Ruler tool group marked by the red arrow in the image below. Click the Symmetrical Ruler in the Sub Tool window. Then in the Tool Property window click on the small wrench icon in the lower right corner that the blue arrow is pointing to in the image below.

Clicking the wrench icon brings up the Sub Tool Detail window for that tool. This window has all the available options for the current tool, including some that might not be shown in the Tool Property window by default.
If you want an option from the Sub Tool Detail window to show in the Tool Property window, there’s a very simple way to do that! Simply look for the box on the left in front of the setting’s name. Options that show in the Tool Property will be filled in with blue and have a small eye icon inside the box in front of the setting name. Options that aren’t shown will be gray and empty. Click in the box to either hide or show settings from the Tool Property window.
Now let’s take a look at the Sub Tool Detail for the Symmetrical ruler, which is shown in the following image.

Let’s go down the list of options and talk about what each one does.
Number of Lines is a little difficult to describe if you don’t know what the symmetrical ruler does. But basically this option controls how many times your lines will be “mirrored” around your canvas by the ruler. The minimum value is 2, which means that whatever you draw on one side of the ruler will be mirrored 1 time across the ruler. The maximum number is 16, which will give you 16 “wedges” around the ruler. We’ll explore this more in the next section so don’t feel bad if this doesn’t make sense just yet!
The Line Symmetry checkbox turns line symmetry into what is called rotational symmetry. Take a look at the following example.

Each of these examples was made with a ruler with a Number of Lines of 4, so the drawing is being repeated four times in total around the ruler. With Line symmetry on, the design is mirrored and “flipped” along the ruler. But with Line Symmetry off (which then turns it into rotational symmetry instead), the design is simply rotated around into each section of the ruler. Line Symmetry can only be used for rulers with an even number of lines, rotational symmetry is used for rulers with an odd Number of Lines settings.
Step of Angle allows you to set a minimum rotation angle for the ruler.
The Create at Editing Layer checkbox controls where the ruler is created. With the checkbox on, the ruler will be made at whatever layer is currently active. With the option turned off, a new layer will be made for the ruler.
Now that we’ve taken a quick look at the Symmetrical ruler’s options, let’s create some art with it in the next section!
Using the Symmetrical Ruler
Symmetry is the quality of having exactly similar parts either facing each other or arranged around an axis. So, the symmetrical ruler helps us create drawings that are mirror across one axis or around a central point.
The symmetrical ruler is great for creating logos, designs, or easily making character designs that are the same on each side. Personally, I don’t normally use this ruler for characters, but it can be handy when drawing mechas or other man-made objects.
Even though I don’t normally use this tool for drawing characters, that’s exactly what I’m going to do in the example in this section. The drawing below is of a character I sketched up for this article.

I only fleshed out the left side of the sketch because I’m going to use the Symmetrical Ruler to do the inking on this drawing. The purple line down the center of the character’s face is actually my Symmetrical Ruler, already set up.
To create a Symmetrical Ruler, simply set the Number of Lines and any other settings (detailed in the first section of this article). When the Number of Lines is set to 2, it will create a ruler that simply mirrors across the ruler. For this ruler, I want to mirror from the left side of the face over to the right side when I do the inking, so I found the center point of the face. Then, with the Symmetrical Ruler tool, click and drag with the cursor. In the ruler above, I clicked at the point of the chin and dragged up while holding down the SHIFT key to ensure that my ruler would be precisely 90 degrees.
The line where you draw your ruler at is the “mirror” that will reflect the lines you make, so set it along the area where you want the mirroring to occur. If we were creating something like a landscape that was being reflected into water, we could draw the line horizontally and then draw above the ruler line to create a copy that is upside down below the ruler line.
For this front-view character drawing, however, a 90 degree vertical line is what we need!
Now that the ruler is set up, we can create our drawing on one side and it will automatically be flipped and mirrored on to the other side as we go. Since I’m left handed, I tend to work on the left side of the canvas. Almost any drawing tools will work with this ruler, by the way, including the Direct Drawing tools (straight lines, ellipse tools, rectangle tool, etc). There is one drawing tool that doesn’t work with the Symmetrical Ruler tool, however, and that is the Eraser.
In the screenshot below, I’ve completed all the inking on the left side of my character’s face. Because of the ruler, the right side of the face has automatically been inked as well. However, there’s a little adjustment that needs to be made!

I’m using the “anime nose” of just a small triangle, but the Symmetrical Ruler has mirror the nose across the face, making the character look like they have a skeleton nose! That’s okay, because the fix is very easy. The Eraser tool doesn’t mirror, so all we need to do in this case is take the eraser and erase one side of the “nose triangle”.

If you want to add details that aren’t symmetrical to make the image look a little more natural, it’s easy to turn your ruler off so you can continue drawing or inking on the same layer. To turn a ruler off without clearing it or going to another layer, first click on the Operation - Object tool, then click on the ruler line.
Find the small diamond shaped control slightly off the ruler line, shown by the arrow in the image below, then click on it.

Your ruler will change colors depending on the settings in your Preferences. The default colors for CSP are purple for an “on” ruler and green for an “off” ruler. In the image below you can see that the ruler line up the center of the face is green now because the ruler is off, so the pink line wasn’t mirrored because the ruler is no longer active.

Now that we know how to make a simple symmetrical drawing, let’s create something a little more complex! The ruler below is made with the maximum Number of Lines.

Because the number of lines is even (16), we can keep the Line Symmetry on so that each “wedge” of the ruler gets mirrored into the next one instead of every section facing the same direction as we draw. This means we can draw mandalas or snowflake type designs.
Using just a pen tool, circle tool, straight line tool, and the Fill tool, it’s easy to create a very complex design like the one in the image below!

With the Line Symmetry checkbox turned off and Clip Studio using rotational symmetry instead, the same design would look like this instead:

Now you know how to make complex symmetrical designs easily, no matter how many times you need the design repeated around!
Conclusion
In this article we learned about the Symmetrical Ruler, which is an easy way to make images (or portions of images) that have the same elements either mirrored or repeated around a central axis. Whether you want to create a robot design or a mandala for a coloring book page, this ruler is a great tool to have in your toolbox to save a lot of time!
For more information on CLIP Studio Paint, please visit https://www.clipstudio.net/en or https://graphixly.com
1 comments
I know this is an old article, but there is a way to snap the eraser and make it able to erase with the symmetry tool! You go to the wrench of whatever your eraser is, go to Correction then hit the checkmark next to “Enable Snapping” and it’ll snap the eraser to the ruler.