Making an Animatic Part One
Contact Graphixly @
Hello! My name is Liz Staley and I’m a long-time user of Clip Studio Paint (I started using the program back when it was known as Manga Studio 4!). I was a beta-tester on the Manga Studio 5 program and for Clip Studio Paint, and I have written three books and several video courses about the program. Many of you probably know my name from those books, in fact. I write weekly posts on Graphixly.com and on CSP Tips, so be sure to come back every week to learn more Clip Studio Tips and Tricks from me!
What is an animatic? Animatics are blueprints for an animation or film. They are animated versions of storyboards, usually set to voiceover and music, that provide you with a plan for your project. Without an animatic you may run into problems with timing, composition, and other elements. Animatics are like the rough thumbnail sketch of your project, where you can check for issues and make sure you have a great plan of character and camera movements, and that all your shot compositions make sense. They can be rough sketches and scribbles, or they can be highly detailed and polished - it’s up to you the level of detail to go into for your animatic!
You can see an example of an animatic alongside its final animation counterpart in this video from the Pixar YouTube channel: https://youtu.be/0adjUjhjEFs
In this article we will cover the following topics:
Writing Your Script
Creating Character Reference Sheets
Making your Storyboards
Let’s dive right in!
Writing Your Script
Even if you aren’t working with a team, writing a script is a crucial first step when starting a project. Scripting allows you to plan out your shots so that you know exactly what backgrounds, characters, and props you will need to design.
When writing scripts for ‘the industry’, there is a set format that you should use. The script format for animation is the same as for any other movie or television screenplay. This is a standardized format that goes shot-by-shot, describing setting, camera angles, and laying out character dialog.
Below is an example of the script that I wrote for the animatic I’ll be making in this series of articles.

I chose to write my script in Google Docs for simplicity’s sake, but there are also lots of script writing software options out there for those who want to write scripts more easily and not have to do the formatting by hand. Some of these software options are free, where some have a subscription or one-time cost that can range anywhere from a few dollars to hundreds of dollars. Some are very minimal and only feature a basic word processor with some formatting features, while others can help you keep track of character profiles, concept art, settings, story outlines, and more. Whether you get specialized software or just use a basic word processor like OpenOffice or GoogleDocs is up to you.
This article has suggestions for free script-writing software for those who want a program to do the formatting for them. I have not tried any of the suggestions in this article for myself, so be sure to look for other reviews and research the software that you’re interested in before downloading!
https://www.scriptreaderpro.com/free-screenwriting-software/
If you’re just creating a script for yourself and not working with a team of animators or other artists, you can really write your script in any format that works for you!
Remember to be detailed in your script, especially if you’re working with other artists. Include descriptions of characters, settings, props, camera angles, and camera movements if you have specific ones in mind. Another thing to consider though is to try not to be TOO detailed if working with other creatives. A script and descriptions that are too micromanaging can be stifling to a lot of artists, so it’s nice to leave a bit of room for artistic input.
Of course if you’re the only one who will be working on the project, be as detailed or as vague as you’d like for yourself!
Once you have your project scripted out, make sure to go over the script a time or two to check for any changes that need to be made. Read dialog out loud to ensure it sounds natural and makes sense. It can be helpful to have someone you trust read over your script as well to give feedback.
When you have your script written out, it’s time to get in to drawing!
Creating Character Reference Sheets
Character reference sheets (sometimes called “turnarounds”) show all the characters or creatures in your animation from a variety of angles. For major productions you will usually have many different reference sheets showing the character’s full body look, expressions, and different body movements as well. These tell the personality of the character and also are distributed among the various artists and animators to make sure that characters stay “on model”, or looking the same no matter who is animating the sequence.
Even if you’re not working with a team, nailing down your character designs before starting to animate will save you a lot of headache later on. You want to keep your characters looking consistent as they move around, so doing this planning and designing work ahead of time will be invaluable later as you’re animating.
Before you begin the animation process you should make sure you have your character(s) designed and that you know their personality and how they would emote. Script writing can tell you how your character would talk, but personality and goals will influence how they move and react. For instance, a shy character’s body language will be very different to an outgoing character’s movements.
Using a height chart for your character turnarounds can be very useful. These help you draw your character at the appropriate scale and to keep multiple characters in scale to each other. An example of one of my characters’ turnarounds with a height chart is shown below.

When I went to create this turnaround, I couldn’t find a height chart that was in feet instead of centimeters, so I created the one above and made it available for free on the CSP Assets library! You can find that resource here if you’d like to use it: https://assets.clip-studio.com/en-us/detail?id=1894715
While doing your character designs you should also design anything else you will need to draw for your project. For instance: environments, props, weapons, creatures, vehicles, and other key items. It can also be helpful to have a folder of reference images to look at while you’re creating your animation. You can then put these reference images in the Sub View window in CSP and access them easily while working on your storyboards and your finished project (if the finished project will be animated!)
Once you have your characters and other elements designed, it’s time to create your storyboards.
Making Your Storyboards
Storyboards are made up of panels like a comic book, but all the panels are usually the same size and they show what will be in each shot of your finished project. You can work out camera angles, character and camera movements, pacing, dialog, action framing, and more using storyboards, so they’re a very important part of creating an animation or even live-action project.
The first thing you need to decide when you begin creating your storyboards is what aspect ratio you will be using for your final project. An aspect ratio is the relationship between the width and height of something. In this case we’re talking about the aspect ratio of whatever screen size our project will be displayed on. At one time, movies and TV were shot in different aspect ratios because movie screens were different proportions to TV screens. With current technology, our TVs and computer monitors are now in wider aspect ratios. However, now we have video for Instagram and TikTok that are formatted as a square (a 1:1 ratio) instead of a long skinny rectangle! So if you are creating storyboards for square “mobile formatted” video, you’ll want to create a perfectly square frame for your panels.
Back on October 30, 2020 I posted a CSP Tips post that showed how to create your own Framing Template for creating storyboards in Clip Studio Paint EX. You can find that article at this link: https://tips.clip-studio.com/en-us/articles/3886
Remember when you’re drawing storyboards that you aren’t drawing a graphic novel - your drawings don’t have to be extremely polished and perfect! Storyboards are a utilitarian form of art, meant to make a plan. Think of them almost as thumbnails for the finished shots. Unless someone is paying you to make them perfect, don’t sweat them too much.
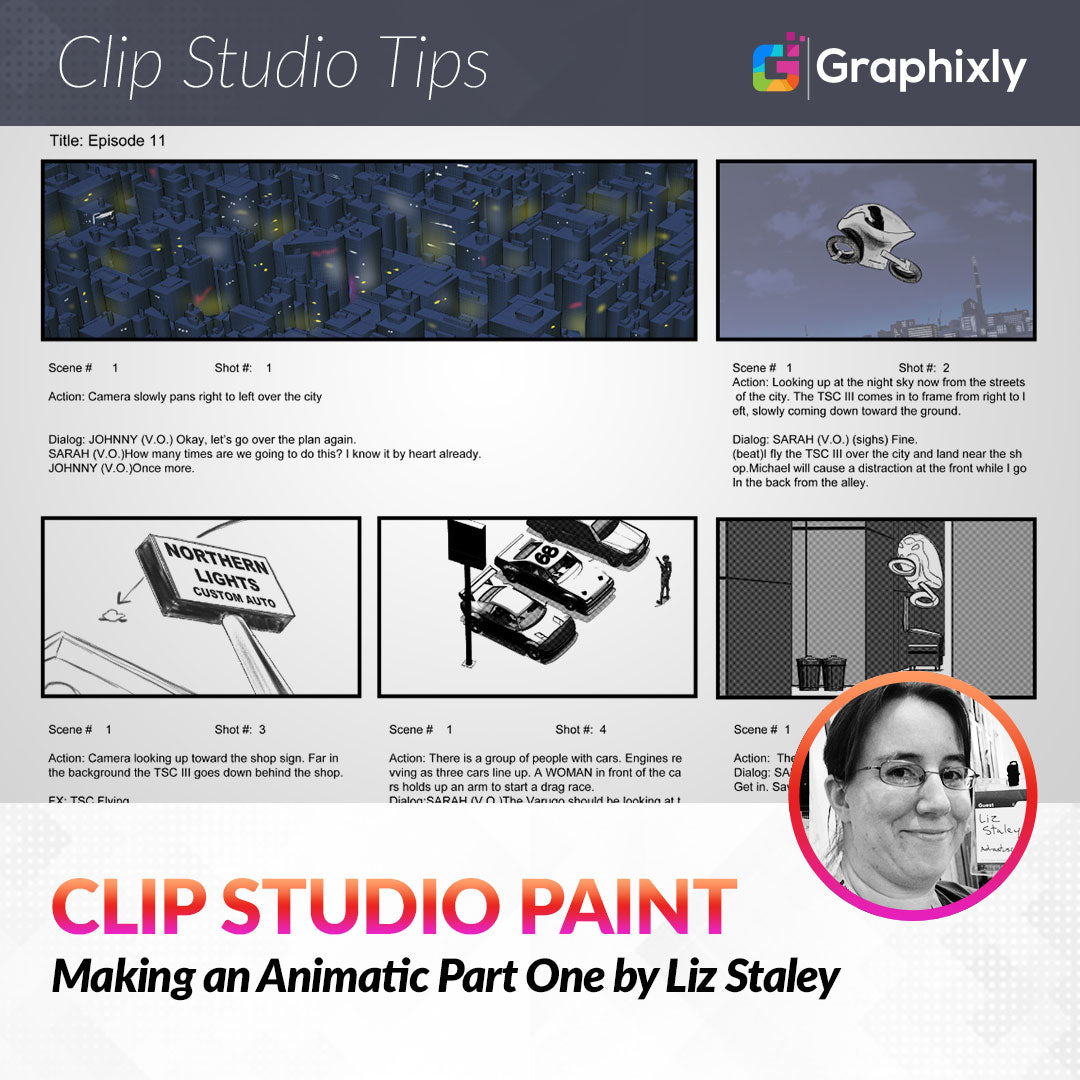
For the storyboards I created to go with the script from the first section of this article, I used several 3D assets to make the process of laying out my shots faster. Having access to assets is one of the great ways that Clip Studio Paint can make storyboarding easier!

Assets used in the storyboards above are:
City 3D model https://assets.clip-studio.com/en-us/detail?id=1685396
Coupe Sport car: https://assets.clip-studio.com/en-us/detail?id=1883799
Drift Car: https://assets.clip-studio.com/en-us/detail?id=1882667
Dumpster: https://assets.clip-studio.com/en-us/detail?id=1889432
Trash can: https://assets.clip-studio.com/en-us/detail?id=1889441
Notice that I made the first shot’s panel take up two spaces. This is because in the storyboard it will be a panning shot over the city, going from right to left. I could also indicate this camera movement in the storyboard art by using arrows and boxes to represent the movement and the first and last position of the camera, like in the image below.

Once you have your storyboards drawn out, check them over for any obvious problems like breaking the 180 degree rule. This is a ‘rule’ in filmmaking and animation where you draw an imaginary line through the center of your scene and always keep your camera angle on one side of that imaginary line. This way your characters don’t ever face the “wrong” direction, which can cause confusion. The image below illustrates the 180 degree rule. The red dotted line is the imaginary line through the scene. The camera on the top part of the image is breaking the 180 degree rule.

This is important because if a character is suddenly facing a different direction it can be confusing for the audience. Say you have two characters talking to one another. One is facing to the left, and one to the right. If suddenly you change between shots of the characters and they’re both facing left, the audience may get confused about where the characters are and why one of them suddenly moved.
You can, of course, show your characters moving in the scene, but make sure that you include the action in your shot instead of having it between shots to avoid confusion.
One of the best ways to learn how to create clear storyboards is to look at storyboards! A simple search on the internet can provide you with tons of reference images for how storyboards are drawn. And, of course, if you are the only one working on your project you don’t have to worry about how detailed the storyboards are so long as you know what they mean. If you are working with a production team, however, your storyboards should be clear enough for everyone on the team to understand them.
Finally, get some feedback on your storyboards from a trusted friend if you are working by yourself (if you’re working with a production team you’ll be getting lots of feedback from the director!) to make sure you didn’t miss anything that’s out of place or confusing.
In the next part we’ll learn how to take our storyboards and turn them into an animatic using Clip Studio Paint, so stay tuned!
Conclusion
Proper planning goes a long way in making any sort of animation, film, or even TV show. Make sure that you get the necessary prep work out of the way so the production of your finished project goes as smoothly as possible!
For more information on CLIP Studio Paint, please visit https://www.clipstudio.net/en or https://graphixly.com