Magnetic Lasso Tool
Contact Graphixly @
Hello! My name is Liz Staley and I’m a long-time user of Clip Studio Paint (I started using the program back when it was known as Manga Studio 4!). I was a beta-tester on the Manga Studio 5 program and for Clip Studio Paint, and I have written three books and several video courses about the program. Many of you probably know my name from those books, in fact. I write weekly posts on Graphixly.com and on CSP Tips, so be sure to come back every week to learn more Clip Studio Tips and Tricks from me!
As of March 12, 2025, Clip Studio Paint 4.0 has been released! There are lots of new features that I’m really excited to explore and to write about. And since I just was writing about selection tools the past two weeks, and there’s a brand new selection tool in 4.0, let’s start there!
In this article we will cover the following topics:
Using the Magnetic Lasso Tool
Let’s get to it!
Using the Magnetic Lasso Tool
After installing Clip Studio Paint 4.0, you will find the new Magnetic Lasso tool under the Selection Area category.

The magnetic lasso tool is fantastic for selecting complex areas that would be difficult to select using the other selection tools. This tool snaps to the edges of an area as you move along. For instance, let’s select the hair on this drawing, which would be a tedious process using the regular lasso tool because of the complexity.
Select the Magnetic Lasso tool and click at the edge of the area to be selected. You can then drag around the outside of the area, much like using the regular lasso tool, but this time the selection will “snap” to the lines of the area!

Now, as you can see, because of the small gaps along the hair line in my image, the selection isn’t perfect. (Actually, as we’ll see in a little bit, a large gap actually works a bit better!) However, along the rest of the hair it’s very accurate!
Also, for this example I am creating the selection on the Line Art layer, then switching to the flat color layer to fill in the selection.

Using the regular lasso tool, I’ll go ahead and quickly clean up the hairline area.

To make the Magnetic Lasso tool even easier to use for filling flat colors, let’s make one little adjustment! Select the line art layer and then click on the “Set as Reference Layer” icon, shown below.

Now we can go to another layer, such as the flat colors layer, and use the Magnetic Lasso tool to select areas according to the reference layer.

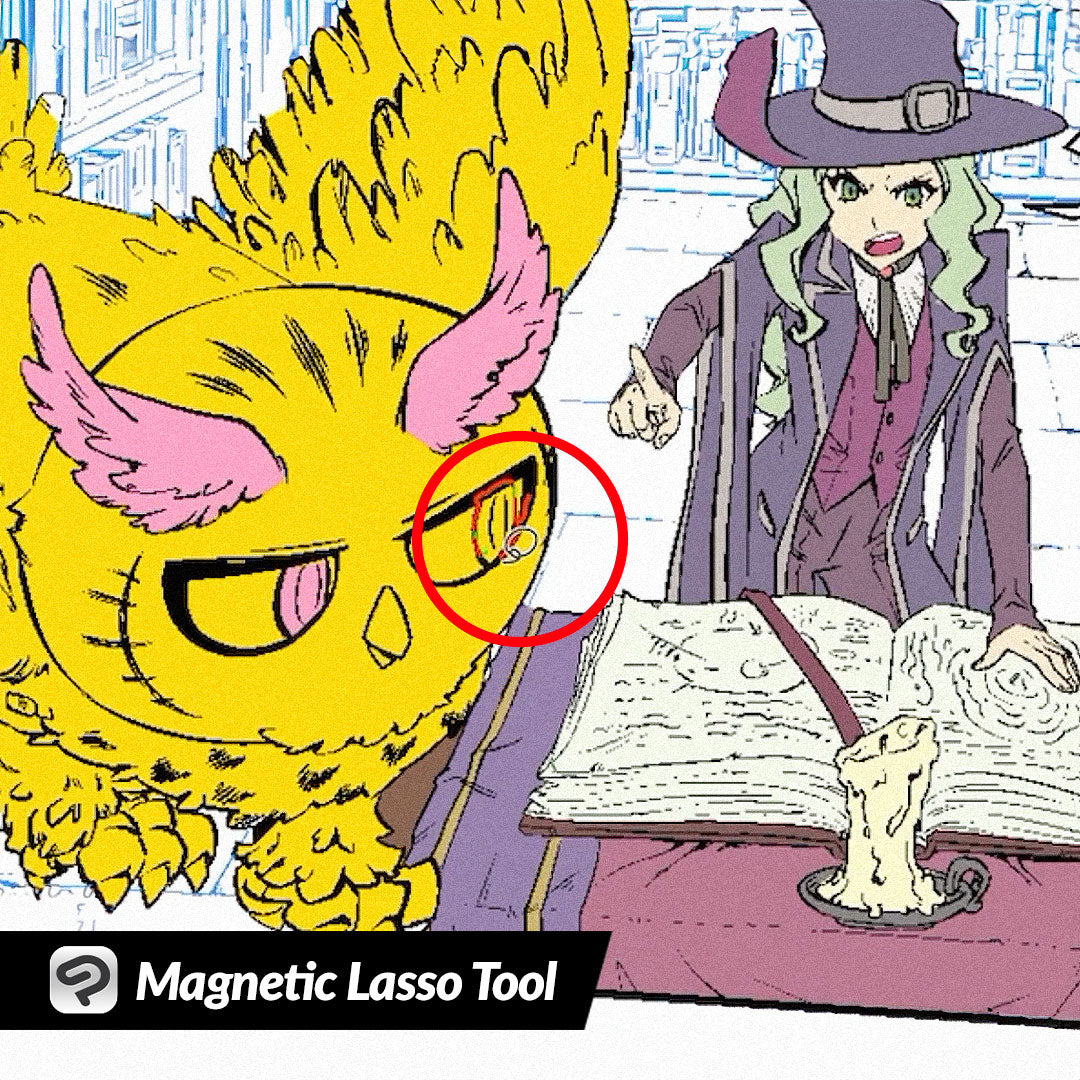
This tool is great for complex but mostly closed areas, or areas with large gaps, but not as good for areas that have small gaps. For instance, selecting the character’s eye didn’t work well because of the gap in the line at the bottom, so the magnetic lasso just snaps up to the iris line.

However, for the chest area it works very well because there is a large gap that it switches to freeform selection for until we get back to the line art.

Now we can easily fill this area, despite the huge gap at the bottom that would prevent us from using the Auto Select tool or the Fill tool.

Conclusion
This is such a useful tool that I missed from other graphics programs and I’m so excited that it’s now in Clip Studio Paint! Come back each week to explore more of the new features in Version 4.0!
For more information on CLIP Studio Paint, please visit https://www.clipstudio.net/en or https://graphixly.com