Inking with Vectors
Contact Graphixly @
Hello! My name is Liz Staley and I’m a long-time user of Clip Studio Paint (I started using the program back when it was known as Manga Studio 4!). I was a beta-tester on the Manga Studio 5 program and for Clip Studio Paint, and I have written three books and several video courses about the program. Many of you probably know my name from those books, in fact. I write weekly posts on Graphixly.com and on CSP Tips, so be sure to come back every week to learn more Clip Studio Tips and Tricks from me!
Iniking is probably my favorite step of the illustration process. But inking can cause some artists issues, especially if there are physical issues that prevent getting a nice looking ink line. One way that inking an image can be more accessible is to ink using vector layers. Vector layers are also awesome for inking man-made items that are smooth and technical, such as cars, robots, furniture, or (as we are going to do in this tutorial) something like a coffee cup. Let’s explore the vector tools of Clip Studio Paint and how they can help us create an inked image.
In this article we will cover the following topics:
Creating Vectors with Pen Tool
Using Figure Tools for Vectors
Let’s get to inking with vectors!
Creating Vectors with Pen Tool
When inking with vectors on more organic shapes, I like to use my regular inking tools on a vector layer to get a line with variation of width in it, but that can still be edited.
To get started, we’ll need a new Vector Layer. Working on a Vector Layer tells Clip Studio to render the lines using points instead of just pixels. This also allows us to edit those points after making our lines so that we can perfect them.
To create a vector layer, click on the New Vector Layer button in the Layer palette (shown below), or click on Layer - New Layer - Vector Layer.

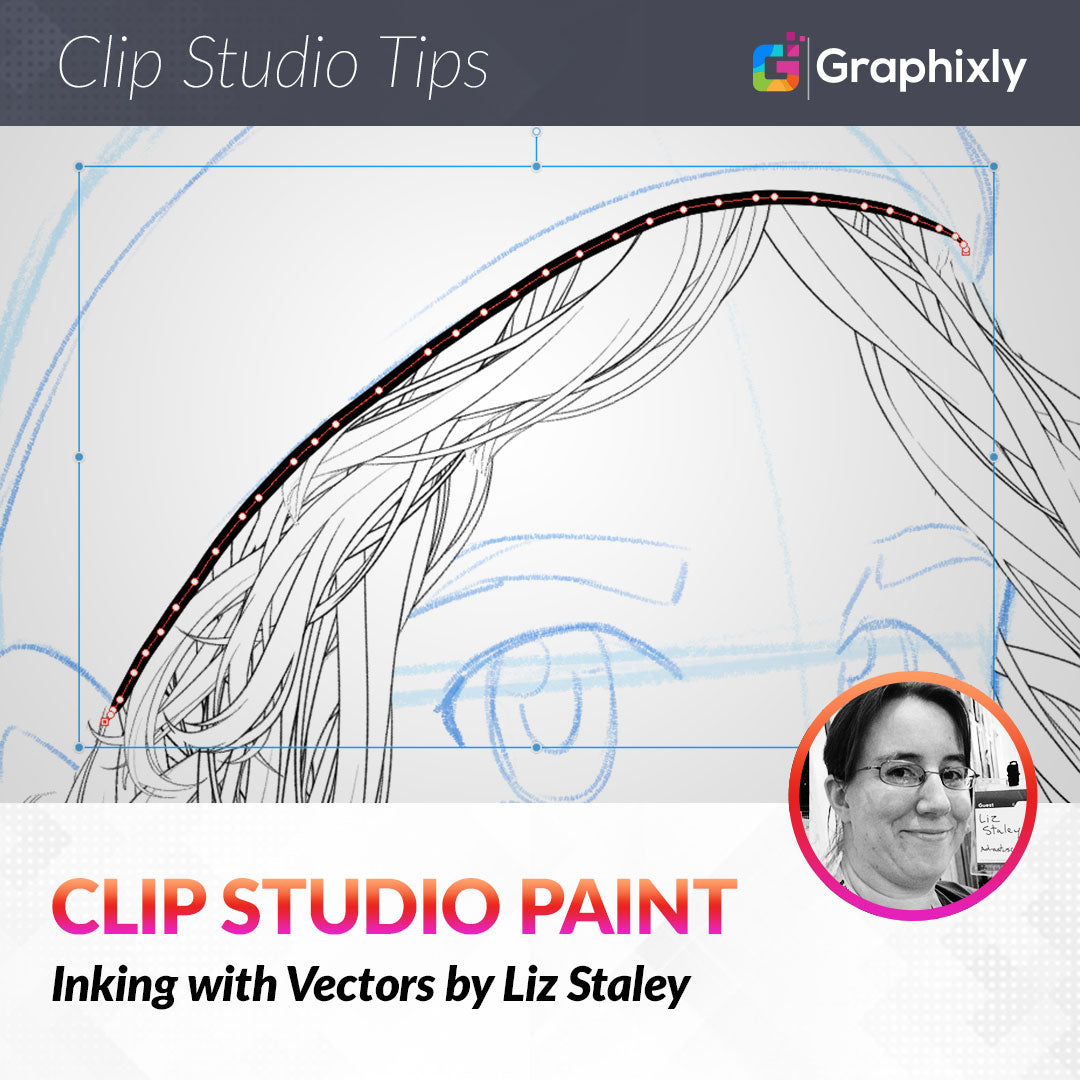
With this layer as the currently active one, make a mark with your favorite inking pen tool. At this point it will look just like any normal line. However, if we take the Operation - Object subtool and click on the line, we’ll see a lot of little white points that go along the length of the line, as well as a bounding box around it!

These little white points are the control points of the line, and they allow us to manipulate it to perfect the curve or to even change it entirely. However, one of the downsides of using a regular drawing tool on a vector layer is that it creates far too many points along the line to allow for easy manipulation. There are 37 control points on the one line above, which would be nearly impossible to move to get a smooth curve! But that’s okay, because we have a secret weapon the “Correct Line” group of tools, which are shown below.

The Correct Line subtool group contains an arsenal of tools for working with vector lines, however the ones we will be using in this article are the Control Point, Simplify Vector Line, and Correct Line Width tools.
Let’s start with the Simplify vector line tool. Select it, then adjust the brush size in the Tool Property window if needed. I like for this tool to be approximately the size of my existing line or just a little larger, since that makes it easier to use.
Draw along the existing line with the Simplify vector line tool. You will see a green highlight as you use the tool, indicating where the tool will be applied.

Now let’s click on the line again with the Object subtool. Our line now has only 7 control points, which will make it much easier to adjust!
There is a Control Point subtool in the Correct Line group that will allow us to move the control points (as well as other functions which we will explore in a moment), but I prefer to use the Object tool to move control points. I don’t know why, it’s just usually the tool I go to when adjusting my vector lines. So I will use that to adjust the remaining control points to better match my sketched line.

I sometimes find that even after using the Simplify line tool, there are still too many control points - especially at the ends of the lines. In this case I will manually delete some control points to make editing easier. To do this, you can simply click on the unwanted control point with the Object tool, then right-click and select “Delete control point” from the popup. Or, if you are using the Control point subtool in the Correct line group, change the option from “Move control points” to “Delete control point” in the Tool Property window, then click on the unwanted control point to delete it with one click.

After adjusting the line to a curve that I like, I want to adjust the line width. For this illustration I want a thinner line than my normal inking style.
To correct the line width, we’re going to use the Correct Line Width subtool. In the Tool Property window of this subtool, there are several different options. I will mainly be using the Thicken and Narrow settings. I usually keep these on a fairly small amount of correction, something around 1.0 or 1.5, and make several passes if needed to make the line thicker and thinner gradually.

Using the tool, I made my lines thinner overall, then made them a little thicker in the areas where the shadow would be. In the top of the upper line of the hat in the following image, you can see that the line is so thin it’s basically disappeared entirely, but lines gradually get a bit thicker on the left side of the illustration.

One thing you must keep in mind after using the Correct line width tool, however, is that CSP will add a bunch of control points back in to the line. So if you want to adjust the position or curve of the line after changing the line width, you will need to use the Simply vector line tool again to make the number of control points manageable again. The line selected in the screenshot below had about 8 control points when I adjusted it before using the Correct line width tool, but now it’s back up to lots of points after!

For more mechanical objects, we can use the Figure tools to create vectors as well, which is exactly what we’ll do in the next section.
Using Figure Tools for Vectors
In this illustration I have a travel coffee cup in the character’s hands. Since this object is manmade and has perfect lines and curves, I want it to have a smoother look instead of my usual hand-inked style.
For this section I will be assuming that you know the basics of using the Figure tools, including the Straight line, curve, continuous curve, and ellipse tools.

For this, I will be using the Figure drawing tools to create this cup. On my vector layer, I grabbed the straight line tool and used it to create the straight parts on the side of the cup. Note that I left some gaps and created the sides using several lines to get the look of the paper sleeve around the middle of the cup, which is slightly larger than the cup itself.

Next, using the Curve tool, I created a line with three points for the bottom of the cup. Note that at this point being precise isn’t necessary, we can clean up any overlap easily in a few steps. I’m also not worrying about the line widths at this point, because I’ll be using the Correct line width tool later to adjust the lines.

I used the same curve tool to create the top and bottom of the paper sleeve around the middle of the cup.
The bottom of the cup is very simple, but what about the lid? To create the lid we need to think about it in small parts. To create the bottom of the lid, I used the Continuous Curve tool and created a point each time the line changed direction. It looks really off at this point, because some of the changes in direction are sharp corners and not curves, but we’re going to fix it.

Remember the Control Point subtool? In the Tool Property window for that tool is an option called “Switch Corner”. With this option selected, clicking on an existing control point will change it from a curve to a sharp corner (or vice versa). Using this, we can change the control points at top of this section of the lid to sharp corners instead of gradual curves, keeping the curve along the bottom.

We can create the top of the lid using three ellipses and a few straight lines. Draw out an ellipse, then rotate and scale it to match the top of the cup. I’m starting with the outside ellipse, but will be copying and changing it to create the internal ring of the lid and also the bottom line of the same part.

To make a copy of a vector line or shape, select it with the Object tool. Then right-click and select “copy”. We can then right-click again and select paste (or use the Ctrl+V command). Move and resize the ellipse to create the smaller internal ellipse.

I used the same copy-and-paste procedure to create the bottom curve of the top of the lid, then connected it to the original ellipse using the straight line tool.
Once I have all the lines and curves planned out, I have a bit of a mess of overlapping lines and bits that are sticking out. But that’s okay, because we can use the eraser tool to very quickly clean up the vector lines.
Select the Eraser tool, then the Vector subtool. In the Tool Property window make sure that the “Erase up to intersection” option is chosen. In the screenshot below you can see that I’ve used the eraser to draw through part of the curve line that is sticking out beyond the edge of the cup.

Boom! The line that I drew the eraser through gets erased up to the point where it meets the other vector line. This is why I overdrew most of the lines on the cup. Using this eraser option makes it very easy to clean up. Simply draw the eraser through one bit of the unwanted part of a line and the entire portion of the line will disappear. No need to manually erase all the unnecessary parts.

Then, using the Correct Line Width tool from earlier, I adjusted the lines to give them variation and make them look more like the rest of the illustration. You can see the finished ink lines below.

The hair in the above illustration is the Hair Brush from CSP User Winter_B, and can be found here: https://assets.clip-studio.com/en-us/detail?id=1896205
Conclusion
Whether for accessibility reasons or to achieve a certain look, knowing how to ink with vectors is a great skill to have. Vectors make drawing long, sweeping lines or manmade objects much easier and can turn inking into a more enjoyable process for those who find it tedious.
For more information on CLIP Studio Paint, please visit https://www.clipstudio.net/en or https://graphixly.com