Importing 3D Models to CSP
Contact Graphixly @
Hello! My name is Liz Staley and I’m a long-time user of Clip Studio Paint (I started using the program back when it was known as Manga Studio 4!). I was a beta-tester on the Manga Studio 5 program and for Clip Studio Paint, and I have written three books and several video courses about the program. Many of you probably know my name from those books, in fact. I write weekly posts on Graphixly.com and on CSP Tips, so be sure to come back every week to learn more Clip Studio Tips and Tricks from me!
I think that using 3D models in your work for reference is one of the best things about using Clip Studio Paint. I love being able to put a model into the program and draw directly over it rather than having to pose a model in another program and take screenshots! This week, let’s add a free 3D model found on a third-party site to CSP, and also add a new model to the Materials Library using Clip Studio Assets.
In this article we will cover the following topics:
Importing Third Party Models
Importing Models from Clip Studio Assets
Let’s go!
Importing Third Party Models
At time of writing, there are several formats of 3D models that can be imported into Clip Studio Paint. These include the Clip Studio 3D Character format (cs3c), Clip Studio 3D Object format extension (cs3o), Clip Studio 3D Background format (cs3s), and FBX, 6KT, 6KH, LWO, LWS, OBJ, GLB, gITF, and VRM files.
Please note that FBX files can’t be imported on Android devices, and 6kt and 6kh files cannot be imported on tablets.
Also note that FBX, GLB, and gITF files are the only ones that will display normal maps in Clip Studio Paint, and any object that contains a texture map that cannot be displayed will be displayed without it.
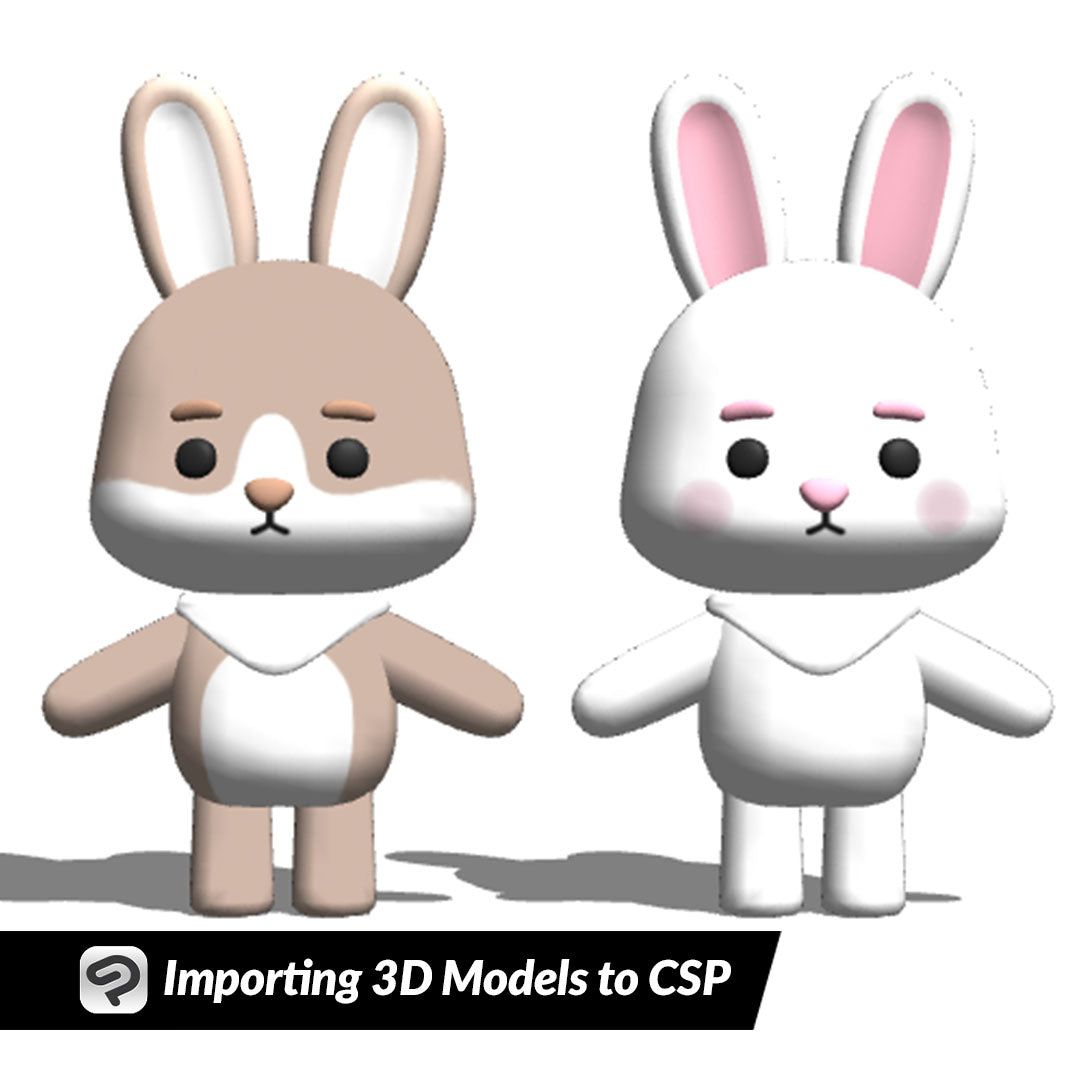
I found this bunny 3D model available in a few different formats on Fab.com and thought it was cute, so let’s download it and put it into Clip Studio Paint!

I clicked on download and then downloaded both the OBJ and the FBX files so I can show you how imported models look with and without the included textures.

Now let’s import our cute bunny model. You can either click on File - Import - 3D data or, if you are on PC or Mac you can drag and drop your model file using the following steps. First set up your screen so that you can see your Clip Studio Paint canvas and also the folder where you downloaded your model. Then click on the model file and drag and drop it to your canvas.

Depending on the size and complexity of the model, it may take a moment to import your model.
Since this is the OBJ version, the textures do not display.

Doing the drag and drop process again with the FBX file though displays any textures that are compatible with CSP (which doesn’t include the plaid on the bandanas in this model’s case!)

Now one of the downsides of importing models that weren’t made for CSP is that they may not be set up to move individual parts. This bunny model does have the parts separated out, however when moving the head the ears and face don’t move with it, leading to some pretty crazy results!

However, by opening the Sub Tool Detail menu and selecting all of one bunny using the Object List, the entire model can be moved at once, as shown below.

Importing Models from Clip Studio Assets
Because of some of the limitations on importing models that weren’t made with Clip Studio Paint in mind, I always look on the Clip Studio Assets site for a 3D element that I want to incorporate. If I can’t find what I want there, then I might search other 3D model sites.
You can access Clip Studio Assets through the Clip Studio App. To see only 3D models, tap on the “Filter” button next to the search bar and then select one of the 3D categories. You can also enter a search term if you are looking for something specific.

Once you find the 3D model you want to use, click on its thumbnail to view details about it. If the file is free you will see a “Download” button, if it is paid you will see a “Checkout now” button. Click this to start the checkout or download process.

Once the model has finished downloading, head back to Clip Studio Paint and open the Material Library. Your downloaded model will show at the top of the Material Library list. If you don’t see it there, your download may not have completed yet.
Click the model’s thumbnail in the Materials Library, then drag and drop it to the Canvas or use the “Paste selected to the canvas” icon at the bottom of the material window.

Since this model was made for Clip Studio, it includes controls that we can use to pose the model. Note that not all 3D models have this feature, but most character models do. Look for the terms “posable” or “rigged” if you want to be able to change the model’s pose!

Because this model is made for Clip Studio, we can also use the 3D pose information to change the model quickly. Let’s drag and drop one of the Entire Body poses to the model.

The pose information is applied to the model. However we do need to do a little bit of tweaking because of the proportions of the chibi model - mainly to the arm going to the head because the hand is disappearing into the head!

Using the 3D controls, reposition any parts of the model that are clipped incorrectly.

Now you’re ready to draw from your 3D reference!

Conclusion
Using 3D models is a great way to speed up your workflow, whether it's for poses, backgrounds, or props. Though I have a preference for using models found in the Assets marketplace, it is possible to import models from other programs - with stipulations! However if you’re just needing a reference for a drawing and don’t need textures displayed then third party models can be a great way to add to your work.
For more information on CLIP Studio Paint, please visit https://www.clipstudio.net/en or https://graphixly.com