Getting Used to Your First Graphics Tablet
Contact Graphixly @
Hello! My name is Liz Staley and I’m a long-time user of Clip Studio Paint (I started using the program back when it was known as Manga Studio 4!). I was a beta-tester on the Manga Studio 5 program and for Clip Studio Paint, and I have written three books and several video courses about the program. Many of you probably know my name from those books, in fact. I write weekly posts on Graphixly.com and on CSP Tips, so be sure to come back every week to learn more Clip Studio Tips and Tricks from me!
Buying your first graphics tablet can be an overwhelming experience. There are so many options and brands now, so how do you know what kind to get? And once you have it, a tablet can be a bit awkward to use at first! So how do you get used to using this new piece of hardware without too much frustration? In this article we’ll discuss some tips for choosing your first graphics tablet and then cover an exercise that you can do to start developing skills with your new tablet.
In this article we will cover the following topics:
What Kind of Tablet Should You Get?
Exercises for Getting Used to Your New Tablet
Let’s get drawing!
What Kind of Tablet Should You Get?
There are so many brands and types of tablets for sale now that it can be confusing what kind you should get. There are a few things you should consider before making a purchase.
Type
There are usually two types of graphic tablets, those with a screen built in and those without a screen.
Graphics tablets that do not have a screen built in, such as the Wacom Intuos, are usually cheaper than the ones with a screen. However, these types of tablets do require more adjustment than the ones with a screen. This is because your hand will operate the pen on the tablet surface but you will be looking at the monitor of your desktop or laptop. This disconnect often causes issues for those who are just starting out, but with practice this can be easily overcome!

A tablet with a screen, such as a Wacom Cintiq, can take the place of a monitor on a desktop computer. With this type of tablet you use the pen stylus directly on the monitor glass, so it’s the most like drawing on a piece of paper in front of you. However these tablets are more expensive than the other kind so they can be a significant investment. But if you have this type of tablet and another monitor, you can do your art on the tablet monitor and have your references on the second monitor, which is very helpful!

Of course there are also tablets that have a screen and that act like a computer all on their own, which are the most expensive of all. With this type of tablet you don’t need a laptop or a desktop computer to run the tablet on because it already has the operating system, storage, and software directly on it. This is something like a Wacom Mobile Studio Pro.
So what type of tablet should you get? The advice that I usually give is that if you are just starting out with digital art and aren’t sure if you’ll be doing it long term, get a cheaper non-monitor tablet. They take a little more getting used to, but they are less of a monetary investment. You can always upgrade to a different style of tablet if you decide that you like creating digital art after all.
Size
As for size, that very much depends on how you draw and the space that you have available to you. If you draw from the elbow and have the space, get a larger size tablet. If you draw from the wrist, have limited space, or will be taking the tablet traveling with you, you will be much happier with a smaller size tablet. If you are getting the traditional style graphics tablet without the monitor built in, you may also want to consider the size of your current monitor. If you have a very large monitor but get a small tablet, you will be moving the stylus just a tiny bit but the cursor will move very far! If you have a small monitor but get a large tablet, you will have to move the stylus a long way just to move a little bit on the monitor, so make sure you take these things into consideration as well.
Brand
Finally, let’s talk about brands for a moment. Since I started creating digital art many years ago there have been lots of technological advancements made in the world of graphics tablets. There are lots of brands now that have tons of good reviews.
Personally, I’m a huge fan of Wacom brand tablets. I’ve had several different tablets over the years, and the Wacom tablets have always lasted me much longer than any other brand. My first Wacom tablet lasted me about 10 years and when I upgraded it went to an aspiring young artist who continued to use it. My current tablet is a refurbished Wacom Cintiq 21 inch that has lasted me nearly another 10 years so far just about daily use. So I’m always more likely to recommend a Wacom tablet over other brands just because they are my personal preference for longevity.
Remember to check reviews for the type of tablet that you are thinking about purchasing. I prefer to check the reviews on sites like Amazon, if available, or to look for review videos on YouTube.
Setting Up Your Space
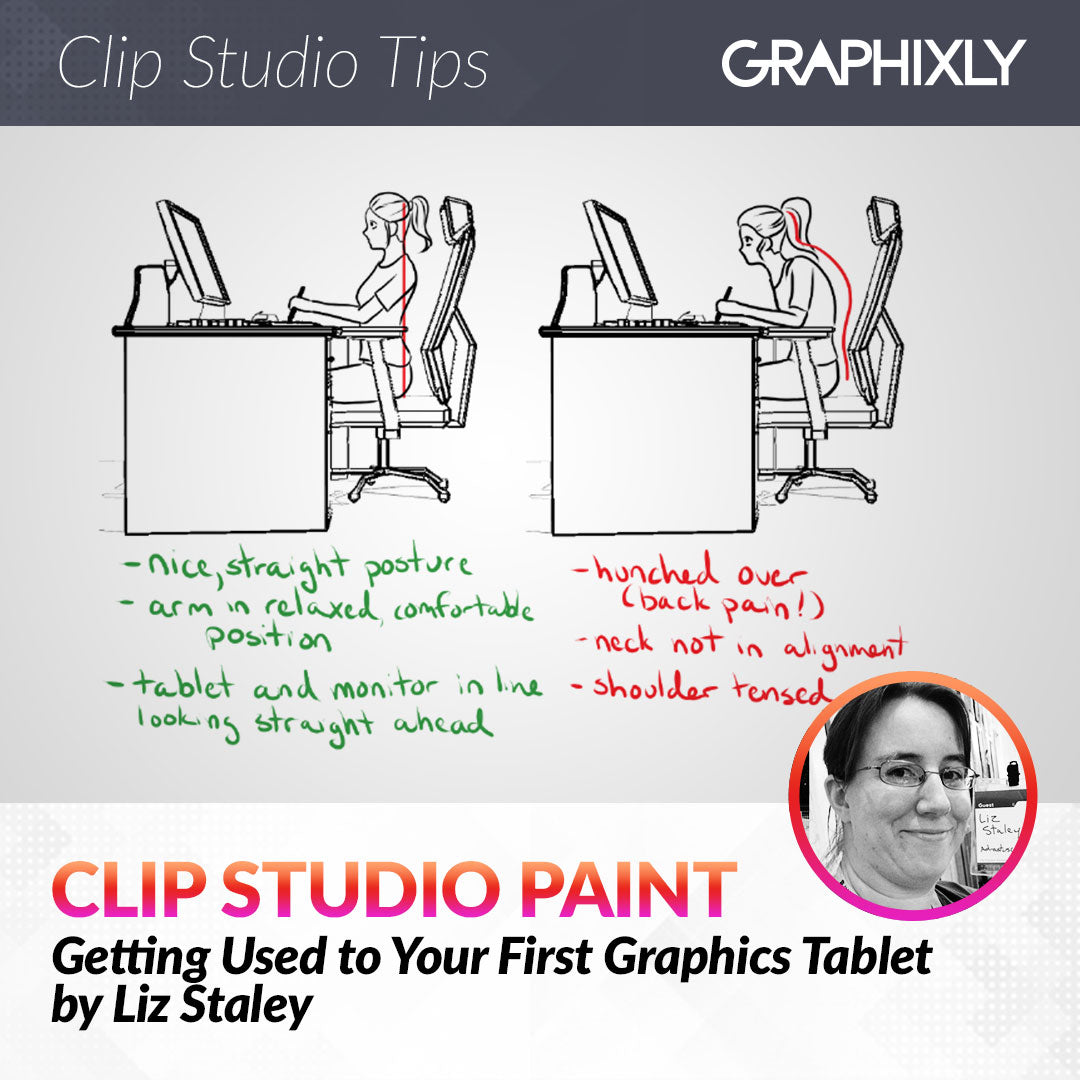
Once you purchase your tablet, you’ll want to make sure that your workspace is set up so that you can work comfortably. Be sure that you have your tablet somewhere where you can sit up straight, with your arm comfortably relaxed in a natural position, with your shoulders relaxed. Don’t sit hunched over or with your shoulders tensed up. Be sure that you are looking straight ahead with your neck aligned.

Going over every way that you can set up your workspace isn’t something I have the space for in this post. However, there is a great post on the Wacom website that goes over lots of ways you can set up your space depending on the type of desk and tablet that you have, so I highly recommend checking it out!
https://community.wacom.com/en-us/setting-up-your-workstation/
Exercises for Getting Used to Your New Tablet
Once you’ve purchased your tablet and set up your workspace, make sure that you download and install the drivers recommended for your operating system. This will ensure that all the features of your tablet, such as pressure sensitivity, are working correctly.
With your tablet connected, it’s time to get drawing! But you can’t expect to just open your software of choice and start making a masterpiece if you’ve never used a graphics tablet before! Let’s do some exercises to get used to how the tablet behaves instead.
In Clip Studio Paint, create a new canvas the size of your choosing. I made mine 8x10 inches at 300dpi, but the size really doesn’t matter much. Then go to View - Grid to turn on the grid overlay. We are going to divide our page into squares to do our exercises in.
On a new layer, I divided my page into one-inch squares using the Straight Line tool and a light blue color.

Now take a pen tool of your choice (I recommend the G-pen if you are new to Clip Studio Paint, because it has a little bit of line variation) and begin drawing lines in each of the boxes. Start by trying to make thin, parallel lines with little variation in thickness. Then you can try making parallel lines while going from little pressure to heavy pressure to change the thickness of the line. In the next box start with heavy pressure and go to light pressure to make the line taper out toward the end.
(Optional: I made another layer with light gray lines on it that I tried to follow as closely as possible with my black ink lines! This is harder than just making lines without guides so if you are brand new you don’t have to do this.)
Make sure to practice horizontal, vertical, and diagonal lines of varying thicknesses.

Once you have the hang of making parallel lines, you can try your hand at cross-hatching as well.

After working on straight lines in various angles and thicknesses, you can then start doing parallel curved lines, circles, ovals, and curved cross-hatching. This is a great way to not only get used to your new graphics tablet but also to any new drawing tools. I actually use this exercise in my sketchbook when I get a new drawing pen!

Once you’re comfortable making short lines, you can try making longer lines. Make sure to make straight lines as well as curved ones!

By the time that you’ve filled the page with patterns and lines, you should have a much better feel of your new tablet, as well as the drawing tool you have selected to use for this exercise.
If you want a pre-done sheet to follow to test out your tablet, the image below is the guide sheet that I made for this article! Feel free to save it and open it in your software, then trace along the gray lines on a new layer so you can use this sheet over again for more practice!

Conclusion
Getting a graphics tablet can be a large investment depending on the type and brand that you get. However, a tablet is a very useful piece of hardware for the digital artist to have and to be proficient at using. Plus it’s fun to see how many different types of lines you can create with just one tool, too!
For more information on CLIP Studio Paint, please visit https://www.clipstudio.net/en or https://graphixly.com