Easy Inking with Vector Layers
Contact Graphixly @
Hello! My name is Liz Staley and I’m a long-time user of Clip Studio Paint (I started using the program back when it was known as Manga Studio 4!). I was a beta-tester on the Manga Studio 5 program and for Clip Studio Paint, and I have written three books and several video courses about the program. Many of you probably know my name from those books, in fact. I write weekly posts on Graphixly.com and on CSP Tips, so be sure to come back every week to learn more Clip Studio Tips and Tricks from me!
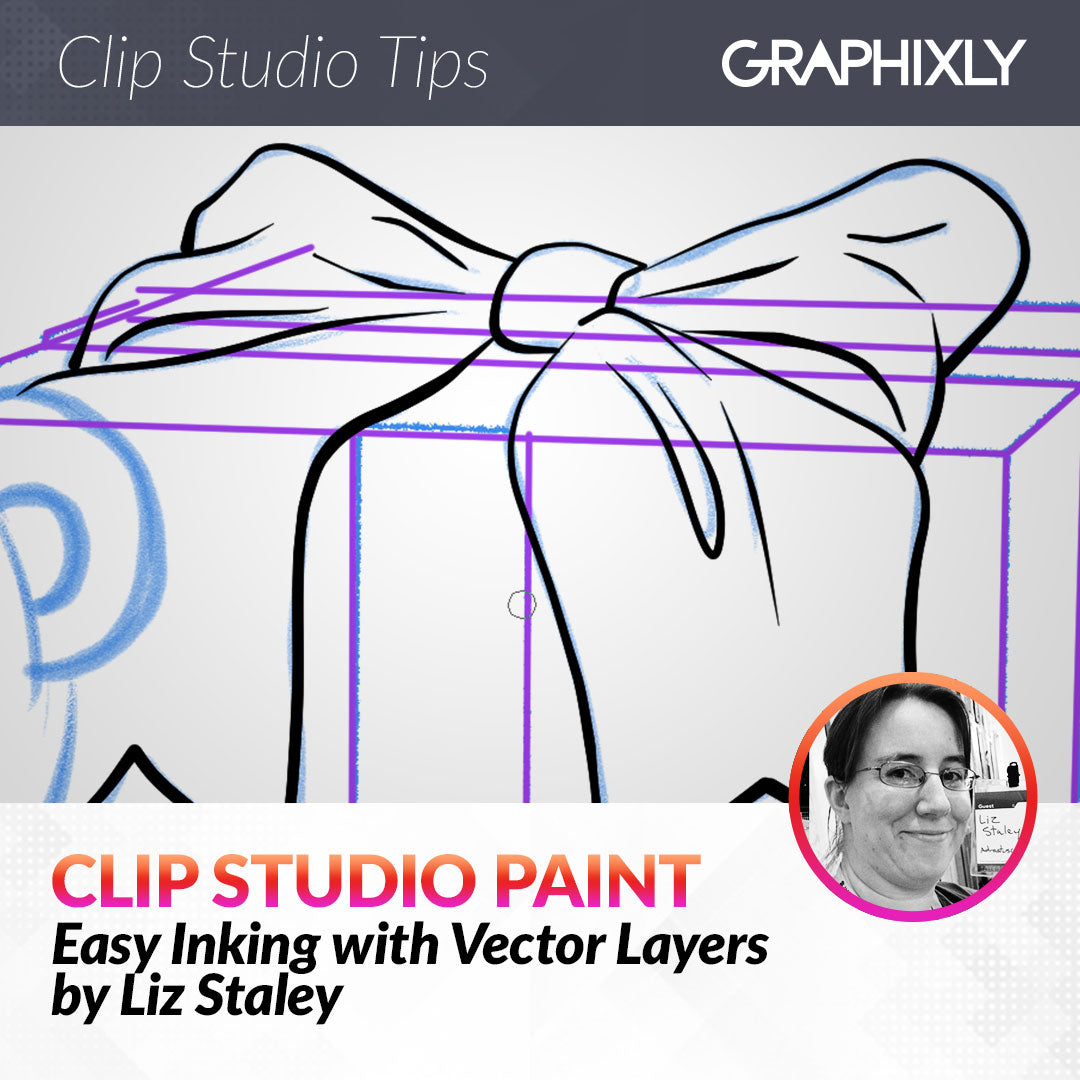
Inking is probably my favorite part of the creation process. I’m pretty confident in my inking abilities so I use raster layers 99.99% of the time. However there are times and situations where using vectors is a much easier option. If you aren’t confident with inking or have a physical impairment, using vector lines for inking can make the process much easier.
Let’s start inking!
Inking with Vectors
Let’s start off by making a new layer. In order to use vectors in CSP, we need to create a New vector layer. This can be done by either click on the New vector layer icon in the Layer palette or click on Layer - New - New vector layer.

Any marks that we create on this layer will be vectors, which are not made up of pixels but made up of points. In the image that I’m inking for this example, I have a gift box that contains a lot of straight lines. Instead of inking these with a pen, I’m going to use the Figure - Straight line subtool. Click, drag, and click again to create a line. If you need your vector line to be longer or shorter, you can take the Operation - Object tool, click on one end of the line to select the control point there, and then drag to edit the line.
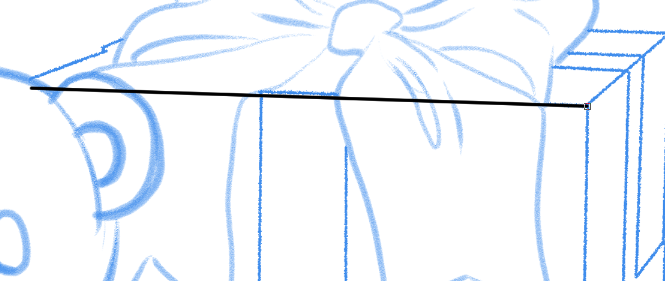
I used the straight line tool to go over all the lines on my box. Again, not worried about the lines overlapping or being sloppy at the moment because we will fix that in a few steps when we talk about the Vector Eraser.

For the bow on top of the gift box, I’m going to use my favorite inking pen tool and draw my lines. You can use the various curve and line tools if that is more natural for you, but as I said in the intro I really like inking! I also created this linework on a new vector layer separate from the box lines for ease of cleanup later.

One of the best things about working with vector layers is that, since they are made up of points, our lines can be edited after they’re made. However, when creating lines on vector layers with brush tools, CSP tends to create a lot of control points! This makes editing the lines and keeping them smooth quite difficult without a bit of editing. Notice how many control points are in the line selected below!

To fix this, select the “Correct line” tool category and then select the Simplify Vector Line subtool.

Click and drag over the line you want to simplify. Sometimes after doing this the line may move off of where you want it to be. If this happens, simply take the Object subtool and edit the control points to make the line in the shape that you want it.

Here’s my bow lineart after using the Simplify Vector Line tool on each of the lines. You can see that some of my lines have gotten very thin, and that the one of the bottom of the loop on the left side of the bow has gotten quite pointy!

To fix lines that have gotten a bit “wonky”, use the Object subtool and click on the line. Then click on the points along the line and drag them to refine the shape.
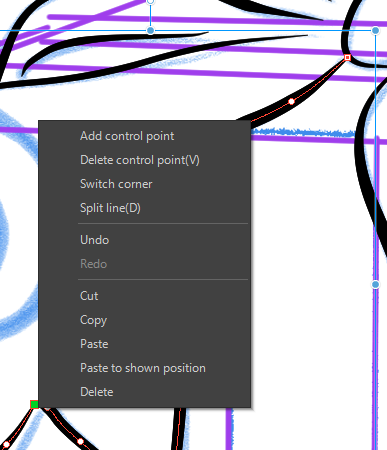
If you right-click on the line with the Object subtool you will also get a pop-up menu with a few options that are useful. For instance, on the line above that had a sharp corner I selected the control point and right-clicked, then selected “Switch Corner” to change from a sharp transition to a curved one. You can also add a control point if you need more control, or delete one if there’s one in an unnecessary location.
I usually find that CSP, for whatever reason, has two control points right on top of each other right at the end of my hand-drawn vector lines. I delete them to make editing and positioning easier.
Once I’m satisfied with the position and shape of my lines I can start thinking about the line thicknesses. Another nice feature of using vector layers to ink is that the thickness of the entire line or parts of the line can be easily edited even after the marks are made.

Under the Correct Line category of tools select the “Correct Line Width” subtool. Make sure that the Tool Property window is open as well because this is where we will control how this tool behaves.
The two settings that I find most useful in the Properties for Correct Line Width are the “Thicken” and “Narrow” settings. These do exactly what they say they do - either make the part of the line that is highlighted with the tool thicker or narrower.

For instance, when I used the “Simplify Line” tool earlier on these thin fabric wrinkles it turned my lines into an even one-pixel line all the way across. This is definitely not what I intended! Set the tool option to “Thicken” and go over the part of the line you want to make thicker.

Unless you have “Process Whole Line” set to ON, this tool will only affect the part of the line that you highlight with the tool.
Note that this process also adds control points back in, as shown below. That’s why I tend to do this after getting my lines in the positions that I want them to be!

Here is my finished bow line art. I made areas that are toward the light thinner, while areas of overlap and areas that are further away from the light source are thicker to imply shading.

Now that our box and bow are done, let’s do some cleanup on those unnecessary box lines! Select the Eraser group of tools and then the “Vector” subtool. This eraser is set up specifically for vector lines and has some options that the regular eraser tools don’t have that make cleanup for vectors faster and easier.

In the Tool Property window for the Vector Eraser you will notice a checkbox and three icons marked with the text “Vector Eraser”. The left-most icon in this setting makes the eraser behave just like a raster eraser, so it will erase only what it touches. I like this setting for large areas, like the lines of the gift box that are behind the bow.

The next icon under the Vector Eraser option is called “Up to intersection”. With this option on, Clip Studio Paint will erase a vector line up to any intersection with another vector line, no matter how little of the line was touched with the eraser tool. For instance, in the screenshot below you can see that I simply erased a tiny bit of the middle of this line.

However, when I complete the erase command the line disappears up to the intersection with the line of the bow.

Using this setting it takes only a few seconds to clean up the extra lines on the ribbon around the box, as well as extra lines where the ribbon wraps around the bottom and sides of the box!

Using the tools in this article you can ink anything with vector lines! I even added some weight to the box lines by using the Correct Line Width tool but with the “Process Whole Line” checkbox on so that it edited the entire line with one click! I feel like this makes the straight lines feel a bit more organic and less like they were just made with the straight line tool because of the variation.

Conclusion
Though they aren’t my favorite method of inking, vectors are a great way to build confidence with inking or to make it more accessible.
For more information on CLIP Studio Paint, please visit https://www.clipstudio.net/en or https://graphixly.com