Drawing Short Hairstyles
Contact Graphixly @
Hello! My name is Liz Staley and I’m a long-time user of Clip Studio Paint (I started using the program back when it was known as Manga Studio 4!). I was a beta-tester on the Manga Studio 5 program and for Clip Studio Paint, and I have written three books and several video courses about the program. Many of you probably know my name from those books, in fact. I write weekly posts on Graphixly.com and on CSP Tips, so be sure to come back every week to learn more Clip Studio Tips and Tricks from me!
Continuing on with our exploration of how to draw different character components, let’s talk about short hairstyles this week! I love drawing hair, it’s so much fun. But I must admit that I like drawing long hair much more than short hair most of the time because you can have fun making it flow in the breeze. Short hairstyles can still be fun to design and draw, however!
In this article we will cover the following topics:
Planning The Hairstyle
Hairstyles from Different Angles
Let’s dive right in!
Planning the Hairstyle
Before we draw our hair, we need to think about a few things. One of those things is what kind of hairline does the character have? In real life people have various hairlines, which is the line where your forehead ends and your hair begins. Some people have a straight hairline, some have curved, some have low hairlines where their forehead seems smaller, and some have a “widow’s peak”, which is a hairline that comes down to a point in the middle. The shape of the hairline will change the look of your hairstyle, especially if it is very short, spiky, or swept back away from the face.
Below is a quick example of some different types of hairlines. The face/head shape template was created by CSP User Ceneriste. You can find the template here- https://assets.clip-studio.com/en-us/detail?id=1903498

When drawing very short hairstyles, knowing where the hairline is and how it’s shaped on the character is very important. In the example below you can see two very short hairstyles and how the hairline affects them.
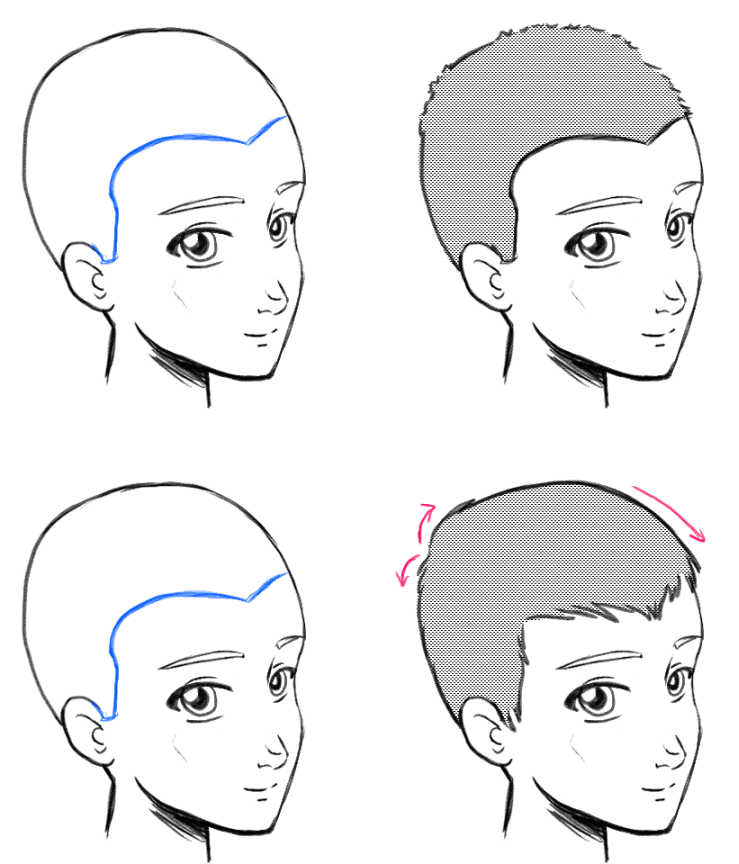
The top hairstyle is basically a buzz cut, so the hairline is just about the only part of the hair that we’ll see, besides a little bit of fuzz at the top that I’ve indicated with a few very short lines. The bottom hairstyle is a little longer than the top one but not too long. The pink arrows show how the hair falls in this style. The hair is pushed forward so it obscures the hairline a bit but the shape of the hairline still influences the shape of the hairstyle and how it falls on the forehead.

These characters have much longer hair compared to the previous examples, but because that hair is swept back away from the face we need to take the shape of the hairline into account.
Quick Tip! When drawing hair, think of the hairstyle as “chunks” or “sections” of hair instead of individual strands. Though our hair is made of individual strands, everyone’s hair tends to fall into sections naturally when it has some length to it. Drawing every individual strand of hair tends to look sloppy and overcomplicated, while drawing hair in sections and then adding a bit of detail looks a bit neater. Of course there are times when you might want to draw individual strands, so use your own judgment, but this tip has served me well in my years of drawing!

When drawing hairstyles that have a bit more length to the hair, it is also important to consider the point of origin of the hair (or the part, if the character parts their hair). In the examples below the pink dot on each drawing shows the point of origin or the start of the part for the hairstyle.

Note that though the top left and bottom right examples have the same point, they are very different hairstyles! The top left character parts their hair down the middle, where the bottom right character’s hair falls naturally forward toward their forehead.
If you’re really stuck, the internet is a great resource for reference images you can use for inspiration. You can google “short haircuts”, “short hairstyles for men”, “short hairstyles for women”, “trendy short hairstyles” or more and find many websites dedicated to showcasing the coolest haircuts. Just make sure you don’t copy the image directly but instead use it simply as inspiration, as I’ve done with the spiky hairstyle below.

The only problem with this approach is that you may only get one angle of the hairstyle. This is fine if you’re doing a one-off illustration, but what if you’re designing a character for a comic or animation?
Hairstyles from Different Angles
Looking for reference images online is fantastic, but sometimes it does have its limits. If the hairstyle you’re drawing is basic then you can probably find photos of similar hairstyles at other angles, but what if you’re drawing a more cartoonish (or anime or manga-ish!) hairstyle? Not too many real hairstyles can imitate the gravity-defying nature of anime and manga characters.
This is where the tip I mentioned above about thinking of the hair in sections can come in handy. When I’m trying to figure out how a hairstyle would work in 3-dimensions, I find it helpful to mentally divide the hair into sections and then try to imagine how the look of the hair would change as the head changes angles.
In the example below I’ve used colors to mark out five sections in the hairstyle. Note how they interact as the head is drawn from different angles.

Of course, as helpful as this is, the absolute best way to make your character’s hairstyle consistent is to practice drawing it over and over! Back in my comic-creating days I would always find a new character’s hairstyle changing each time they came up, at least for the first few times I drew them. After a while my brain and hand would get into a muscle memory of what that character’s hairstyle looked like, but it always took a little while for me personally. So I think one of the best things you can do when creating a new character who you’ll be drawing over and over and you want to make sure their look is consistent is to draw them a lot before you need them in your finished piece! Doodle them over and over again, draw an expression sheet and a character turn-around so you can get the look down. Then when you need to draw them in a comic or animation, you’ll have a better understanding of how they look from all angles instead of just one!
Conclusion
Designing hairstyles can be a fun and enjoyable activity, and is one of my favorite parts of character design. But I also know how frustrating it can be, especially for new artists. With some practice and a few considerations though, you’ll soon be a master of drawing hair. Remember to just keep practicing!
For more information on CLIP Studio Paint, please visit https://www.clipstudio.net/en or https://graphixly.com