Drawing on 3D Models
Contact Graphixly @
Hello! My name is Liz Staley and I’m a long-time user of Clip Studio Paint (I started using the program back when it was known as Manga Studio 4!). I was a beta-tester on the Manga Studio 5 program and for Clip Studio Paint, and I have written three books and several video courses about the program. Many of you probably know my name from those books, in fact. I write weekly posts on Graphixly.com and on CSP Tips, so be sure to come back every week to learn more Clip Studio Tips and Tricks from me!
For me, this was the most unexpected new feature when I saw it on the announcement for Clip Studio Paint 4.0! However, thinking about it, it is definitely extremely useful - whether you want to draw facial features on a model so you can easily track eye placement in 3D or if you want to draw a costume on a full body so it makes drawing the same outfit over and over again easier, I feel like the options for this are just about endless!
In this article we will cover the following topics:
Drawing on a 3D Model
Saving a Drawn on Model to Materials
Let’s start drawing in 3D!
Drawing on a 3D Model
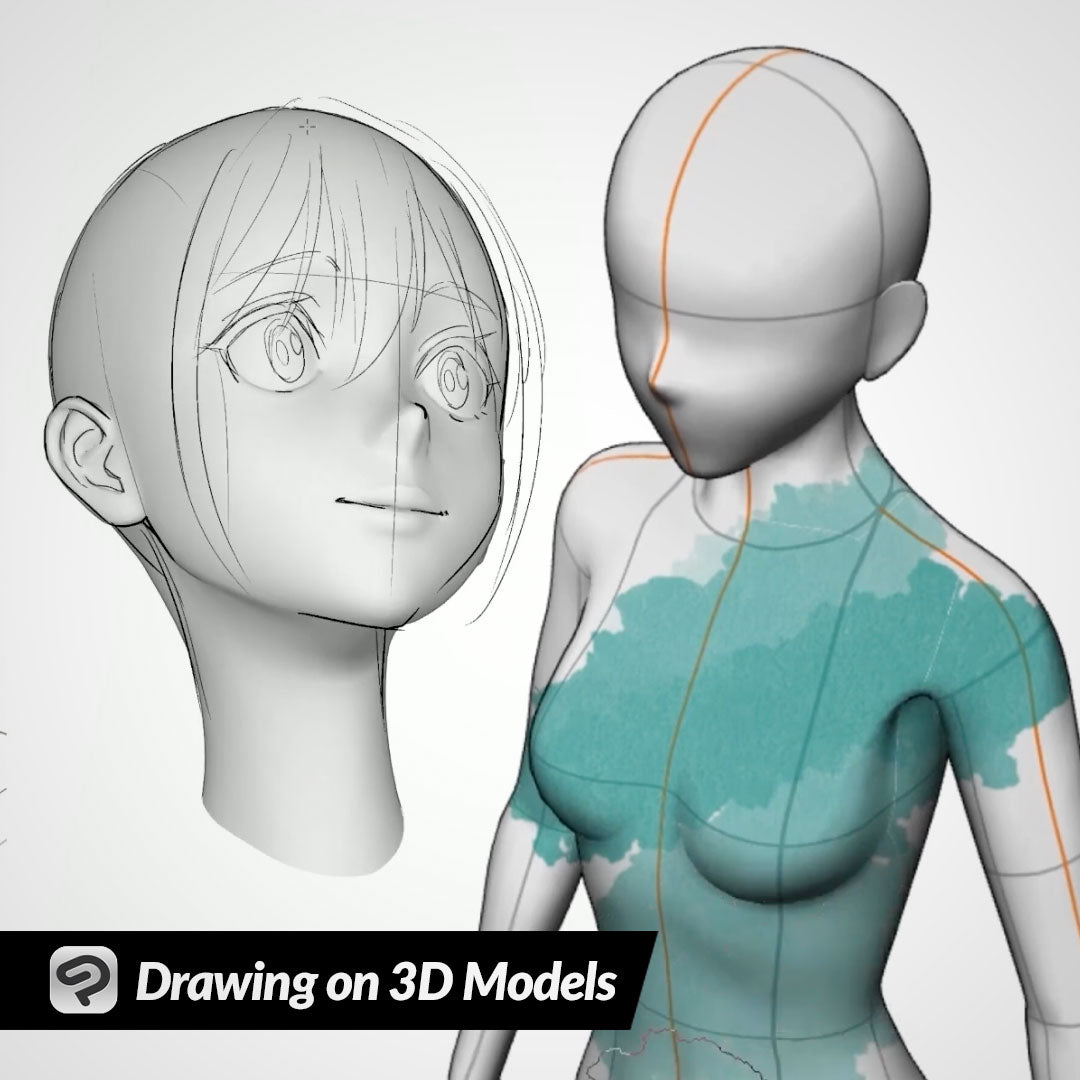
It is possible to draw on 3D body types and 3D primitives. At time of writing it does not seem to be possible to draw on 3D heads or objects, but perhaps this is something that will come in the future!
Start with any 3D body type or primitive you like. In this example I am going to use a body type and draw an outfit on it with the help of the symmetry ruler.

If you want to use the symmetry ruler to help you get your design the same on both sides of the figure, you will need to do something before you can add the symmetry ruler. In the Layer palette, right-click the 3D model layer and go to Ruler/Frame - Delete Ruler to delete the perspective ruler that is already on the 3D layer.

Now we can add a new ruler to this layer before we start drawing. Click on the Ruler category in the tool box, then choose the Symmetrical ruler.

Make sure that your 3D model view as facing directly forward - which it should be if you loaded in a standard body shape model and haven’t moved the model or the camera at all. Then put your cursor over the middle line down the center of the model and click and drag. Hold down the SHIFT key to ensure that your ruler is perfectly straight down the center of the character. In the screenshot below, the purple line is my symmetrical ruler.

Now you can take any drawing tool and begin drawing out your design on one side of the model. If you are using the Symmetrical ruler then your drawing will be mirrored across the character. However, make sure that you are still looking directly straight at the model and have not moved the character, because the ruler is not locked to the model! If you move your view to, say, a ¾ view then the mirror will still happen across the ruler but will be messed up because the model is not flat to the plane of the camera.
I used my favorite Pen tool to start drawing out the front of the character’s uniform below.

To change to the back of the model and make sure that you are looking straight at the model, it is highly recommended to use the preset camera angles. If you do not see the launch bar below your 3D model, click on the Object - Operation subtool and click on the model. Then click on the “Specify Camera Angle from Preset” icon and choose a camera angle from the icons. I mainly used the top left and top right angles to look at the character from straight in front and straight behind.

This is the part that started getting a bit tricky, but it wasn’t too bad! The best thing to do would be to make sure that any elements that wrap around the entire model line up with a line on the model itself to make drawing between the back and front easier. I didn’t do that, so instead what I did was draw some basic lines on the back of the model where I thought the wrap around elements ended on the front.

Then I switched to the Object subtool and moved around the model to see if the lines matched up with what I drew on the front already. If they didn’t, I used the camera presets to go to the back of the model again and erased the lines so I could do them again.
Note that if you are having a hard time seeing parts of the model because of shadows, you can use the Object subtool to click on the model and select it, then in the Tool Property window you can either adjust the direction of the lighting or turn off ambient lighting altogether.

If you want to temporarily turn off the symmetrical ruler or move it, the process is not difficult but is a little different than when using a ruler on a raster or vector layer. First, click on the ruler icon next to the 3D layer’s thumbnail in the Layer palette.

If you want to temporarily turn off the ruler so you can draw asymmetrical details, after clicking the icon in the step above select the Object subtool. Then find the small diamond shaped control slightly off the ruler. It will be located somewhere near where you clicked and dragged to create the ruler. Clicking this control will turn it into a crossed out symbol and the color of the ruler will change from purple to green. This indicates that the ruler is “turned off” and tools will no longer snap to it.

To move a ruler to a new location, click on the ruler icon next to the layer’s thumbnail in the layer palette. Then click on the ruler with the Object tool and drag it to move to the new location. In the example I’m creating, there is a symmetrical logo on one side of the uniform chest, so I’ve moved the ruler over to create that.
If you “turned off” the ruler, make sure to click on the control in the screenshot above to turn it back on so tools will interact with it again.

Continue moving your model around to add details to your model as needed.

Saving a Drawn On Model to Materials
Once you’ve taken the time to draw out an outfit on a 3D model, you’ll probably want to be able to use it quickly! For that I recommend saving your model to the Material Library as a custom material. This way it will be easy to drag it into a new file and reference it whenever you need to.
To save your body shape to the Material library, click on your model to select it if it is not already selected. Then, in the bar beneath the model, click on the “Register body shape as material” icon.

In the Material property window, give your model a name in the Material name entry box. Add tags if you wish by clicking on the icon in the bottom right of the Search Tag box, typing in the tag, and pressing Enter on your keyboard.

Click OK to finish saving your model. Now you can drag your customized model from the Material library window to the canvas and pose it as a perfect reference for your next comic or illustration!

Conclusion
This was not a feature I was ever expecting from Clip Studio Paint, but I feel for those who create comics this is probably one of the most useful features! By putting in just a little work, you can have a posable reference for every angle of a character’s face and outfit, and that’s a great way to save time over the course of creating hundreds of drawings of the same thing!
For more information on CLIP Studio Paint, please visit https://www.clipstudio.net/en or https://graphixly.com