Designing a Folded Greeting Card
Contact Graphixly @
Hello! My name is Liz Staley and I’m a long-time user of Clip Studio Paint (I started using the program back when it was known as Manga Studio 4!). I was a beta-tester on the Manga Studio 5 program and for Clip Studio Paint, and I have written three books and several video courses about the program. Many of you probably know my name from those books, in fact. I write weekly posts on Graphixly.com and on CSP Tips, so be sure to come back every week to learn more Clip Studio Tips and Tricks from me!
Holiday season is coming up, and one of the things usually associated with winter holidays is sending cards. This week, let’s design our own double-folded card for whatever holiday you wish to send a seasonal greeting for!
In this article we will cover the following topics:
Setting Up the File
Designing the Front
Working with Text
Folding Your Card
Let’s start designing!
Setting Up the File
I’m going to design this card to be on a standard US Letter size piece of paper that will be folded twice to create the card. To accomplish this I created a new file set to 8.5 width by 11.0 height and 300dpi. If paper is a different size in your country feel free to change this to the dimensions you need!

Once we’ve created our file we need to divide the page into fourths. The easiest way to do this, I’ve found, is to use the Grid. Go to View - Grid in order to bring up the grid on your canvas.

Next select the Ruler - Guide subtool. Count the squares in one direction of your canvas and divide that number evenly by 2. Click and drag with your Guide subtool at the halfway mark of the grid to create a division.

If your guide is not exactly where you need it to be, take the Operation - Object subtool and click on the guide. You can then drag or use the arrow keys in order to adjust the position of the guide.

Complete the Guide step above for both the horizontal and vertical directions of your canvas so that there are 4 quadrants.

With the guides made, click on View - Grid again to hide the grid.
Because we are making a double-fold card, we need to be aware of how we need to lay out the card so that the design elements are where they should be once we fold the card. As you can see, the inside portions of the card need to be put on our canvas upside down so that they are in the correct orientation on the finished product. When we work with text later in this article I will show you how to rotate your elements so that they are where they need to be.

Designing the Front
Now that we have our canvas set up, let’s start by designing the front of our card. If you have a lot of elements to use in your design, I recommend creating a Layer Folder for the front design to keep it all organized.
I have a piece of my art that I’m going to use in this example, but I want to also use some other elements such as a wreath and perhaps a nice background image. I decided to use CSP Assets to look for the other design elements for my card. If you don’t know how to use CSP Assets, check out this article from me all about it: https://tips.clip-studio.com/en-us/articles/4329
To put the artwork in that I want to use for my card, I’m going to use File - Import - Image. Select the image you want to import and click OK.

My artwork was too large for the area of the front of the card so I resized it using the controls in the corners of the blue box surrounding the imported image. Then I moved it to its position in the card front area of my canvas. Remember to leave room for text if you’re planning to have any on the front of your card.

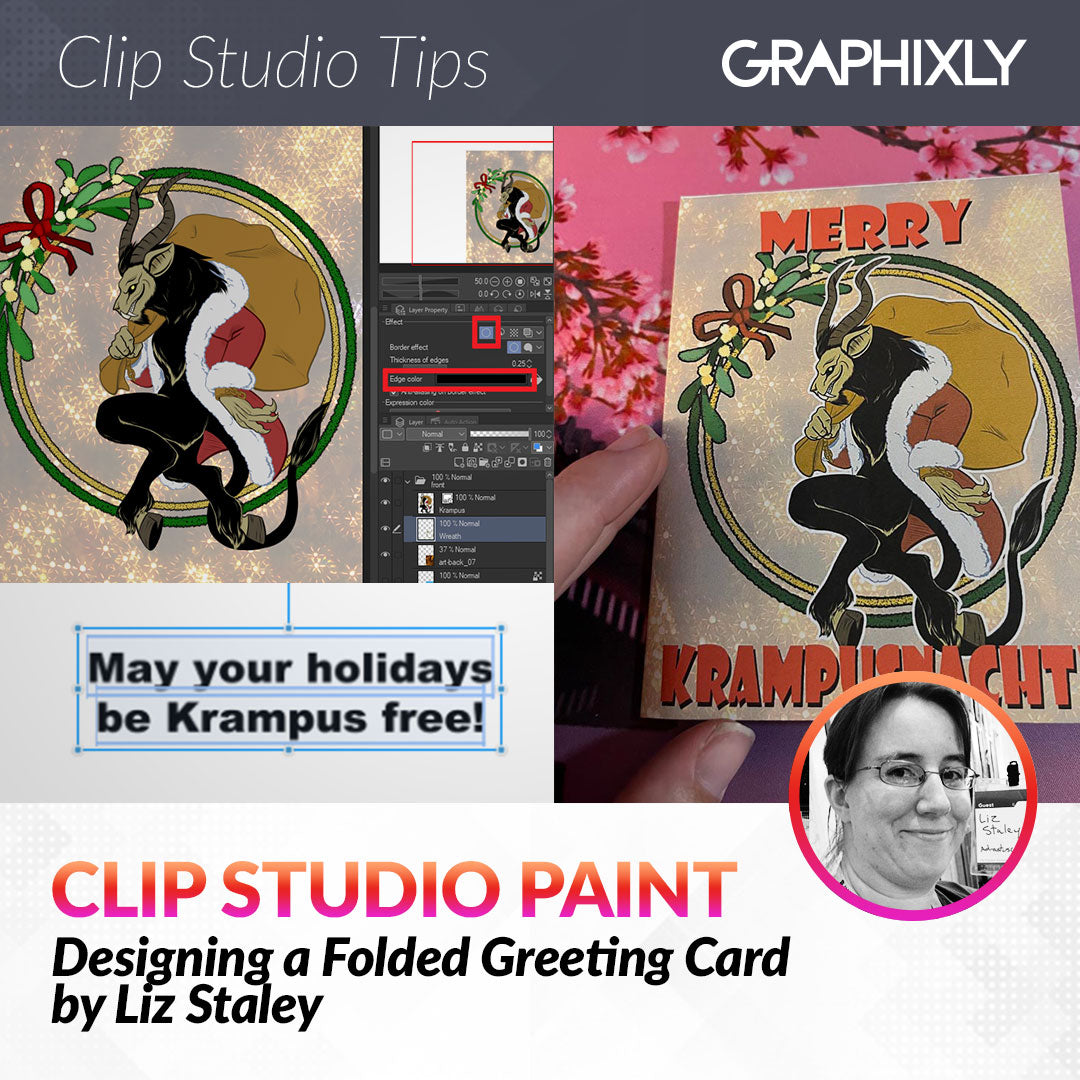
After deciding on a background image I then wanted to add a stroke (or outer border) to the wreath element as well as to my artwork. To add a stroke, select the relevant layer, then find the Layer Property palette. In the Layer Property palette, click on the first icon in the “Effect” section to turn on the Border Effect. This will open the Border Effect options. Click on the rectangle to the right of “Edge color” to change the color of the stroke. The default color is white but you can change it to anything you like!

Use the “Thickness of Edge” slider or arrows to make the border thicker or thinner.

I completed the same Border effect steps with my artwork, but left the color white to make the artwork stand out more.

Now it’s time to add some text.
Working With Text
Using the Text tool, click somewhere on the front of your card and type in your greeting. I’m going to have one word above my art and one word below, so I’m doing my text on two different layers.
In the Tool Property window for the Text subtool you can choose your font from the installed fonts on your computer, set the size, and also change the style between bold, italic, and more.

I want my second layer of text to be the same color, size, and font as my first one, and the easiest way to do that is to make a copy of the text layer and then change it to what I want it to say. Click and drag the text layer to the “New Raster Layer” icon in the Layer palette window.

Now I have “Merry” and “Merry Copy”, so I can move the Merry Copy layer down to the position of my bottom text. Then click on the copy layer with the Text subtool and erase the previous text before typing in the new text.

Because the bottom word is much longer than the top, I ended up making the font size smaller so the entire word was visible.

So far I like the look but I think a slight drop shadow on the text would make it “pop” more. Unfortunately, CSP doesn’t have a filter or layer effect that creates a drop shadow. But that’s okay because we can fake it with just a few clicks!
Make copies of both text layers using the instructions above. Then right-click on each copy layer and click on the “Rasterize” option. This changes our text from editable text to pixels. If you change your text layer you will have to repeat this process because the copy layers won’t be editable by the text subtool.

Now, with one rasterized layer on top of the other, right-click the top layer and click on Merge with layer below. This combines our two rasterized layers into one layer, and will make it easier to have both drop shadows even when we move them shortly.

Use the Lock Transparent Pixels option on the rasterized and merged text, then use the fill icon to change the color to whatever you want your drop shadow to be. I chose black for mine. Select the Move Layer tool and then use the arrow keys or click-and-drag to move the text copy to form the drop shadow. 
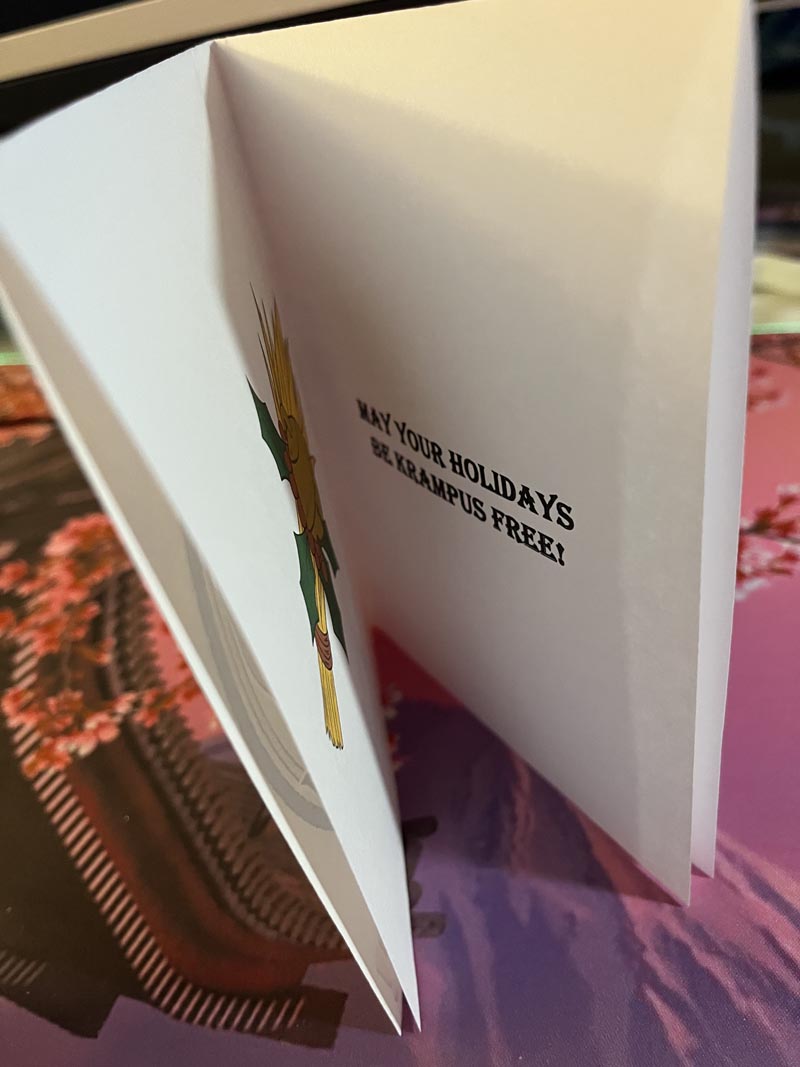
Now let’s add a greeting to the inside of the card. I want the text to be on the right inside of the card when it’s opened, which means that the greeting needs to go in the upper left side of the canvas, and be upside down.
Use the text tool and your favorite font to type your interior text in the upper left quadrant of your canvas.

Move your cursor over the circle handle above the text until it turns into a curved double-ended arrow. Click and drag to start rotating the text.

Holding down the SHIFT key on the keyboard will ensure that the rotation goes only in even steps. Hold down the Shift key and keep rotating until the text is completely upside down, then release.

Continue adding any additional elements, making sure that they are upside down if they will be in the inside of the card, until you are finished designing. Then print off your card and follow the folding instructions in the next section.
Folding Your Card
I saved my card as a jpg and then used my computer’s software to print it off on a regular sheet of paper. I’d recommend using a little bit heavier paper such as a cardstock if you want a nicer card. Below is how my card came off the printer. You can see that the elements for the outside of the card are right-side-up and the inside of the card is upside down.

Turn your print over so that it is face down on your table.

Take the edge furthest from you and fold it down toward you, meeting the top edge of the paper up with the bottom edge so that now you are looking at the inside design for the card (but with it face-up now!). Make a sharp crease.

Now take the left edge of the paper and fold it over to meet the right edge. You should be looking at the front of your card now. Make a sharp crease once you have the edges lined up.

Your card is now complete! If you stand it up you will notice that each of the sides is made up of two layers of paper because of the way we folded it. Your card will stand up nicely even if printed just on regular printer paper because of the double layers, however it will look even better if you use a thicker paper such as cardstock. When using thicker paper make sure to go over the crease with either a bone folder or the side of a pen to really make the folds sharp!
Sign your card and it is ready to give to a recipient!
Conclusion
Even though greeting card design isn’t what CSP was made for, it still is a perfectly fine program to use to lay out one - especially one as simple as a double-folded card where you only need to design for one side of a standard sheet of paper!
For more information on CLIP Studio Paint, please visit https://www.clipstudio.net/en or https://graphixly.com