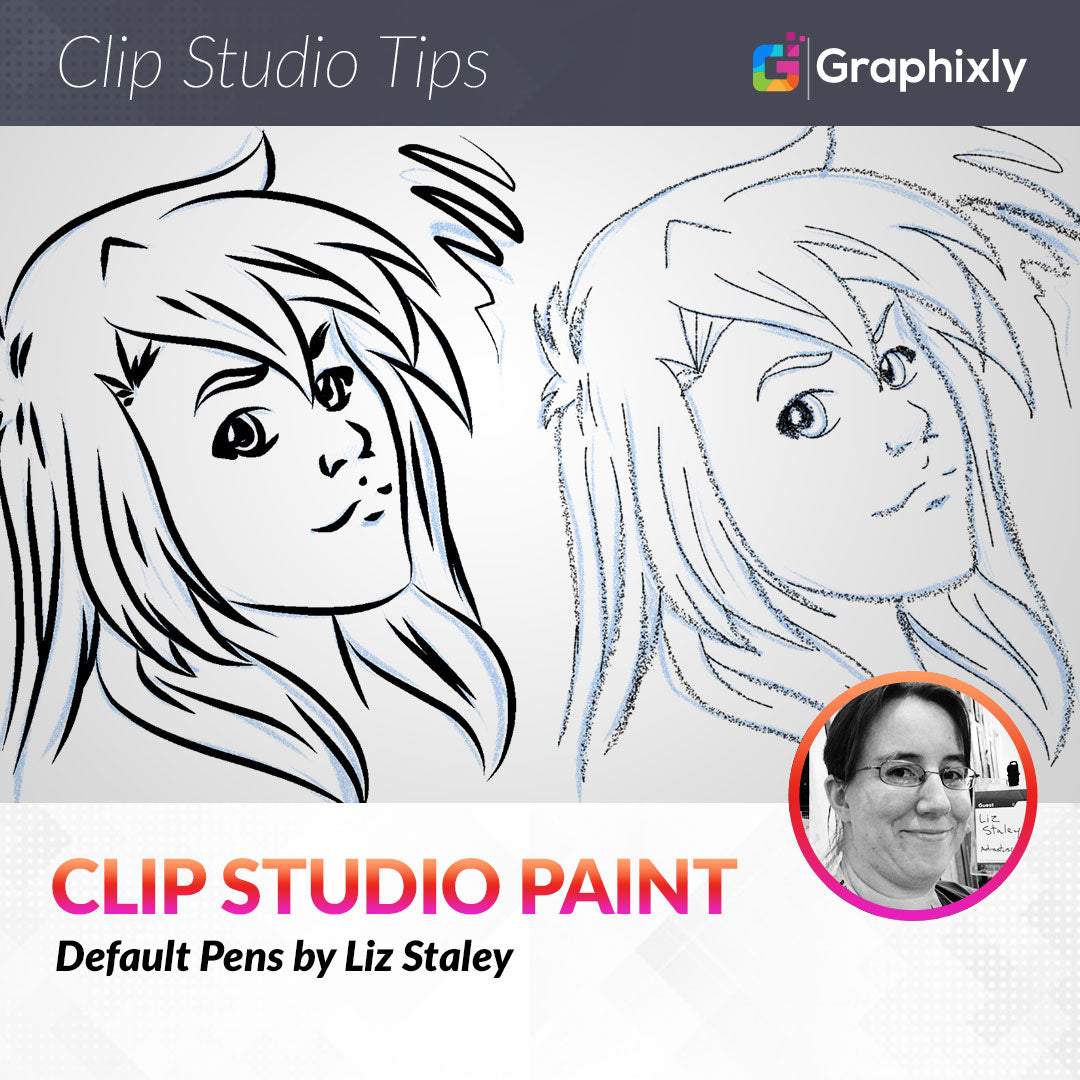
Default Pens
Contact Graphixly @
Hello! My name is Liz Staley and I’m a long-time user of Clip Studio Paint (I started using the program back when it was known as Manga Studio 4!). I was a beta-tester on the Manga Studio 5 program and for Clip Studio Paint, and I have written three books and several video courses about the program. Many of you probably know my name from those books, in fact. I write weekly posts on Graphixly.com and on CSP Tips, so be sure to come back every week to learn more Clip Studio Tips and Tricks from me!
Last week we talked about the default pencil tools and how they can be a great addition to your drawing arsenal, as well as when you might want to use them in your art. This time I’m going to cover the default Pen tools and their inking properties.
If you want some tips and tricks on inking, check out my Inking tutorial! https://tips.clip-studio.com/en-us/articles/3170
In this article we will cover the following topics:
G-pen
Real G-pen
Mapping Pen
Turnip Pen
Calligraphy
Tapered Pen
For Effect Line
Textured Pen
Let’s dive right in!
G-pen
The following image was inked with a zoom of 150-200% and a 10.0 Brush Size.

The G-pen, for me, is a little stiffer than I’d like. Which makes sense, because a real life G-pen is a fountain pen with a metal nib, so it does take a bit of pressure to get a thicker line with one! However, I did find it easy to control how thick and thin my lines got without them getting out of control. To be honest, this is a great “starter inking brush” for those who want to try out pressure sensitivity and are still getting their feet wet with varying line weights.
If you’re new to inking and to using varying line weights, the G-pen might give you a little more control over your strokes until you gain confidence.
Real G-pen
The following image was inked with a 200% zoom and an 8.0 brush size.

The Real G-pen feels, to me, like something between a metal nib pen and a brush. Considering that my favorite “pen and paper” inking device is a brush, that means that I much prefer the feel of this pen tool over the G-pen tool. It seems to have a bit more give to it and doesn’t require quite as much pressure to get to the thickest line weight. It also goes to the thinnest line from the thickest quite easily. This one was a joy to use for how I like to ink.
The Real G-pen has a little more of a “paintbrush” feel and might be a good tool for the more confident inker. It requires less pressure, so may be ideal for those who use a lighter pressure on their tablet.
Mapping Pen
The image below was created with a 200% zoom and a 10.0 brush size.

The first big difference with this pen over the previous two is that, by default, there is no anti-aliasing turned on. This means that instead of the computer “blurring” around the edges of the lines to make it a bit softer and make the transition from the line to the background color not so abrupt. When zoomed in, “aliased” lines will look “jagged” or “pixelated”. This is because there are no gray pixels around the edge of the lines to smooth them out.
If you like the way this pen behaves, but don’t like the aliasing, you can change it in the Sub Tool Detail menu. However, there are times when using an aliased inking tool can be a good idea! If you are making a pure black and white comic or image that will not have any gray or color, you can create your canvas at a higher DPI (like 600 or even 1200, if you have a good enough hardware setup) and keep the color settings on Monochrome while inking with aliased tools. This will make your file size smaller because the images are made up of only white and black pixels. Plus, your lines will look SUPER crisp and clean when they are sized down for printing or for web display.
Artists who work on pure black and white art at high DPI and who like a responsive pen with great pressure sensitivity may like the Mapping Pen.
Turnip Pen
The following image was inked with the Turnip pen, at 200% zoom with a 10.0 brush size.

This was probably my favorite of the default pen tools! It has a great sensitivity and just felt really nice for me to use. As I said before, I use a brush when inking on paper, and to me this felt the most like having a brush in my hand. It’s a responsive brush that goes from thin to thick and back again without too much pressure, and does it evenly.
If you want an inking tool that smoothly goes from thick to thin and feels more “brushy” than like a pen, this is the one I would recommend for sure!
Calligraphy
The drawing below was made with the Calligraphy pen at 15.0 brush size and with a zoom of 150%.

This brush seems to be for exactly what it says in the name - Calligraphy writing. It has no default pressure sensitivity, so each stroke simply starts and ends at the same width, and the only line variation comes from the brush tip shape, which is a long and slanted oval. This brush is made to mimic a calligraphy pen being held by a right-handed person, since the default slope goes downward from right to left.
This pen would be good for someone who is emulating calligraphic writing digitally - and that’s probably exactly what I’m going to use it for myself! I personally wouldn’t use this for character art myself, but with the right art style it could look really amazing.
Tapered Pen
The image below was created at 200% zoom with a 8.0 Brush Size

The tapered pen was my third favorite pen to use for this article. It feels like something between a brush and a pen and is very responsive to tablet pressure. It also has “Adjust by speed” enabled by default. This means that the faster you draw a stroke, the more Clip Studio Paint will adjust the beginning and end of the line. The default settings for this pen will taper the start of the stroke a little bit and the end of it by a larger amount, meaning that the end of your stroke will go off to a point if you draw it quickly, even if you don’t gradually take the pressure off your stylus in an even way. It’s a bit hard to explain, so give it a try and make some quick marks with your stylus to see what it does!
If you’re an artist having trouble with tapering the ends of your lines then this might be the pen for you. This pen would also look really nice when combined with a ruler to make speed lines or other effect lines that need to taper off.
For Effect Pen
The following image was created with a 14.0 brush size and 150% zoom.

This was, without a doubt, the most frustrating pen for me to use, mostly because I felt like I had no control over it. When using this pen, the stroke that you’re drawing looks like it’s all one width. But once you finish your stroke, the beginning and end of the line autocorrect and taper. If you look at each of the lines in the image above, you can see that every one of them starts off thin, goes to the same thickness in the middle, and then tapers off at the end. This looks good on some lines, but in the areas when I want all the lines to be thicker because the area is in shadow, it’s not the effect I’d be looking for!
For the artist who is very uncomfortable with line weights but wants the look of tapered lines, this might be the pen to use. You do sacrifice control with the default settings though, so you may want to adjust the settings if you don’t want every line to look the same.
Textured Pen
The following image was inked using the Textured pen at 8.0 brush size and 150% zoom.
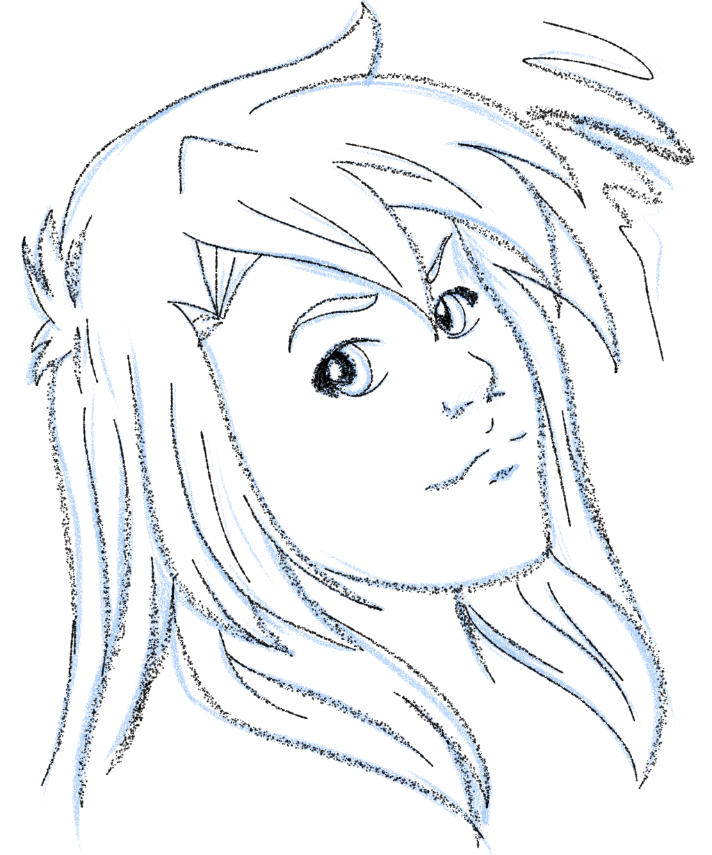
This pen is definitely interesting to use. As you increase the pressure on your tablet, the particles that make up the brush tip get more space between them. This gives the lines an interesting look, as you can certainly see from the example above!
I think there are art styles and applications where this brush would be fine in its default state, but I’d tweak it before using it myself - mainly because I tend to use thicker lines for my art!
If you want a really rough, almost “sketchy” look to your thicker lines, or are looking for a way to draw a special effect, then this pen might be the one to use!
Conclusion
I really can’t overstate how good the set of tools that come pre-installed in CSP are! There’s a wide range of tools with different looks and feels to them, so users who don’t want to create their own brushes or download brushes should be able to find a tool that they like to use.
For more information on CLIP Studio Paint, please visit https://www.clipstudio.net/en or https://graphixly.com