Customizing 3D Model Body Type
Contact Graphixly @
Hello! My name is Liz Staley and I’m a long-time user of Clip Studio Paint (I started using the program back when it was known as Manga Studio 4!). I was a beta-tester on the Manga Studio 5 program and for Clip Studio Paint, and I have written three books and several video courses about the program. Many of you probably know my name from those books, in fact. I write weekly posts on Graphixly.com and on CSP Tips, so be sure to come back every week to learn more Clip Studio Tips and Tricks from me!
Last week in my Character Design tips article I talked about using CSP Assets for reference to make your characters’ body and face shapes unique. But what if you want to customize a body shape to your own tastes but you don’t know how to 3D model? Thankfully, we can customize a 3D body type right in CSP with some simple steps!
In this article we will cover the following topics:
Customizing a Body Type
Saving Body Type as a Material
Let’s get started.
Customizing a Body Type
First let’s get a 3D figure out onto our canvas to customize! Open a canvas (doesn’t matter what size), then open the Materials Library and go to 3D - Body Type. Let’s select one of the basic male or female default drawing bodies. You can now click and drag the thumbnail for the body type to the canvas to add it.

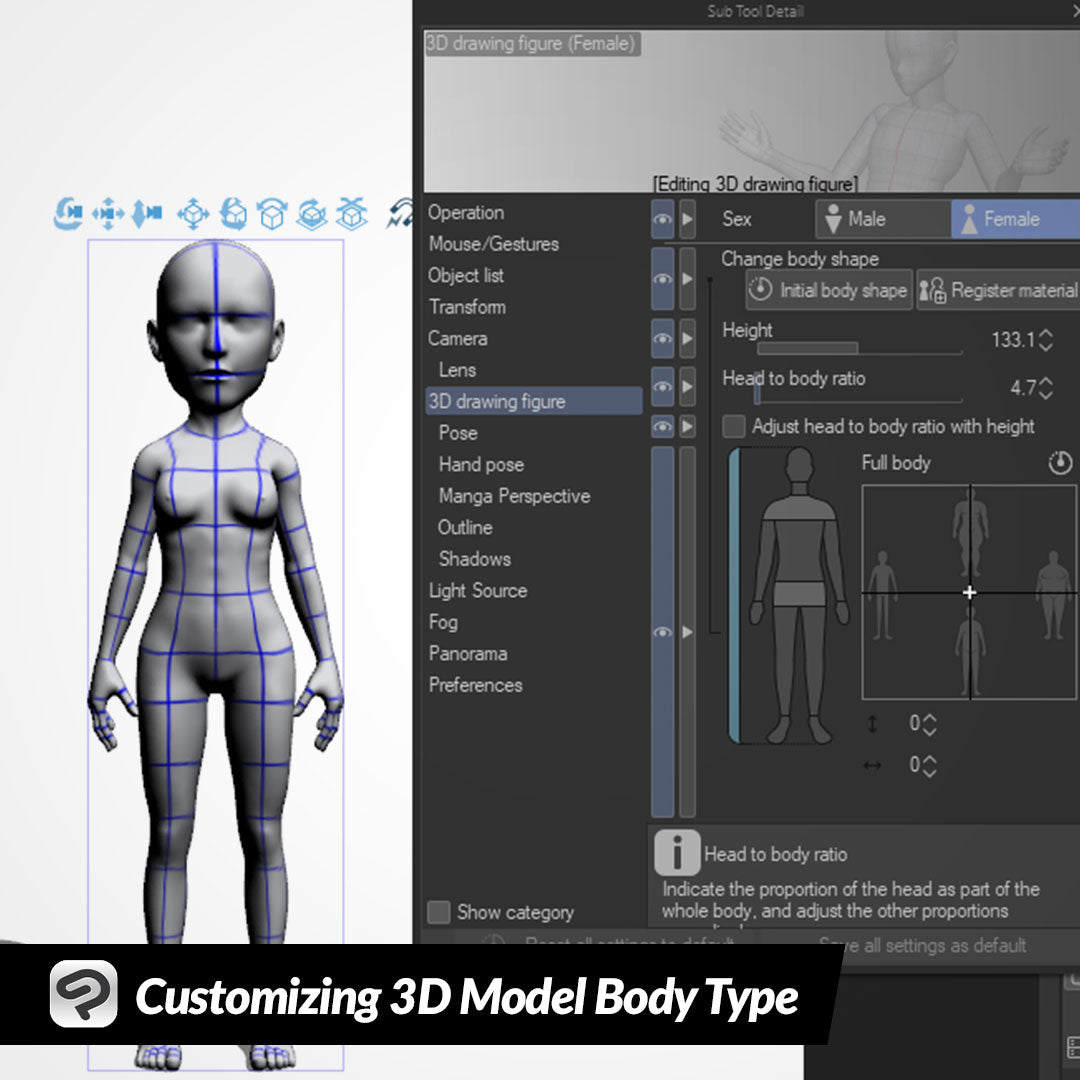
With your 3D figure selected, click on the wrench icon in the lower right hand corner of the Tool Property window to open the Sub Tool Details window. In the menu on the left side of this window, click on the “3D drawing figure” category to open the customization options.

At the very top of this options window there are two buttons to change the sex of the drawing figure and toggle between the male and female options.

Let’s ignore the next section of options and go down to the Height sliders. Adjusting the Height slider does exactly what it sounds like - it changes the height of the character! If you have several characters who you know the heights of in centimeters, you can actually use this slider to make your models all the correct heights compared to one another, which is great for group shots!
Note that if the “Adjust head to body ratio with height” checkbox is checked, the head size will be changed as the height slider is adjusted to match the current value of the Head to Body Ratio slider.

With the “Adjust head to body ratio with height” checkbox turned off, you can adjust the height and the head to body ratio independently of one another.

In addition to changing the height of the entire body, we can adjust the proportions of almost all the body parts individually. To do this, click on a body part in the simplified drawing in the Sub Tool Detail window. This will bring up a controller of that particular body part where the height and width can be adjusted, such as the head adjustment in the following image.

Almost every part of the 3D figure can be adjusted independently, aside from the shoulders and the hips. Note also that some parts have even more individual adjustment, like the upper and lower torso, upper and lower arms, and upper and lower legs.

What if we want to make our character thinner, or more muscular? In addition to being able to adjust the proportions and height of our model, we can also adjust the body type. Click on the blue bar to the side of the drawing of the model in the Sub Tool Detail window to reselect the entire model for adjusting.

When in this mode, the controller to the right of this drawing is divided into four quadrants. Horizontally these are scrawny and fat, while vertically they are muscular and untoned. By dragging the + sign you can mix these quadrants to get a body type combination that you like.

If you make changes that you don’t like and want to start again from the default model, you can click on the “Initial body shape” button above the Height slider to reset to the model you started with.
Next, let’s save our customized body type so we can use it again later!
Saving Body Type as a Material
After customizing your body type, you definitely will want to save your model so you can use it again later on (especially if this is for a character you’re going to be drawing many times or is a body type you just like drawing!)
Click on the “Register material” button above the Height slider to start the saving process.

In the Material Property window, enter a Material Name to describe your body shape. I also like to choose the 3D - Body Shape folder under the “Choose save location” option.
If you want to be able to find your custom material quickly, I recommend adding tags by clicking on the + symbol at the bottom right of the “Search tag” window, and also adding a Material Image. You can click on the folder icon to the right of the Material image text and load any image from your files to show as the thumbnail in your material library.

Click on Ok to finish saving your material. Your custom body shape will now show in your Material Library! Drag and drop it to any canvas to use it again!

Conclusion
It’s very easy to customize a reference for your characters to make each one as unique as possible and to fulfill your vision for your work with just a little bit of time. Don’t forget to save your character body shapes to use them easily in the future as well so you’ll save time!
For more information on CLIP Studio Paint, please visit https://www.clipstudio.net/en or https://graphixly.com