Rulers Part 6 - Creating One Point Perspective using Perspective Ruler
Contact Graphixly @
Hello! My name is Liz Staley and I’m a long-time user of Clip Studio Paint (I started using the program back when it was known as Manga Studio 4!). I was a beta-tester on the Manga Studio 5 program and for Clip Studio Paint, and I have written three books and several video courses about the program. Many of you probably know my name from those books, in fact. I write weekly posts on Graphixly.com and on CSP Tips, so be sure to come back every week to learn more Clip Studio Tips and Tricks from me!
When I first learned about this software, it was the Perspective Ruler tool that made me realize how awesome it was and influenced my decision to start using it. And I still think that the built-in ruler tools are one of the coolest features in CSP. Covering all the ruler tools in one tutorial would result in a huge amount of text, so this is part 6 of my ruler series. Finally we’ve gotten to the tool that made me buy this program in the first place!
In this article we will cover the following topics:
A Few Notes About Perspective Drawing
Perspective Ruler Settings
One-point Perspective Using the Perspective Ruler
Let’s dive right in and get started!
A Few Notes About Perspective Drawing
Before we get started, I want to say a few things about drawing in perspective. Being able to draw convincing perspectives is, in my opinion, a critical skill for just about any artist (but especially comic artists, concept artists, etc). It’s not a very difficult skill to acquire, but it does require some practice and a lot of learning. Thankfully, there are a lot of resources online that will teach you how to draw in one, two, and three-point perspective.
That being said, this article will NOT be covering how to draw in perspective, or the more advanced concepts of perspective drawing. This is simply about how to use the Clip Studio Paint Perspective Ruler.
If you’re a comic artist who wants to ramp-up your background drawing skills, I recommend “Vanishing Point: Perspective for Comics From the Ground Up” by Jason Cheeseman-Meyer as a fantastic book to have for reference. Even after drawing perspective for years, I still learned a lot from this book when I was creating comics!

Perspective Ruler Settings
The Perspective Ruler, compared to some of the other rulers we’ve covered in this series, actually has very few settings! So let’s take a look at them quickly before we get into how to set up a one-point perspective ruler and use it.
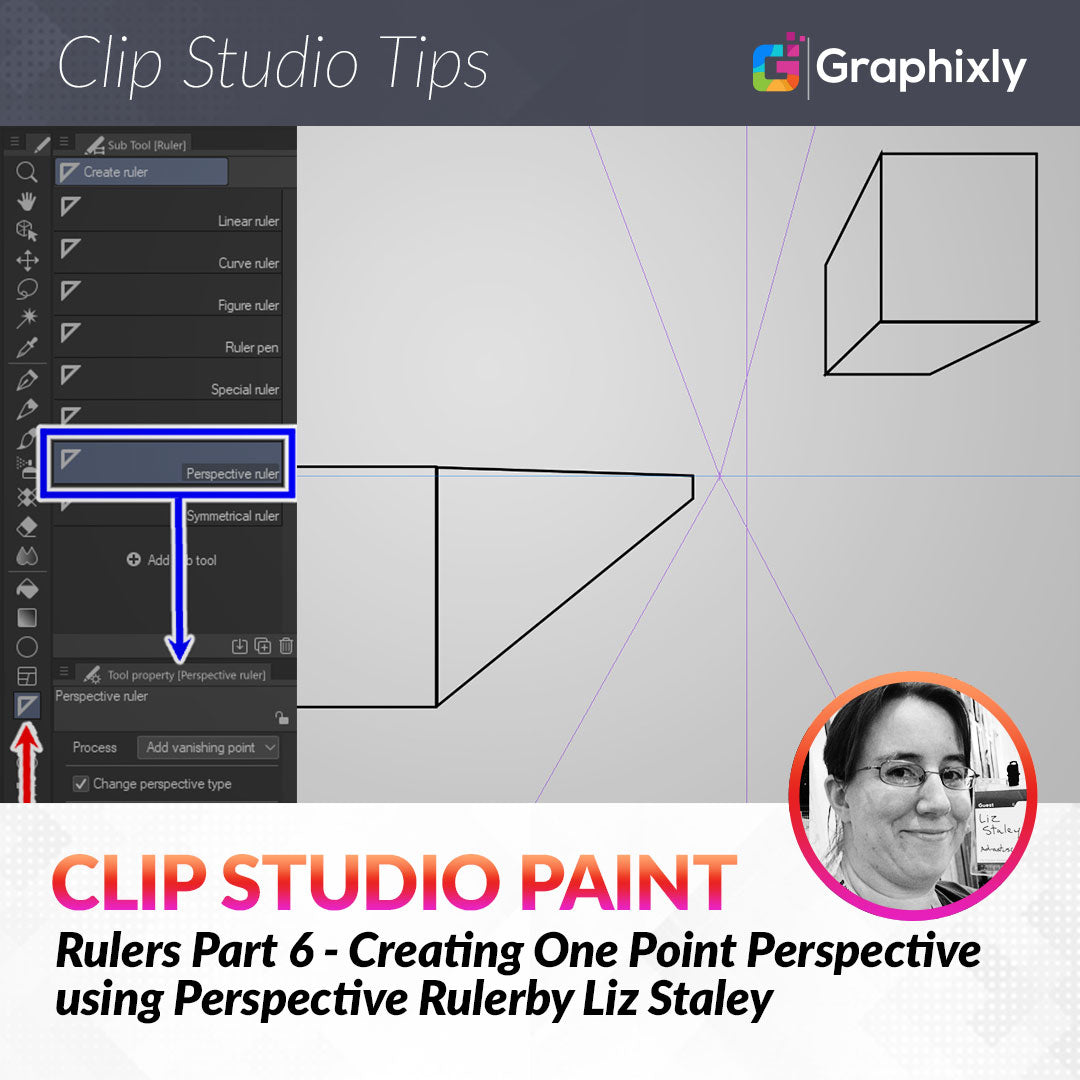
You can find the perspective ruler by clicking on the Ruler tool group (shown by the red arrow in the image below) and then clicking on “Perspective ruler” in the Sub Tool window (shown with the blue rectangle also in the image below). Settings are shown in the Tool Property window below the Sub Tool window.

The Perspective Ruler has only three options, which by default are all shown in the Tool Property window. We can check this by clicking on the small wrench icon in the lower right-hand corner of the Tool Property window to bring up the Sub Tool Detail window, shown below.

The Process drop-down menu is the main way to adjust and customize your Perspective Ruler. This menu allows you to add and delete vanishing points, add and delete guides, fix vanishing points, and Infinitize vanishing points. Most of these options are self-explanatory, I think, especially when we get into actually setting up the ruler. But let’s go through each of the Process options quickly.
Add Vanishing Point: Create a vanishing point. You can use this to start a new perspective ruler or create additional points on an existing ruler.
Delete Vanishing Point: Get rid of an existing vanishing point.
Add Guide: Create a new guide, which is a line that radiates out from a vanishing point.
Delete Guide: Get rid of a guide line.
Fix Vanishing Point: Lock a vanishing point.
Infinitize: Switch a vanishing point to infinity. I’m going to be frankly honest here, I’ve never seen a difference with this option or known the point of it, so I never use it.
That’s all the dropdown options for the Process option. Let’s look at the other two options for the Perspective Ruler as well.
The Change Perspective Type checkbox, when checked, will automatically change the perspective type if a vanishing point is added to the existing ruler. For example, when adding a second vanishing point, the perspective type will be changed from one-point to two-point. With this box unchecked, vanishing points can be added without changing the perspective type.
Finally, the Create at Editing Layer checkbox controls where the ruler will be created. When checked, the perspective ruler is created on the currently active layer. When unchecked, a new layer will be created for the ruler at the bottom of the layer stack.
Now that we’re familiar with the settings of the Perspective Ruler, let’s create a ruler.
One-point Perspective Using the Perspective Ruler
Creating a perspective ruler is pretty simple, especially after you’ve done it a few times and are familiar with the parts of it.
I do recommend, if possible, to do a rough sketch of the scene you want to draw in perspective before setting up your ruler. I find this makes it easier to set the ruler up correctly. For this demonstration I won’t be doing a sketch beforehand, but I wanted to put that tip in anyway!
With the perspective ruler tool selected and the Process set to “Add Vanishing Point”, click and drag out a line on your canvas. This will be your horizon line. To keep the line straight, hold down the SHIFT key on your keyboard. Release the mouse when you have your horizon line set up.

Now click on the horizon line where you want your vanishing point to be and drag out from the horizon to set a guideline. The screenshot below shows my horizon line and the initial guide.

Even though only one guide is showing, there’s actually a second line that’s been created as well. We need to find it though because it’s hiding in the horizon line at the moment! Let’s take the Operation - Object tool and click on the perspective ruler to select it. Doing this will show all the various Perspective Ruler handles and controls, as shown below.

All the little circles and dots on the lines of the ruler are various controls. The one we’re concerned with, though, is the move control for the guide we’re looking for. This control is actually the third dot to the right of the vertical line in the image above (the only completely white circle on the horizon line). Clicking on it selects it and now we can move it, as shown below.

Now we can position this second guide to where we want it. This is where having a sketch would come in! For instance, if my sketch had a road heading toward the horizon, I would put both of these guides on the sides of the road in the drawing.
If you want to know exactly what all the controls of the Perspective Ruler are, there is a fantastic entry in the Clip Studio Paint Instruction Manual that details all of them. You can find it here: https://www.clip-studio.com/site/gd_en/csp/userguide/csp_userguide/740_pers_ruler/740_pers_ruler_function.htm
While we’re adjusting and perfecting our perspective ruler, we don’t have to keep going back to the Perspective Ruler tool to add guides or additional vanishing points. Simply right-click on the perspective ruler to show the pop-up menu, shown in the image below.

This menu gives us the same options as the Process dropdown from the Perspective Ruler subtool, with a few extra options. This menu also has options to Fix Eye Level (just like Fix vanishing point, but for the horizon line), and Horizontalize Eye Level (make eye level horizontal).
Once you have your one-point perspective ruler set up, you can use your favorite drawing tools to draw out your background or objects in perfect perspective. Make sure that the “Snap to Special Ruler” icon in the Command Bar is active so the drawing tools follow the ruler.
Most drawing tools will snap to the Perspective ruler, including the Figure tools. The image below was made using the Rectangle Figure Tool to create each side of the blocks.

Below is a short video I recorded of setting up a simple one-point perspective ruler and drawing on it using various drawing tools, including pen tools, figure tools, and Effect tools.
Conclusion
In this article we learned about creating a one-point perspective ruler using the Perspective Ruler tool. This is just one way we can use this incredibly powerful tool. Come back next time for more perspective fun when we cover creating Two-point and Three-point Perspective rulers!
For more information on CLIP Studio Paint, please visit https://www.clipstudio.net/en or https://graphixly.com