Creating Comic Frames Part Two
Contact Graphixly @
Hello! My name is Liz Staley and I’m a long-time user of Clip Studio Paint (I started using the program back when it was known as Manga Studio 4!). I was a beta-tester on the Manga Studio 5 program and for Clip Studio Paint, and I have written three books and several video courses about the program. Many of you probably know my name from those books, in fact. I write weekly posts on Graphixly.com and on CSP Tips, so be sure to come back every week to learn more Clip Studio Tips and Tricks from me!
Welcome to part 2 of Creating Comic frames. In the previous article we covered the “Create Frame” subtools and how to use them. In this article, we’re going to go over my favorite way of creating comic frames, including how to set up a story file to make panel creation even faster.
In this article we will cover the following topics:
Setting up a Story File with a Frame Template
Using the Cut Frame Border tool
Adjusting Panels
Let’s dive right in!
Setting Up a Story File with a Frame Template
If you don’t have CSP EX, you won’t be able to create a story file. However, you should still be able to use a Framing Template on a single page, so some of this section can apply to you too. When I was making comics, I would create a story file for each new chapter and apply a basic one-frame framing template to all the interior pages so that it was easier to go in and quickly cut the large single panel into smaller panels. So that’s what we’re going to start with in this tutorial, but of course you can choose to do this differently if you don’t like this method!
I’m going to start by clicking File - New and choosing the size document I want to create. I’ve made a 4 page document with no cover pages, and made sure that the “View” option under Multiple Pages is set to “Page-by-Page” instead of “Webtoon”. All my settings are in the screenshot below.

By the way, if you’re a beginner and need more information on creating a file, this is the link for you: https://tips.clip-studio.com/en-us/articles/3458
Before we actually hit “OK” and create our new document, I want to apply a Template to all the pages. The Template checkbox is located in the “Canvas” section of options, beneath the Paper Color option. You can see it indicated by the red arrow in the following image.

Checking the Template box will bring up the Template selection window, which is shown in the middle of the above image. This is connected to the Framing Template section of your Materials library. I’m choosing the One Frame template, which will create one large frame on each page at the size of my Default Border settings. Click on OK to select the framing template to apply.
Now click on OK to create the new file. You can see in the image below that each of my four pages has a rectangle with a black border in it.

Opening one of these pages shows that each page already contains a Frame Border layer on it, ready to be quickly sliced up into more panels.

Using this template is a small thing that can save you a couple seconds of time with each page, which adds up over time. This is what always worked for me to get the page set-up process done quickly so I could get to the fun part (drawing) a little bit faster!
Now that we have our file set up and a panel we can use with the Cut Frame tools, let’s move on.
Using the Cut Frame Border Tool
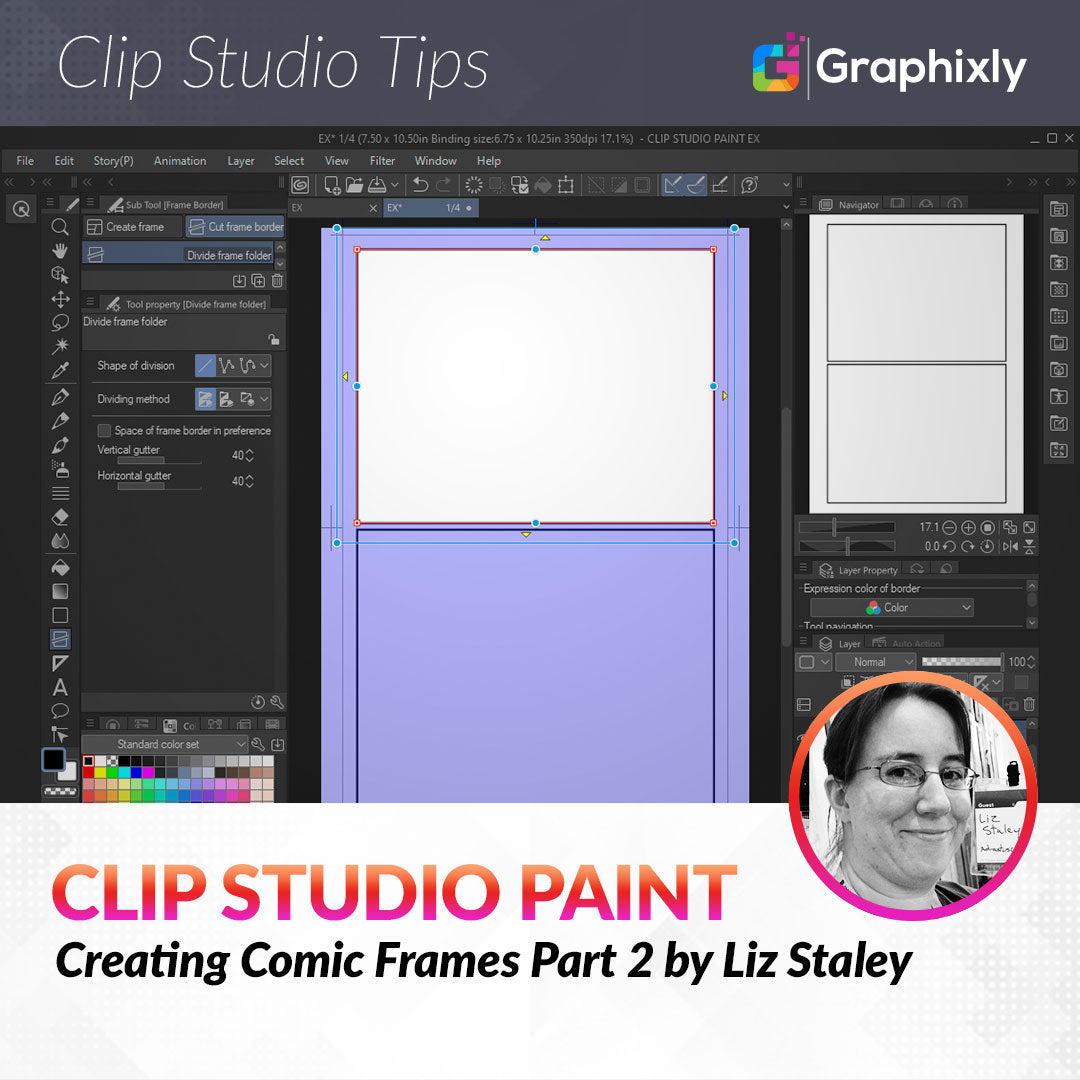
The Cut Frame Border tools allow us to take an existing panel or panels and split those panels up. There are two subtools in this folder, “Divide frame folder” and “Divide frame border”. These both work the same way, except the Divide frame folder tool creates each new panel in its own folder, with its own layer mask. Divide frame border keeps all frames in one folder and has them share a layer mask.
I’m going to mainly be using the Divide frame folder tool in this tutorial because it’s my favorite of the panel creation tools. I LOVE having my frames all in their own folders, partially because it allows me to organize a little better but also because of each frame having its own mask. This means that each frame has a “barrier” around it, preventing anything drawn outside of the panel boundaries to show. For a messy sketcher like me, this is a great thing!
When you have each panel sharing one folder and one layer mask, you have to be extremely careful that your art for one panel doesn’t bleed into the adjacent panels. The image below shows panels that share a layer mask. Note that lines from one panel are visible in other panels because they are not blocked off with the layer mask.

Let’s quickly take a look at the Tool Property options for the Divide Frame Folder subtool, which are almost exactly the same as the Divide frame border tool! Select the Divide frame folder subtool and then click on the small wrench icon in the lower right corner of the Tool Property window to open the Sub Tool Detail window and see all the options that may not be shown in the tool property window.

Shape of division: Controls how the division is handled. The options are either one straight line, polyline (straight lines that change direction - think a zig-zag!), and spline. Spline allows us to create divides that are made of curves, which we’ll see in just a little bit.
Step of angle: set the smallest number of the line angle. Used for when you need a very precise angle to your lines.
Add/delete control points while drawing: Only active when “Divide by polyline” and “Divide by spline” are chosen. Allows you to click to add control points to a divide you’re currently making, and click on existing points to delete them also.
Dividing method: The three icons here are “Divide frame folder and duplicate inside layer”, “Divide frame folder and create empty folder”, and “Divide not folder but frame border”. Use the first option to create a new folder with each divide and also duplicate layers inside the folder. Basically, if you have a blank layer inside the first panel all ready for drawing, each folder will then be created with another blank layer, saving some precious time! The second option is pretty self-explanatory, and the third turns the Divide frame folder tool into the Divide frame border tool.
Space of frame border in preference: Sets the frame border space (the “gutter” between panels) according to the value set in the Clip Studio Preferences instead of in the tool.
Vertical Gutter: Sets the vertical space between panels.
Horizontal Gutter: Sets the horizontal space between panels.
Now that we’ve had a quick look at the settings, let’s use the tool! I’m going to use the Divide by straight line option, as well as the “Duplicate inside layer” Dividing method.
To start cutting up frames, simply click and drag with the Divide frame folder tool where you want to start your division. A set of preview lines will show up across the panel, as shown in the following screenshot.

You can hold down the SHIFT key on your keyboard to get a perfectly straight line. Once the preview lines are in the position you want them, release your mouse button to complete the division.

Looking in the Layer palette you can see that I now have two layer folders - “Frame 1” and “Frame 2”. The black and white thumbnails to the left of each folder name are previews of the layer masks associated with each frame, and are a quick way to tell which frame is associated with each folder when looking at the list of layers!
Next let’s change the Division Method option to “Divide by polyline” and cut the top panel in half using it. Click at the edge of the frame to be divided, then move the cursor and click where you want the line to change directions.

Continue clicking and moving to make the shape of the division, then double-click to finish cutting the frame. You can see in the image below that we now have three comic frames, two in the top row and one on the bottom. The two in the top row are separated by a zig-zag divide.

The Divide by spline option works the same way as the polyline method. Click along the edge of the frame to be divided, then click again where you want it to change direction. Double-click when you want to finish splitting the panel. The bottom panel in the following image has been divided using the Spline division method.

You can use any of these methods to quickly turn one large frame into multiple frames. In the next section we will quickly learn how to resize and adjust existing panels.
Adjusting Panels
Resizing and repositioning existing frames is as easy as creating new ones! As we learned in the first part of this series, to make small changes you simply select the Operation - Object subtool and click on the border of the frame you want to change. You will see a blue outer box with control points that you can use to click and drag to resize the frame. Along the edges of the panel you will also see a red line with control points that can also be dragged.
But did you know that you can have adjacent panels automatically adjust themselves as you resize another panel, while keeping your desired gutter width? Let’s take a look at the Tool Property panel of the Object subtool WHILE we have a comic panel object selected.
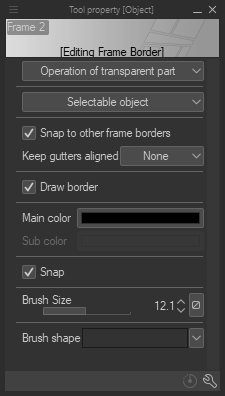
In this menu we can change the color of the panel line using the Main Color window, and even change the width of the outer line using the Brush Size slider. But the option we’re most interested in for this example is the “Keep gutters aligned” one.
Let’s see what happens when Keep Gutters Aligned is set to “None” and we move a control point on one of our panels.

The right-hand panel is now overlapping the left-hand panel from where the control point has been moved. We could move the control points on the left-hand panel to try and match the new shape, or we could let CSP handle that!
Change the “Keep gutters aligned” dropdown menu to the “All” option before moving any of your panel borders, and you will get the results we see in the screenshot below instead!

Now Clip Studio Paint will keep our gutters the same width that we set them as when we created our panels, and we save some time by not needing to change the points on two panels!
With all the skills and tools we’ve covered in this article and the previous one, you should be a panel-creating master!
Conclusion
I hope that over these past two tutorials you’ve seen just how quick and easy it is to create panels for your comic creations. These tools are set up to be simple to use and to help you get to the fun parts of being a comic artist faster, without needing to worry about how you’re going to create and manage your panels!
For more information on CLIP Studio Paint, please visit https://www.clipstudio.net/en or https://graphixly.com