Making an Animatic Part Two
Contact Graphixly @
Hello! My name is Liz Staley and I’m a long-time user of Clip Studio Paint (I started using the program back when it was known as Manga Studio 4!). I was a beta-tester on the Manga Studio 5 program and for Clip Studio Paint, and I have written three books and several video courses about the program. Many of you probably know my name from those books, in fact. I write weekly posts on Graphixly.com and on CSP Tips, so be sure to come back every week to learn more Clip Studio Tips and Tricks from me!
Last week we started talking about creating an animatic for an animated project. This article will take the script and storyboards we created last time and turn them into a movie - or, rather, a plan for a movie!
In this article we will cover the following topics:
Setting up an animation file
Doing Basic Keyframe Animation
Importing and Editing Audio Files
Exporting your Animatic
Let’s get started!
Setting Up An Animation File
The first thing we need to do is get a file set up to create an animatic in. Go to File - New or press Ctrl+N to open the New file settings options. In the “Use of Work” area, click on the Animation icon. This will bring up the settings specifically for creating animation files.
Enter a name in the File Name text box. If you don’t enter a name your file will be called “Animation” until you save it, so you still have a chance to save it under a different name if you forget to enter your desired name in this box.

The Preset dropdown menu has a couple of default settings for different screen sizes. The one that you choose will depend on the aspect ratio you decided on back in the storyboarding step in the previous article. I chose the 1280x720 preset because it’s a 16:9 aspect ratio, which matches my storyboards.
The only other areas of the New settings we really need to worry about for this project is the Frame rate and the Playback time. Most animation for TV and movies is done in 30 frames per second or more. However, since this is just an animatic and the motion doesn’t need to be extremely smooth, I’m making the choice to keep the frame rate at 8 frames per second. This will make it easier to work with our timeline and should make the file size smaller as well.
Once we’ve chosen the frame rate, we want to then adjust the Playback time. After reading the dialog in my storyboards out loud, I think I need about 25 seconds of time for this animatic. So I multiplied 25 x 8 (the frame rate) and found I needed at least 200 frames to create 25 seconds of animatic.
With these settings adjusted, hit OK to create the new file.

Once the new file is created you should see your working area and also the Timeline window. The Timeline is where you will control the timing and movement of all your elements, so you definitely want to make sure it’s open before continuing! If you don’t see the Timeline window (indicated above in the red box), go to Window > Timeline to open it.
Now we’re ready to start adding elements from our storyboards and doing simple keyframe animation!
Basic Keyframe Animation
To create the animatic we are going to take the elements from the storyboards we created last week and do some very basic keyframe animation with them to show the general movement and work out the timing of shots.
The first shot of my storyboard plan is a simple pan over a city and night while two characters are speaking in voiceover. With my storyboard file open in a separate tab from the animatic, I selected the large city shot from the first frame of the storyboard using the rectangle selection tool, then copied it. Go back to the Animatic file and, making sure you’re in the “Animation Folder 1” folder in the Layer window, paste in the storyboard element. You may have to go to Edit > Paste instead of using the keyboard shortcut command.

Even though we’ve pasted in our background element, it probably won’t be showing in our animation window yet. This is because we need to tell CSP what layer to show at what time in the timeline.
So let’s start setting up frames in the timeline! Animation Folder 1 should already be showing on the left side of the timeline window, along with a preview of any layers that are in the folder. Clip Studio Paint created a “1” layer when we made the file, but we won’t need this layer because we’re going to use the images from the storyboards instead of drawing all new ones.
First, make sure that your timeline is on the first frame. You can check this by looking near the top of the timeline window, where you will see numbers going out horizontally along the timeline. These are frame numbers, and each second is also indicated. The red vertical line that shows both in the numbered area of the timeline and goes down through the layers is what we’ll call the “scrubber”, which you can drag back and forth across the timeline to “scrub” through your animation.
After ensuring that the scrubber is at frame 1, right-click at frame 1 in the Animation Folder 1 level of the Timeline. A pop-up menu will appear, and to the left in this window should be a list of the layers that are currently in this animation folder. Select the layer that should be displayed. In the screenshot below, I want the layer titled “Shot 1” to show, so I click that.

Now you should be able to see your pasted element in the animation canvas. Use the transform tools to resize and move it, if needed. I needed to both resize the city shot and move it all the way to the left so that we can do the keyframe animation to make the city pan toward the right with the keyframes we’ll be adding.
What are keyframes? A keyframe in traditional animation is a main pose in an action. Keyframe animators used to draw these parts of the movement, and then “in-betweeners” would draw all the frames between the key frames to smooth out the motion and complete the animation.
In computer animation keyframes are very similar, but the computer fills in the inbetween frames. The computer can’t take a character from one pose to another, but it can move something left, right, up, or down, rotate it, or change the opacity between two or more keyframes. This is perfect for something like an animatic where we’re just flipping between shots and doing basic movements of elements to check the timing for a finished project.
Before we can start adding keyframes, we need to enable them on the timeline layer. To do this, make sure you’re on the layer you want to do keyframe animation on, then click on the icon shown in the red box in the following image.

Now we can add two or more keyframes with a difference between them (either in position, rotation, or opacity) and CSP will automatically change or move the layer contents at an appropriate rate for the amount of change and the number of frames. The bigger the difference between the two keyframes, and the closer the keyframes are together on the timeline, the faster the change will be.
Let’s add the first keyframe for our panning shot. To do this, right-click in the timeline on the frame where you want to start the motion and click “Add Keyframe” (or click on the Add Keyframe icon at the top of the Timeline window).

When you’ve added a keyframe a small diamond shape will appear on that frame in the timeline.
Before moving the layer to make the animation, we need to add a second keyframe. Figure out how long the movement should be, then repeat the Add Keyframe action above. Now, using the Operation > Object tool, move or rotate the layer while the second keyframe is the one selected.
In the image below I’ve moved the bounding box for the city shot toward the right until it gets to the leftmost part of the image from the storyboard.

Now you can use the scrubber and drag it back and forth to preview the motion.
If you want this element to only show for part of the timeline’s length, you need to change the duration. For this, scroll in the timeline window all the way to the ending frame (for me it’s frame number 200, what we set for the Playback time in the previous section!). Looking closely, you’ll notice a white box that goes around the outside of the layer in the timeline. This box indicates the area of the timeline where this element will be visible. By hovering your cursor near the right side of this box, the cursor will turn into a double-ended arrow. You can now drag the side of the box back toward the left to make the duration shorter. In the screenshot below, I’ve changed the duration of this shot overall to last only 9 seconds of my playback time.

You can also click and drag the keyframes as well! Remember that you can check the timing of your project at any time by clicking the Play button at the top of the timeline. This will allow you to watch your animation in real time.
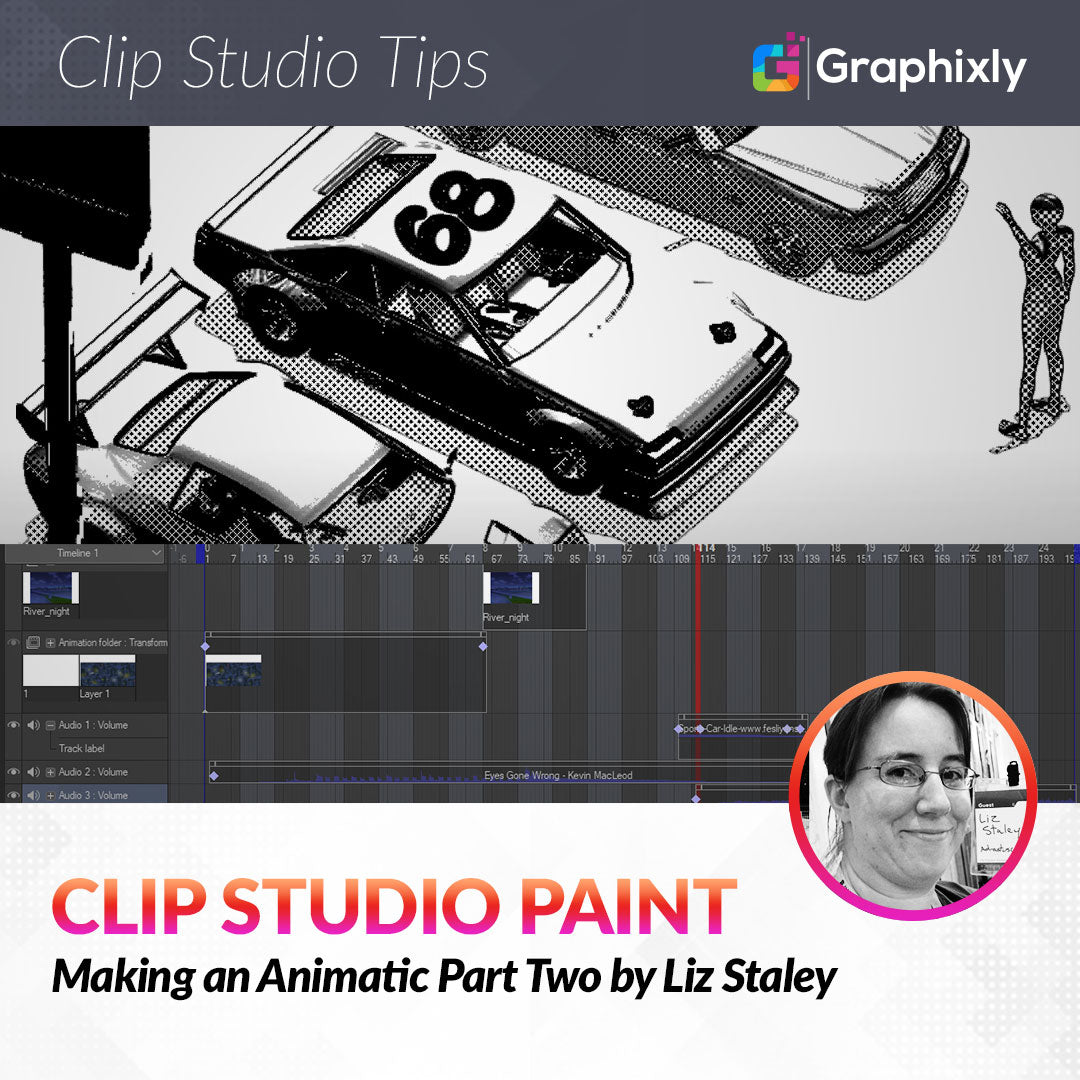
Once I’ve changed the duration of the first shot, it’s time to start putting in the background and the craft that my character is flying for the next shot. The background is the “River Night” background image material from the default CSP material library, so I’ll need to put that in on one layer and then copy and paste the craft from my storyboard onto its own layer above the background.
To create both of these elements we need to make new animation folders for both the background and the foreground element. To create a new Animation folder, click on the icon indicated in the screenshot below.

The new folder will show both as a new layer on the timeline and a new folder in the Layer window. I then added the background image from the Material library into the new animation folder, then created another new folder to copy and paste the element I wanted to animate.
Continue this process for all the shots and elements you are including in your animatic. Note that if you are working on a particularly long project you may want to break it up into multiple animatics and then export all the pieces and stitch them together in a video editing program. This will keep the timeline from getting too jumbled and reduce strain on your hardware as well!
Importing and Editing Audio Files
Ideally, especially if you’re working on a project for a company, you will have at least temporary recordings of dialog to work with. Having these audio recordings can really help with setting the pacing of your shots, because you can hear exactly how long each line of spoken dialog is.
Note that I did not have any voice recordings for this example (I’m not a voice actor and I didn’t have anyone to ask to record some lines for me!) so I used text layover almost like subtitles to indicate the dialog. I did read each line out loud and time how long it took me to say it to give a general idea of how long each shot in the animatic would be, but having recordings would be better and would add a bit more punch to the animatic.
Even though I didn’t have voice recordings to include, I did decide to include some background music and some sound effects for the revving engines of the cars in the fourth shot to show how importing and basic editing of audio works. So let’s get into that now!
First we need to add a new animation layer, but specifically one for audio. We can do this using the menu in the screenshot below.

We will now have a new folder in the animation timeline called “Audio 1”. Right click in this layer and select Import audio file from the popup menu.

Now select the desired audio file from your device. I downloaded two free-to-use music tracks from the YouTube Creator studio and a car engine sound from a free audio website. Once the audio track is uploaded you will see the duration marked out on the timeline just like your visual elements. You can even trim the audio and use only part of it by dragging the left and right edges of the bounding box.
Audio clips can also have keyframes added to them, which is very useful for doing volume changes like fade-ins and fade-outs. To do this, enable keyframes on the audio layer just like we did for the visual layers in the previous section. Add your first keyframe, then make sure that you have the Object subtool active. In the Tool Property window you will see a Volume slider. Change the volume for the first keyframe, then add a second keyframe and change the volume again.
You can see in the screenshot below that my audio layer has four keyframes. The first two go from a volume of 0 to a volume of about 40. The second set of keyframes does the opposite, making the volume go from 40 to 0 so it fades out as the scene changes.

You can upload multiple sound files and layer them, as shown with the audio files in the following screenshot.

Also note that the audio file on the bottom layer was much, MUCH longer (about 3-5 minutes) but using the white box around the element in the timeline and dragging the right boundary in, I was able to easily crop it so that it only plays the amount of music that fits my total amount of animation.
Hitting the Play button at the top of the timeline will allow you to view your animation, along with the audio, in real time, so be sure to use this to check that everything is timed the way you want it.
Once you have all your visual elements paced out and maybe have added some voices, sound effects, or music, it’s time to export your animatic!
Exporting Your Animatic
Now that we’ve got our animatic elements all laid out, with basic keyframe animation and with some audio, it’s time to export it so we can share it with the rest of the animation team (or upload it to YouTube, if that’s what you’re wanting to do!)
To begin the export process, go to File - Export animation, as shown below.

There are several different options for the export format, but for this article we will be using the Movie option. This will give us a video file that we can send to the rest of our production team or upload to the web.
Now let’s take a look at the Movie export settings.

For my purposes for this article, I left most of the settings at their defaults. If you don’t want to export the full size animation you can change the width and height using the scaling settings. This will also change the file size of the exported file, so if you don’t need full HD resolution or need to make sure you file comes in under a certain size, this is a great place to start reducing the size!
The default frame rate, however, was set at 30 frames per second. This needed to be changed to the 8 frames that I created the animatic in, otherwise our 200 frames would go by in 6 seconds instead of 25!
Click on OK to complete the export.
You can see the animatic I created as an example for this article here:
Keep in mind that I was on a deadline for creating this animatic so I didn’t have time to tweak and perfect it as much as I would’ve liked. However I hope that you can take the information in this lesson and use it to make your own animatics and other animations and create some awesome work!
Conclusion
Creating an animatic plan for a more involved animation is easy with planning in the storyboarding and design phase, keyframe animation, and some basic audio editing in Clip Studio Paint! I hope this information has inspired you to make some moving images in your own style!
For more information on CLIP Studio Paint, please visit https://www.clipstudio.net/en or https://graphixly.com
1 comments
Very informative. Liz is a wonderful instructor. Always look forward to her lessons. Thanks for providing this free education.