Creating a 3D Bookshelf with UV Maps
Contact Graphixly @
Hello! My name is Liz Staley and I’m a long-time user of Clip Studio Paint (I started using the program back when it was known as Manga Studio 4!). I was a beta-tester on the Manga Studio 5 program and for Clip Studio Paint, and I have written three books and several video courses about the program. Many of you probably know my name from those books, in fact. I write weekly posts on Graphixly.com and on CSP Tips, so be sure to come back every week to learn more Clip Studio Tips and Tricks from me!
In my last article I talked about the new feature of 3D Primitives, which we can use to make basic 3D objects for reference in our images. In addition to being able to use primitives to build simple objects, we can also use the new UV Map settings to apply textures, colors, or add details to our primitives to make them look more complex. In this article I’m going to show you how to turn a simple cube primitive into a bookshelf using UV Maps.
In this article we will cover the following topics:
Exporting a UV Map
Creating a bookshelf
Applying the UV Map
Let’s get started!
Exporting a UV Map
We’re going to jump in to creating our UV Map pretty quickly, so if you don’t know the basics of using 3D Primitives, check out my previous article on the subject! https://tips.clip-studio.com/en-us/articles/5938
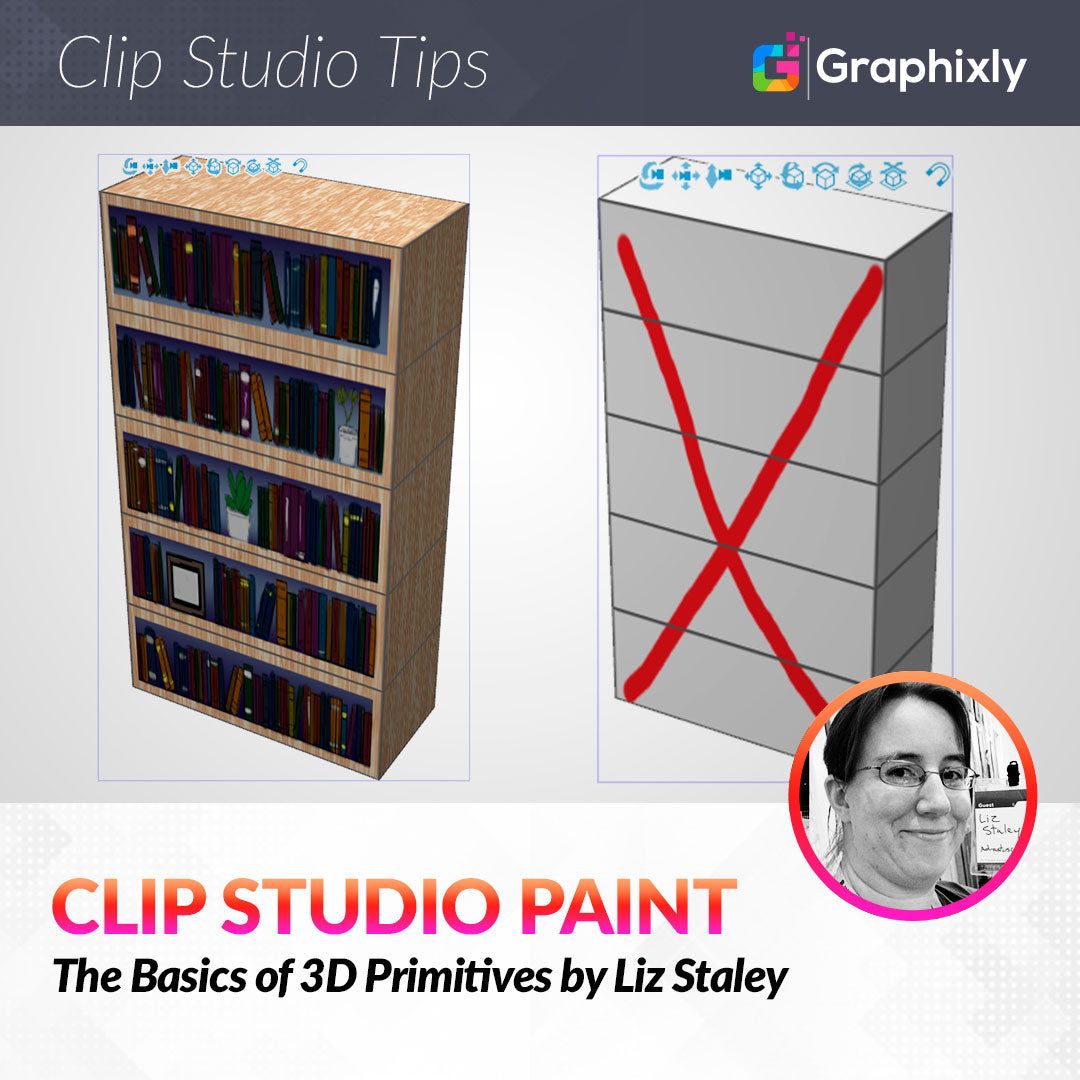
I’ve created a Cube with 5 divisions on the Y-axis and 1 division on both the X and Z axises. Then I resized the cube so that it looked more like the 5 shelf bookshelf that I’ll be creating the look of. Below is the modified Cube that I’ll be creating the UV Map for in this tutorial.

Once you have your divisions and your shape figured out, it’s time to export the UV Map that we’ll use to create the look of our item.
What is a UV Map? A UV Map is a flattened version of the 3D model, created by CSP. We can then take this flat, “unwrapped” version and edit it. Once we apply the altered UV map back to the object, anything that we added to the map will then be shown on the 3D shape. In this case, we’re going to use the divisions on the 3D shape as “shelves” for a bookshelf, and we will create the look of books and other objects on those shelves.
But first we need to export our UV Map, which is very easy to do! First make sure the object you want to export the map for is selected. Then locate the Export button in the Tool Property window, shown with a red rectangle around it in the image below.

If you cannot find this button, you may need to locate the “Color” option in this window and click the small “+” icon next to it to expand it and see this option.
Once you click Export, you will be prompted to save a file. Choose a location to save your file and name it, then click Save. I’ve decided to name mine “bookshelf map” so I’ll know what it is later on.

Once you click Save, the UV Map will be saved in your chosen location. Open this new file (which will be a .PNG) in Clip Studio Paint. You can see my UV Map below!

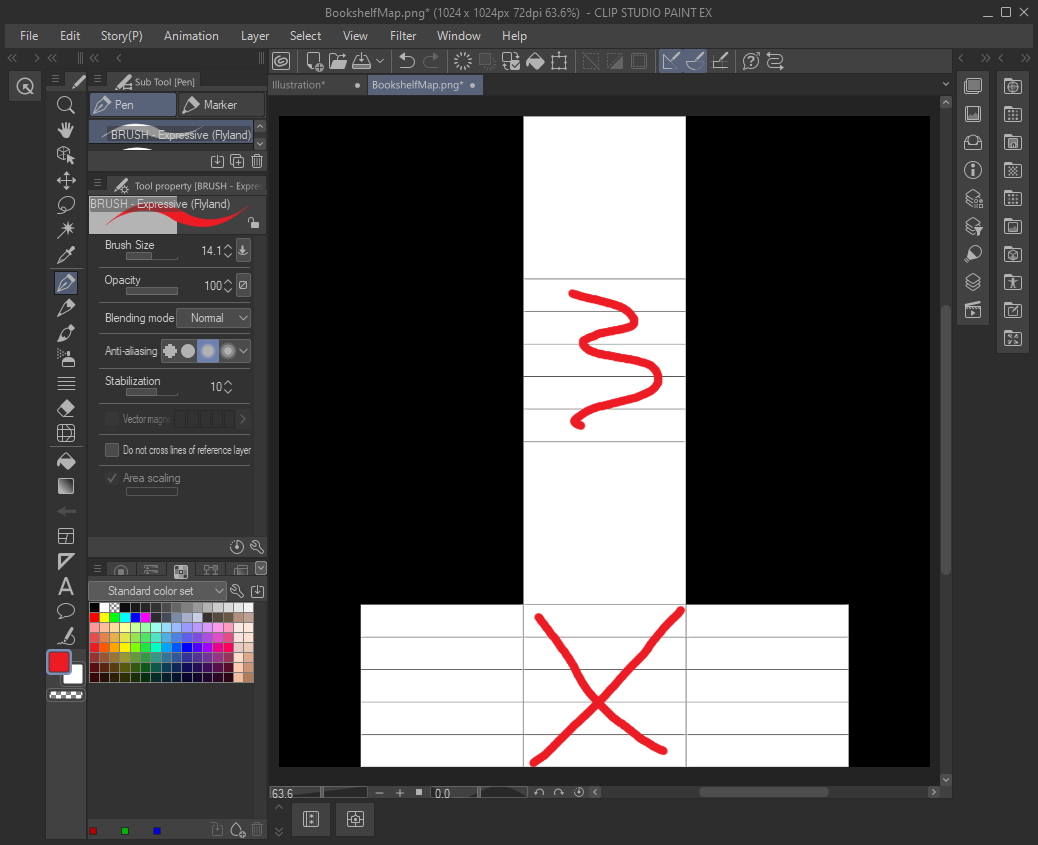
These maps aren’t made with the proportions of the object intact, so I need to figure out which area with 5 divisions on it to create the bookshelves on. We don’t want them to end up on the skinny side of my 3D object, after all!
To figure out which side is which on this map, I took a bright color and a pen tool and quickly drew on two areas. This will allow us to figure out which face is which on our flat map.
Save the map and go back to your 3D object file. With your object selected, click on the File button beneath the Export Map button, shown below.

Select your map file and click Open to apply the file to the object.

Great! Now I know that I need to create my “shelves” in the bottom center section of the UV map, where I made the big red X shape! Now let’s head back to the UV Map file and create our bookshelf look.
Creating a Bookshelf
Now that we know where to create the shelves, it’s time to go back to the UV Map file and create the design. Using the rectangle marquee tool, make a rectangle that is slightly smaller than one of the divisions that is based on the divisions on our 3D shape. This will be the inside of the shelf, with the space around it being the material the bookshelf is made of.

On a new raster layer, fill in a color for the inside of the shelf. I used a gray-blue color. We can change this color later, but we need to have the insides of the shelves mapped out so we can add our item drawings in the correct spots.
Copy this rectangle shape for each shelf. Create another new raster layer above the shelf inside layer. We’ll be using this layer to create the contents of our shelves.
These shelves can be filled with anything, but of course since it’s a bookshelf, I’m going to be putting books on my UV map! The book brush I’m going to be using is made by an awesome creator who goes by “TheStarfishFace” online. You can purchase their brushes at their website: https://thestarfishface.com/products/thestarfishface-props-and-environments-brushes
On my new, empty layer, I made a straight line using StarfishFace’s book brush. I made the books larger and longer than the shelf so I could resize them and pick the section of the book design that I wanted to use from the random pattern of the brush.

With the line of books in place, I then erased the books outside of the shape of the inside of the shelves. Now it looks like this is a shelf full of books!

Continue this for all your shelves. You can also draw other items, like photo frames, plants, sculptures, or anything else that your character would have on their shelves. Personalize it for your project! I added some small potted plants (CSP User AKIRA_HAYAMA Content ID 1769304) and a photo frame (CSP User おかかおにぎり Content ID 1855006) to give a little visual interest.

With the contents of the shelves done, we can now add color to the items. To do this, I combined the various layers of shelf contents down to one layer, then set that layer to the Multiply blending mode. I then added some basic colors to a layer beneath the shelf contents using a brush tool.

Remember that this can be as simple or as detailed as you want it to be! This is really just going to be for reference because the primitive is 3D but this map of the “shelf contents” is just 2D, so it won’t look right from any angle other than straight-on. But if you want something to help with consistency in a background element you can make this very detailed to help keep all the elements in the correct spot. You’ll just have to correct the perspective as you change the camera angle in your scene when you do your final art!
For a final touch, I decided to add a wood texture to the other parts of my bookshelf. There are a few lovely wood textures included in the CSP Materials Library. I used the Wood Grain_White for this article.

To add the texture, drag-and-drop from the Materials Library to your canvas, then arrange and resize the texture as needed. In the screenshot below I made the texture only apply to the areas that were not black in the UV Map file. This step is not necessary however, because once this Map is applied back to our Cube CSP will only show the areas inside the map anyway.

Save the UV Map as a .PNG file. Now it’s time to see our map in action!
Applying the UV Map
With our completed design saved, let’s head back to the canvas with our 3D Primitive in it. Make sure the shape you want to apply the UV map to is selected before proceeding.
In the tool property window, click on the File button under the Map heading. This button is outlined in red in the screenshot below.

Select your UV Map from your files, then click Open.

CSP will now take our UV Map and apply it to the 3D shape.

Voila! Now we can rotate the object or the camera around and have reference for our piece of furniture that will stay consistent.

With the application of UV maps and combining 3D Primitives, you can make custom pieces to use for reference in your work. This is especially helpful if you are doing a comic and you use the same locations over again, or if you need reference for something very specific and can’t find or make a more complex 3D Object.
Conclusion
With the combination of 3D Primitives and UV Maps, you can build simple 3D reference objects to use in your work. I hope this article has given you some inspiration for items you want to make to help speed up your workflow!
For more information on CLIP Studio Paint, please visit https://www.clipstudio.net/en or https://graphixly.com