Color Background from 3D Objects
Contact Graphixly @
Hello! My name is Liz Staley and I’m a long-time user of Clip Studio Paint (I started using the program back when it was known as Manga Studio 4!). I was a beta-tester on the Manga Studio 5 program and for Clip Studio Paint, and I have written three books and several video courses about the program. Many of you probably know my name from those books, in fact. I write weekly posts on Graphixly.com and on CSP Tips, so be sure to come back every week to learn more Clip Studio Tips and Tricks from me!
Sometimes you are on a deadline and don’t have the time to hand-draw a background. Or maybe you just hate drawing backgrounds! With the new advances in technology we can now use 3D models as the base for backgrounds and even color them pretty quickly. In this article we’re going to take a 3D background from lines to a colored version using just CSP Assets and a few other tricks!
In this article we will cover the following topics:
Extracting Lines
Coloring and Finishing
Let’s get to it!
Extracting Lines
First you will need a 3D object of what you want in your background. There are so many of these on CSP Assets, from fantasy cities to stores to train stations and so much more. Some of these assets are free but others usually require you to pay Gold or Clippy. For this example I am using the following two assets:
https://assets.clip-studio.com/en-us/detail?id=2029627
https://assets.clip-studio.com/en-us/detail?id=2033587
Set up your 3D objects and position the camera to your liking. Make sure they are on one 3D layer when you are positioning them.

Right-click on the 3D layer and click on the “Convert to Lines and Tones” option from the menu.

On the Convert to line and tones settings window, make sure that the “Preview” box is checked so that you can see what the outcome of your settings will be. I did turn the Tone Work checkbox on so that some screentones would be included too in order to give me an indication of where I should add shading later.
Adjust your settings until you’re happy with the preview, then click “OK” to commit the conversion.

Clip Studio Paint will create a layer folder with the line art layers and tone layers if you chose to include tones. If you included tones, go into the Layer Folder and turn off all the Tone layers so that just the line art is visible.

Now that our 3D model has been converted to 2D lines, we can move on to the next steps.
Coloring and Finishing
My line art was processed in 2 layers, but for the Colorization process we need one layer. To combine the layers, right-click on the top layer and click on “Merge with layer below”. This will flatten the two layers to one while leaving the other layers untouched.

Click the Lighthouse icon in the Layer palette to turn the Lineart into a reference layer. Then click on Colorize (Technology preview) - Colorize All. You will need to be connected to the internet to use this feature.

Clip Studio Paint will analyze the line art and make a “best guess” at the colors. The ones I got were a bit crazy but I decided to just go with them and make some adjustments later.

First I knew that I wanted the roof to be red instead of the lavender color that CSP chose. To do this I created a new raster layer, set it to multiply blending mode, and then filled in the roof area with a red color. I also lowered the transparency a little to make the red color a bit more subtle.
Another way we can adjust the colors that CSP chose for us is to use a Gradient Map. Click on Layer - New Adjustment Layer - Gradient Map.

Choose a Gradient Set from the drop down menu and then choose a gradient. The simple explanation of this feature is that CSP uses the gradient colors and assigns them to values in the image. The colors I chose for my gradient map adjustment were from the following CSP Asset:
https://assets.clip-studio.com/en-us/detail?id=1822438

Change the blending mode and opacity of the Gradient Map layer if needed.

Next we need to add some finishing touches like grass, a sky, and some additional shading. When doing the colorize step my grass and sky areas were filled in with white so I had to go back to the color layer and cut these areas out to make them transparent again.
On a separate layer I painted in the grass using various shades of green and the following brush set:
https://assets.clip-studio.com/en-us/detail?id=2029105
The sky is a Clip Studio Asset called “Dusk” that I believe is a material included with Clip Studio.

Next let’s add some more shading to really add some depth to the building. Create a new layer and set it to Multiply, then drop the opacity to about 50%. Choose a shading color (I used a dark blue color!) and then add some shading to your background. I used the Fill tool and the polyline selection tool to fill and section off areas to shade.

I like the shading but everything looks too smooth. Buildings have irregularities to them! So I chose a Grunge texture and added it over my original colorize layer. Then right-click the Grunge texture and go to Layer settings - Clip to layer below. This makes the texture apply only to the filled parts of the layer below (in this case, the building and the pathway, since the colors for those objects are on the original colorize layer. The grass and sky, however, are on different layers so they will not be changed by the grunge texture)
https://assets.clip-studio.com/en-us/detail?id=1786242

I also set the grunge texture to the Hard light blending mode and 65% opacity.

Create a new layer above all the other layers and set it to Add or Add (Glow). Then choose a highlight color and use the soft airbrush to add some light to the image. I used a pale yellow and added highlights to the roof, to the front of the building and the stairs, to the lanterns, and also added a bit of a backlight on the left side of the building to bring back a little of the detail.
Now you can add in any finishing touches like crowds, cars, or whatever else to finish off your scene. I added a couple walking toward the steps. Don’t forget to add shading and highlights to any of these final elements as well to fit them into the scene!
https://assets.clip-studio.com/en-us/detail?id=1835753

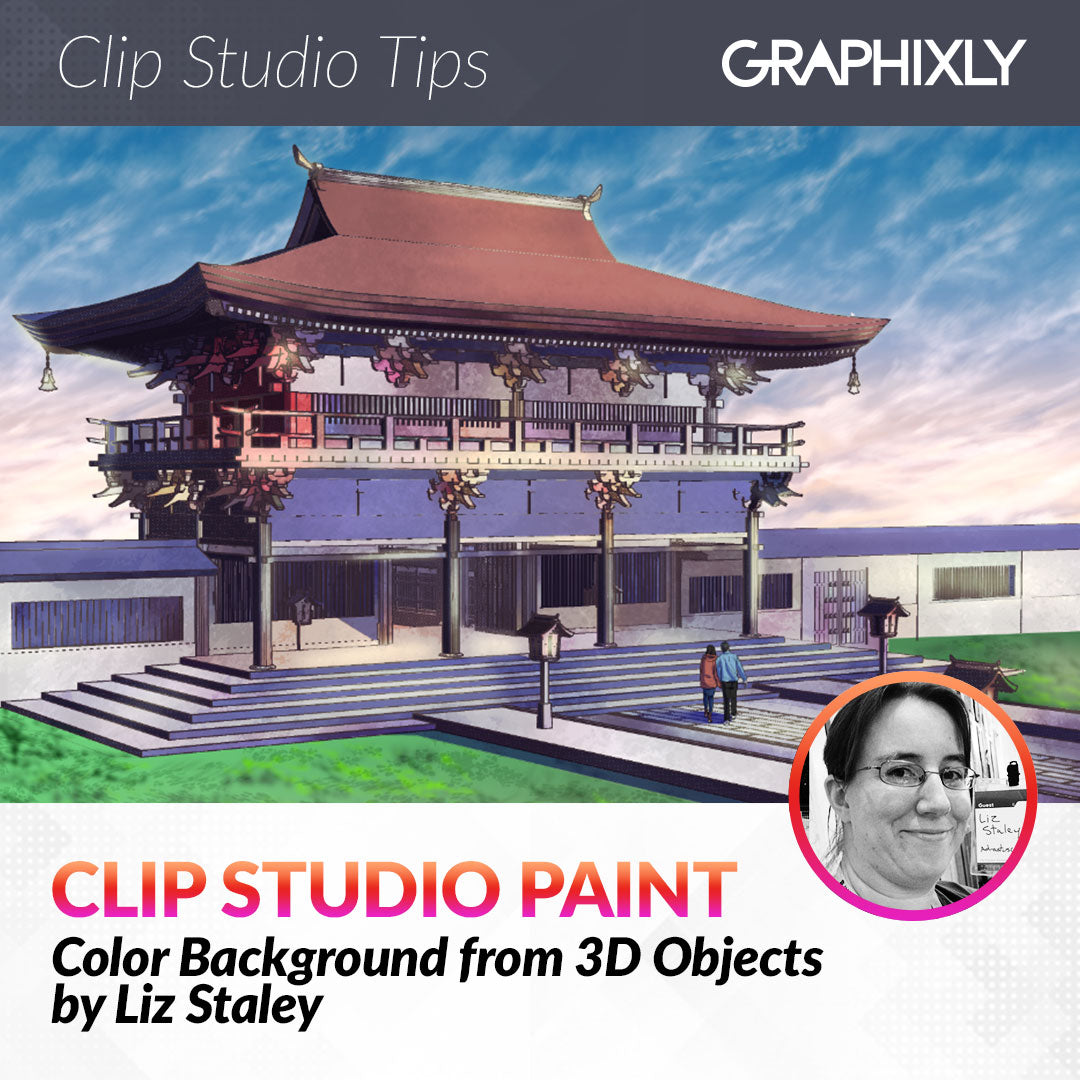
And my background is now done!
Conclusion
As an artist who personally hates drawing backgrounds, these tools in Clip Studio Paint are a game changer! Especially for the artist on a deadline like a comic upload schedule. Happy creating!
For more information on CLIP Studio Paint, please visit https://www.clipstudio.net/en or https://graphixly.com