5 Things You Didn't Know You Could Do In CSP
Contact Graphixly @
Hello! My name is Liz Staley and I’m a long-time user of Clip Studio Paint (I started using the program back when it was known as Manga Studio 4!). I was a beta-tester on the Manga Studio 5 program and for Clip Studio Paint, and I have written three books and several video courses about the program. Many of you probably know my name from those books, in fact. I write weekly posts on Graphixly.com and on CSP Tips, so be sure to come back every week to learn more Clip Studio Tips and Tricks from me!
Even though I’ve been using CSP for years and years now, I still come across things that I didn’t know you could do in this amazing program. Here are five things you might not know that you could do in Clip Studio Paint!
In this article we will cover the following topics:
Adding Tools to the Command Bar
Splitting the Layer Palette View
View Canvas in Two Windows at Once
Change Brush Size by Dragging
Using Anti-overflow with Eraser Tool
Let’s get drawing
Adding Tools to the Command Bar
The Command Bar is the set of icons above the canvas area in CSP. I think most people knew that you could add more functions to this area, like Save as JPG or other items. But did you know that you could also add your most used tools to the Command Bar as well?
There are two ways to do this. The first (and easiest) is to simply drag the tool to the command bar. To do this, select the tool you want to add to the Command Bar from the sub tool palette. Click and drag the tool to the Command Bar. You will see a red line in the Command Bar once you’re over it that shows where the icon will be added (if you see a red square around an existing icon, that means that releasing the drag there will nest the tool underneath that icon).
Release the drag and the icon will be added to the chosen position in the Command Bar. 
If you don’t want to drag and drop your tools, you can also customize the Command Bar by going to File - Command Bar Settings…
In the drop-down menu at the top of the Command Bar Settings window, select “Tools”. Then find the tool you wish to add in the list. Click on the tool and then click on “Add.”
Icons added in this way will show at the end of the Command Bar by default. To change the position, click and drag them to the desired location.
Now you can have your most used tools right at the top of the screen for easy access!

Splitting the Layer Palette View
Have you ever had a file with tons of layers and it takes a long time to scroll through to find the one you want? Did you know that you can split the Layer palette into two panes? I didn’t know this trick until I saw it in another tips post!
In the Layer palette, click on the “Show layer in 2 panes” icon, shown in the red box below. 
At first it won’t look like anything has happened. However, if you look at the bottom of the Layer palette you will see a little line with some dots on it. Hover over this line and then click and drag it up to expand the second pane.
Now you can have one pane in the top of the layer list and the other showing the bottom of the layer list! Below I have the top pane showing my layer folders and the bottom showing the layers I’m currently working on.

View Canvas in Two Windows at Once
Have you ever wished you could see what your image looks like zoomed out when you’re zoomed in working on details or when you’re inking? This is how you can do just that! This does work best on a larger screen or a two-monitor setup though.
With your image open, click on Window - Canvas - New Window. This will open a new tab with your current canvas in it.
Grab the canvas tab and drag it to dock it side-by-side with your current opening. If you are working on a two monitor setup you can also “float” the new canvas window on the other monitor while you work on the image on the main monitor.

Change Brush Size by Dragging
It’s very easy to change your brush size by pressing the [ or ] keys on the keyboard, but did you know you can also change your brush size by dragging? Hold down Ctrl+Alt on your keyboard and drag to the left to make the brush smaller.
You can also hold down Ctrl+Alt and drag to the right to make the brush larger.

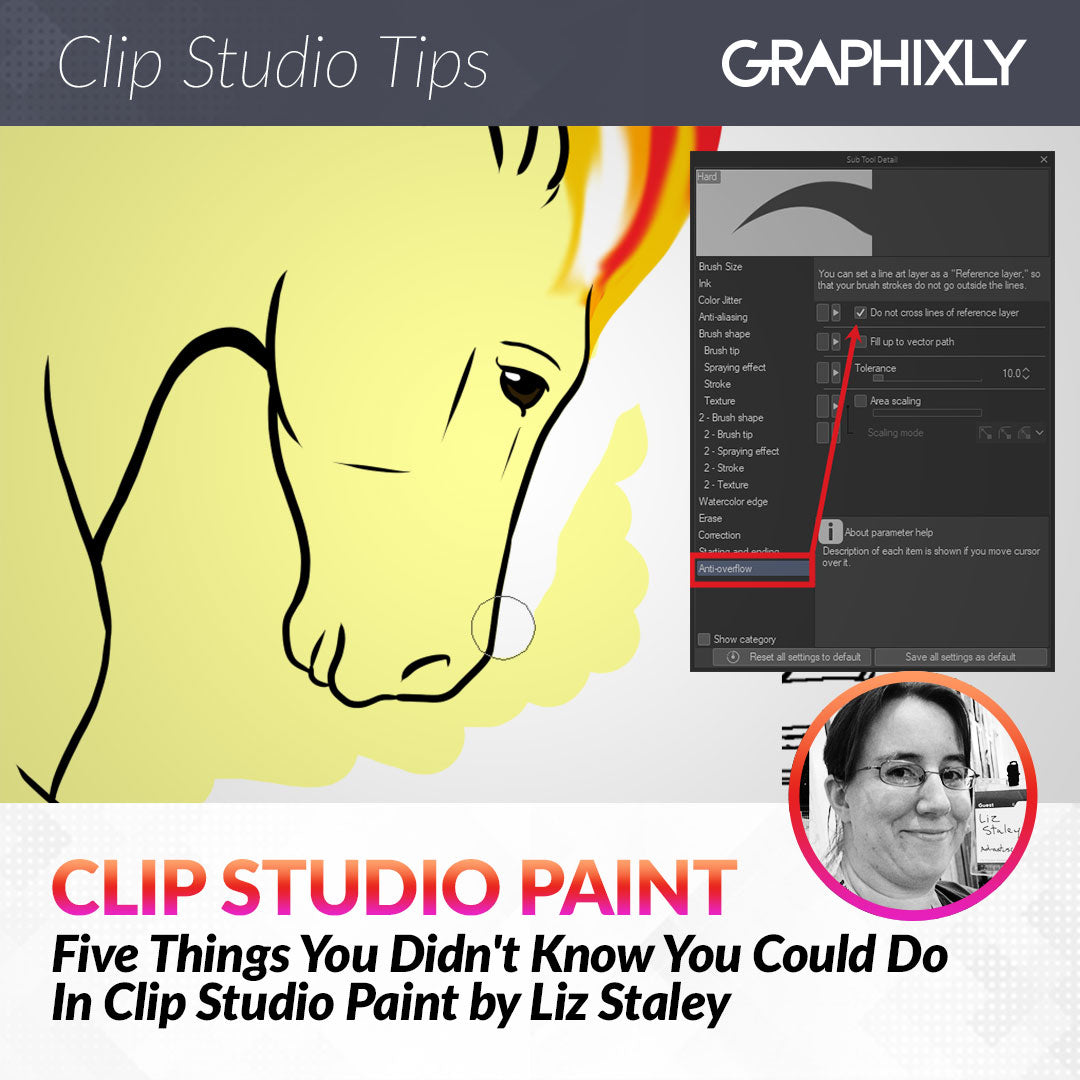
Using Anti-Overflow with the Eraser Tool
Have you ever had to clean up some messy edges where you were painting and you went outside your lines? I absolutely hate having to clean up messy edges, which is why I usually use the Fill tool instead of putting colors down with a big brush and just coming back to fix it later. But if you do find yourself needing to clean up outside your line art often, there’s an option you can turn on that will make this job so much easier!
Open the Sub Tool Detail window of the Eraser, then click on the Anti-overflow options on the right hand side. Turn on the checkbox for “Do not cross lines of reference layer”, then close the Sub Tool Detail window.
Set your line art layer as the reference layer by selecting it in the Layer palette and then clicking on the “Lighthouse”icon. Now no matter what layer your colors are on, you can easily use the Eraser tool to clean up quickly. In the screenshot below, I am using my mouse to control the eraser so I do not have any pressure control, but the color inside of my lines isn’t being erased!

Note though that if you go too far over the reference lines, the eraser will “switch” to the other side, so you do have to have a little bit of care. However this does make it a lot faster to clean up the edges of a character!
Conclusion
It always seems like there’s something new to learn when you’re an artist! Did you know any of these features?
For more information on CLIP Studio Paint, please visit https://www.clipstudio.net/en or https://graphixly.com