4.0 Crystallize Filter and Quick Filters
Contact Graphixly @
Hello! My name is Liz Staley and I’m a long-time user of Clip Studio Paint (I started using the program back when it was known as Manga Studio 4!). I was a beta-tester on the Manga Studio 5 program and for Clip Studio Paint, and I have written three books and several video courses about the program. Many of you probably know my name from those books, in fact. I write weekly posts on Graphixly.com and on CSP Tips, so be sure to come back every week to learn more Clip Studio Tips and Tricks from me!
In Clip Studio Paint 4.0, two new filters were added - Lens Blur and Crystallize. There is also a faster way to apply filters and effects to your images with the Quick Filters and Quick Effects windows as well, which we will be covering! Lens Blur is included in the Quick Effects window, but we’ll also have a section going over the Crystallize Filter’s options in detail as well.
In this article we will cover the following topics:
Quick Filters and Quick Effects
Crystallize Filter
Let’s check it out!
Quick Filters and Quick Effects
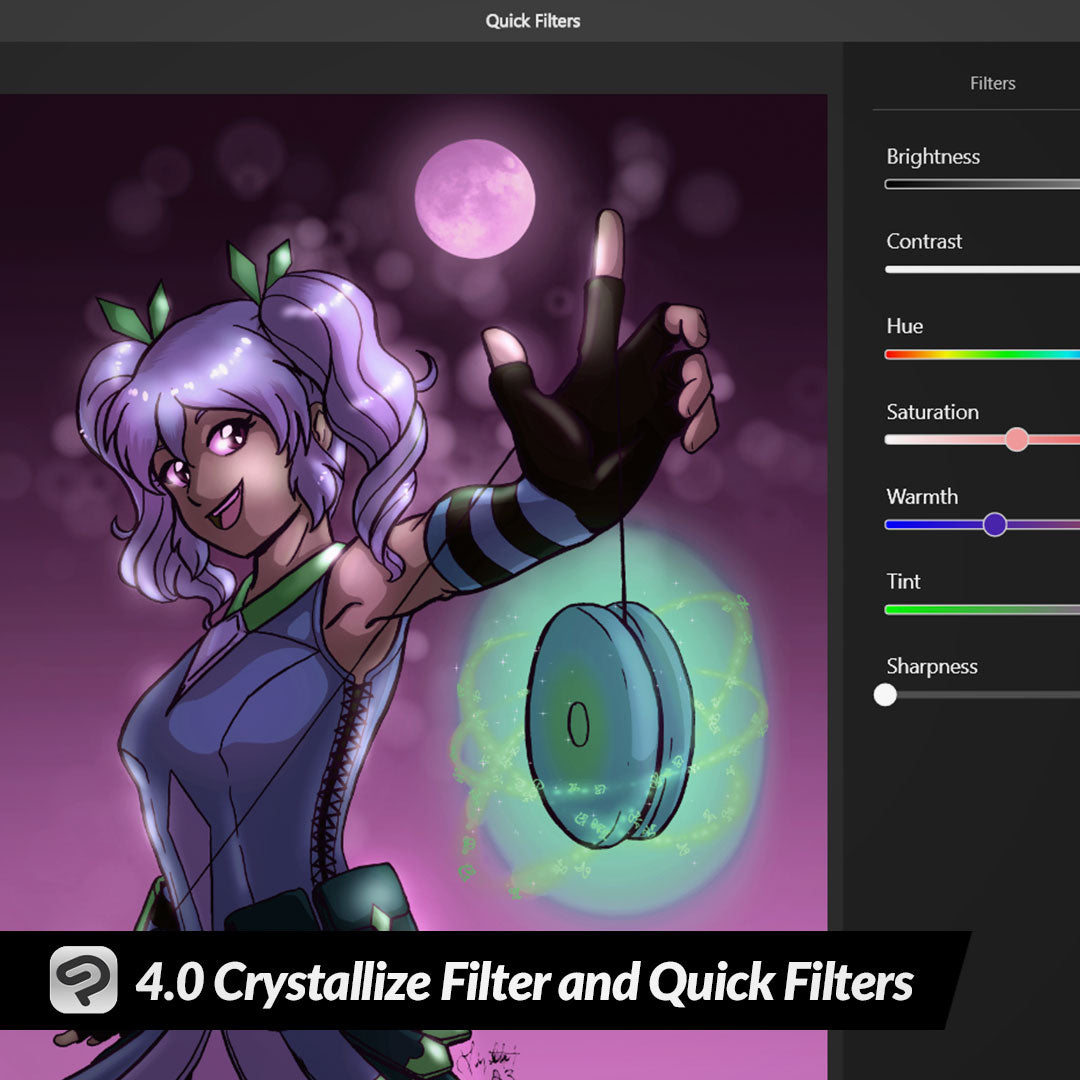
Before we discuss the brand new Crystallize filter, let’s explore the Quick Filters and Quick Effects options and the ways they can change the look of your work. To access these options, click on Filter in the menu bar. At the top you will see Quick Filters and Quick Effects. We’re going to start with the Quick Filters first and then look at Quick Effects after.
There are two options here for Quick Filters. Let’s click on “Apply to current layer” first.

When using Quick Filters this way, the filter will be applied only to the layer that is currently selected. Below, you can see that my character’s layer is being affected by the monochrome filter while the background is still in the original colors.

To apply the filter or effect to the entire image, we’ll want to go to Filter - Quick Filters - Apply to All. This will create a merged layer after we choose our filter, so the original layers will not be changed at all.

Click on one of the icons on the right hand side of the Quick Filters window to see the preview of your image change. At time of writing, there are 9 Quick Filters (10 if you count “None”)

If none of the Quick Filters suits the look you’re trying to achieve, or if you want to customize one of the filters, click on the “Adjust” tab at the top right of the Quick Filters window. Here, we can change the brightness, contrast, hue, saturation, and various other aspects of the image.
Don’t like the changes? Click on “Reset Settings” at the bottom of the Adjust window to reset and try again!

Now let’s take a look at the Quick Effects! Like Quick Filters, you can choose to apply the effect to either the current layer or the entire image. Below is a preview of each of the Quick Effects options available at the time of writing.

When you click on a Quick Effect, you will see several sliders with options for that effect such as strength, angle (on motion blur and chromatic aberration, for example) and other adjustments for that particular effect. Drag these sliders to change the look of the effect in the preview window.
Crystallize Filter
In Clip Studio Paint 4.0 a new filter has been added as well. This does not appear in the Quick Filter or Quick Effects windows. The Crystallize Filter can be found by clicking on Filter - Effect - Crystallize.

This filter has three options that can be adjusted, so let’s look at each one! This filter takes the image and breaks it into pieces like a mosaic.
Cell Size controls the size of these mosaic pieces. In the image below the cell size is quite low.

When we make the cell size larger, however, these mosaic pieces become much larger and more abstract.

The Randomness slider controls how random the shapes of the cells are. In the image above this value is very high, resulting in all kinds of irregular shapes. However, in the screenshot below the value is low and the cells are all almost completely square with just a few irregular edges.

There is also a checkbox to turn on Tiling. Turning this option on seems to mainly straighten out the rows and columns of cells, especially if the randomness is low and the blocks of color are more square. If your areas are more random this will give it a slightly different look, so it’s worth checking the box to see if you like it better or not!

Conclusion
Filters and Effects are a great way to enhance your illustrations or to create special effects easily to save you time. I really love the Quick Filters and Quick Effects for trying out different looks without having to go through the Filters menu over and over again!
For more information on CLIP Studio Paint, please visit https://www.clipstudio.net/en or https://graphixly.com