12 Principles of Animation
Contact Graphixly @
Hello! My name is Liz Staley and I’m a long-time user of Clip Studio Paint (I started using the program back when it was known as Manga Studio 4!). I was a beta-tester on the Manga Studio 5 program and for Clip Studio Paint, and I have written three books and several video courses about the program. Many of you probably know my name from those books, in fact!
I have been an animation enthusiast my entire life and even studied animation in college. There was a point in time in my life when I wanted to be an animator, even, so when it was announced that CSP was going to have animation capabilities, I was really excited about the possibilities! There are so many talented animators using Clip Studio Paint right now! If you want your animations to have the punch and flow of professional cartoons, you need to know about the 12 Principles of Animation, which is what I want to share in this article.
In this article, I will be covering the following topics:
History of the 12 Principles of Animation
Follow-through
Arc
Squash and Stretch
Timing
Anticipation
Secondary Action
Pose to pose/Straight Ahead
Appeal
Solid Drawing
Slow in/Slow Out
Exaggeration
Staging
Let’s get started!
History of the 12 Principles of Animation
The 12 basic principles of animation were introduced by Disney animators Ollie Johnston and Frank Thomas in their 1981 book “The Illusion of Life: Disney Animation”. These principles were based on the work of Disney animators from the 1930’s onward, who were on a quest to produce more realistic animations. Though these principles were originally applied to traditional hand-drawn animation, they also have relevance in today’s computer animations. And they very much apply to the animations done in Clip Studio Paint, as the program is more suited toward an “old-school hand drawn” approach, but with the drawing being done on the computer!
Knowing these principles and applying them to your digital animation can help produce characters that seem to adhere to the physics of our real world, and also help you produce smoother, more lifelike motions. I had a professor in college who made us take a test at the start of every animation class on the 12 Principles, and we continued this until every person in the class got them all correct! Because of that, I have never forgotten these principles and I still feel they are extremely important for anyone wanting to branch out into doing animations - especially if you want to do more than just make a still character blink or something otherwise simple! (There is nothing wrong with simple animations, of course! But if you want to branch out and explore animation, you should know some of the principles that make an animation look alive before you start.)
With that bit of history out of the way, let’s explore the 12 Principles and what each one means.
Follow-through
Follow-through has another closely-related principle that is usually grouped together with it, called “overlapping action”. Follow through and overlapping action make our animation look more realistic. Follow-through refers to any movement that continues after a character’s primary movement has stopped. For instance, if a character with long hair is running, their hair will continue forward once they have come to a sudden stop. We can use this same example to explain overlapping action! In overlapping action, when the long-haired character starts running their hair will “drag” behind them for a moment before it catches up.
The drawings below illustrate overlapping action as the dogs jowls “drag” while the dog turns its head, and then follow-through when the jowls continue moving after the head has turned.

Arc
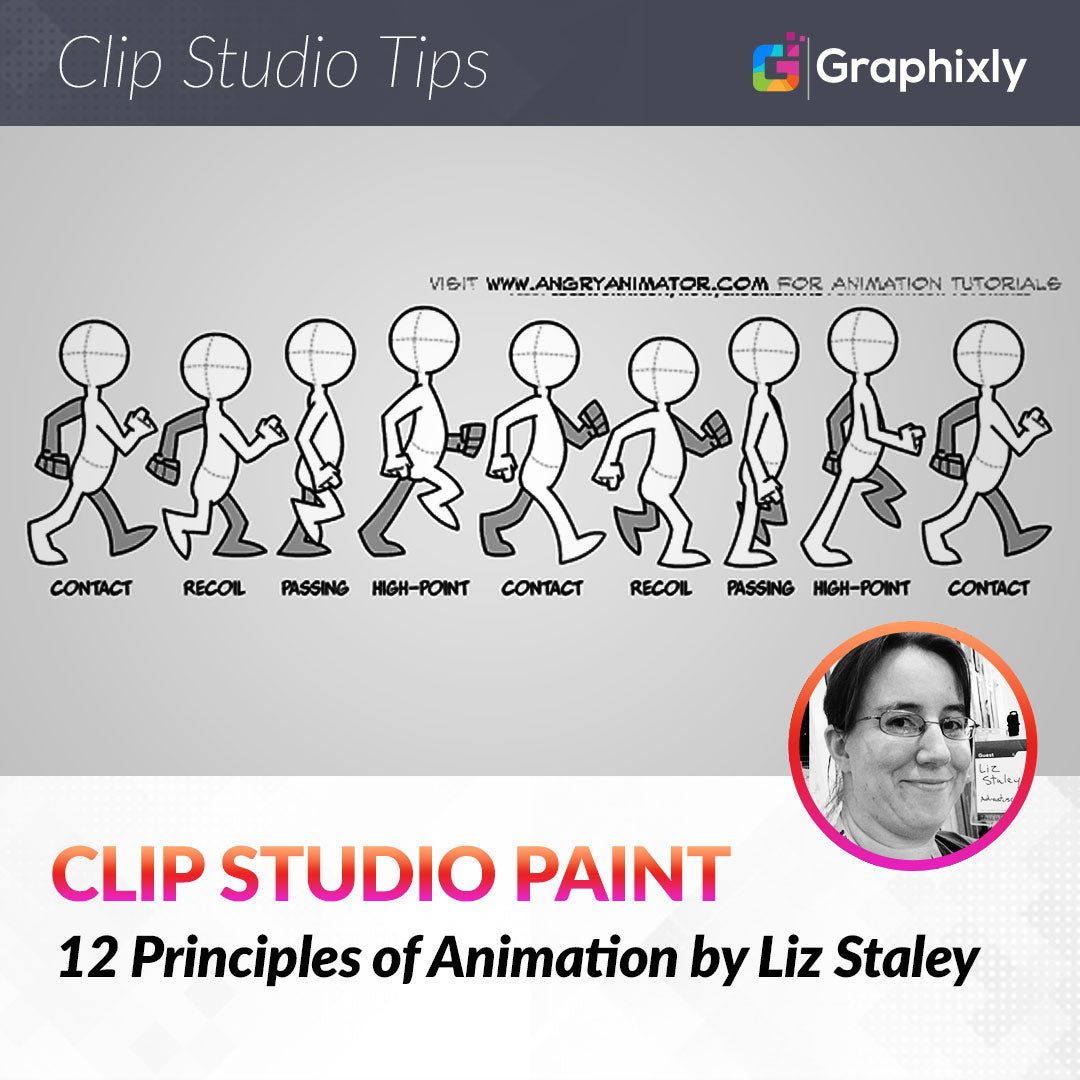
Most natural movement occurs in arcs, so movement should follow curves for greater realism when applicable. (For instance, a ball thrown under-hand would travel in a arc upward and then down, but a fastball thrown by a professional baseball player would travel in a straighter line because of its speed.) In the example below, note that the top of the head, the arms, and even the feet follow arcs as they move along from drawing to drawing.

Squash and Stretch
Squash and stretch is extremely important in animation! It is used to convey weight, density, and even the concept of motion blur! In the bouncing ball examples below, the top ball has no squash or stretch at all in its motion, which will produce a ball that looks like a bouncing bowling ball. But in the bottom example, the ball is stretched as it heads down toward the ground - giving the illusion of fast movement and motion blur - and then squashed when it hits the ground to give the illusion that the ball is flexible. This also produces animation with more weight and dynamism than just keeping the ball the same shape and volume through the entire movement.

Squash and Stretch also applies to more complex subjects, like the anatomy of a character’s face or head. When animating facial expressions or body movements, squash and stretch can be used for comedic effect by pushing the drawings to their extremes, or more moderately just to ensure that the motion comes across clearly. When going for a more realistic look, don’t let the volume of your object change even when it is squashed and stretched. Think of the character or object like a water balloon! Even though you can stretch the balloon and squash it, it always keeps the same overall volume.

Timing
The number of drawings that a given action takes in the animation translates to the speed of that action when the drawings are played back. For instance, the standard rate of frames for most movie animations is 30 frames per second. If an action takes 30 drawings to complete, then it will take 1 second when played back. 15 drawings would be half a second, and so on. Correct timing makes objects look like they have weight and presence. In the drawings of the deer, below, more drawings would be used for the motions at the top of the jump to give the illusion of slower movement, while fewer drawings would be used at the bottom to “speed up” the action, giving the feeling that the deer is bounding along with real weight and momentum.

Anticipation
Using anticipation in your animations prepares the viewer for what is about to happen, allowing the brain to “catch up” to the action. When a person jumps they must bend their knees first. If a pitcher is about to throw a ball, they bring the ball back first and wind up into the action, like the example of the character getting ready to run below.

Anticipation can also be used in less physical ways. For instance, you can show an object before a character picks it up, or show someone looking off the screen before another character walks into the frame. This leads the viewer’s eye to the thing they should be paying attention to and lets them anticipate what will come next.
Secondary Action
Secondary actions are actions that enhance the primary action. When a character turns their head, their hair will move in the secondary action. When a character walks, they might put their hands in their pockets, or look to the side to see if a car is coming. These are all secondary actions that enhance the primary action. In the example below, the main action is the jumping, but the arms and the movement of the hat are secondary actions that make the primary action look more realistic.

Pose to Pose/Straight Ahead
These are less “principles” and more approaches to the animation process. In straight-ahead animation, each drawing is completed in sequence with the first frame being drawn, then the second, then the third, and so-on until the animation is completed.
Pose to pose, however, is a method that requires drawing a few key frames first (each one being a “pose” in the motion) and then going back and drawing the in-between frames that get the motion from keyframe to keyframe. A combination of these techniques is usually used by hand-drawn animators, depending on the scene and their workflow.

Most 3-D animation today works by using Pose-to-Pose, letting the computer handle the in-betweening.
Appeal
Appeal can be defined as the charisma of the character. This can be one of the harder principles to get right and a character may need to be changed several times to get the most appeal. A character who is appealing is not necessarily sympathetic (they can be evil and still be appealing!). There are tricks the artist can use to make characters connect with an audience. For instance, likable characters can have a symmetrical and child-like face. Think of the large eyes of most anime protagonists!

Solid Drawing
When a drawing is solid, it takes into account the form in three-dimensional space. The animator needs a strong foundation of anatomy, balance, light and shadow, perspective, atc. When an artist has a solid drawing, their characters will still be recognizable no matter what angle they are shown at, and no matter the amount of squash and stretch or exaggeration applied to them. One way to start getting your characters more “solid” is to do character model sheets before starting your animation (or comic, or illustration project!), which is something still done in the animation industry today!

Slow-in and Slow-out
Objects in real life need time to accelerate and time to slow down, and that concept is what this principle deals with! More frames are drawn at the beginning and end of an action to create a “slow in” and “slow out” look that gives the illusion that the object is picking up speed. Fewer drawings in the middle of the action will increase the look of speed. This principle can be applied to characters moving between poses, or to inanimate objects like a bouncing ball or a box being pushed.

Exaggeration
Exaggerating action in animation is important. Animations that try to create an exact imitation of real life movements can appear stiff and lifeless. Sometimes exaggeration can be taken to an extreme, especially in comedy, but sometimes a more subtle approach is needed. For instance, I remember when I animated a walk cycle for the first time (see the above section about Arc), I commented that a real person doesn’t pick their foot up so high when they walk. However, when animating this small exaggeration is needed to make the motion “read” correctly in the viewer’s brain. For animation that isn’t surreal or comedic, exaggeration can still be employed by just pushing motions and character expressions to an extreme.

Staging
This is the same concept as staging in theater or film. When you have good staging, the audience knows where to look and what is of greatest importance in the scene. The creators of the 12 principles defined staging as “the presentation of any idea so that it is completely and unmistakably clear”, whether that idea is an action, expression, mood, or personality. To have good staging, you should keep the focus on what is relevant and avoid unnecessary details. Your characters should also have clear poses so that their actions are immediately recognizable, as shown in the examples below.

Conclusion
Though modern animation has gone mostly away from drawing on paper and painting on cels, 2D animation is still a beloved art. Whether you want to create elaborate cartoons in Clip Studio Paint or you want to just draw a few simple animations, understanding what makes animation look “alive” will help with those goals. Remember that in animation the drawings aren’t ACTUALLY moving, they just appear to be. And like a stage magician, the animator must be skilled in illusion to create the trick they want to pull off! The 12 principles are also helpful for 3D animators, as well.
For video examples of the 12 Principles, take a look at
https://www.creativebloq.com/advice/understand-the-12-principles-of-animation
for a short video of each principle! I hope this article helped you understand more about the history of animation and the tricks to making your characters look believable!
1 comments
The 12 principles of animation, developed by Disney animators, include key techniques like squash and stretch, anticipation, staging, and timing to create more realistic and engaging movement. These principles enhance animations by making them more fluid, believable, and emotionally impactful. For more details contact – https://www.realtecvirtual.com/3d-animation.php.